crwdns2933423:0crwdne2933423:0
crwdns2947577:0crwdnd2947577:0crwdne2947577:0

Hover-1 H1 Power Button Replacement

crwdns2942213:0crwdne2942213:0

    1. Hover-1 H1 Power Button  Replacement, Bottom Shell: crwdns2935265:01crwdnd2935265:01crwdnd2935265:01crwdne2935265:0
      • Remove the ten 9mm machine screws by using a long Phillips #2 screwdriver to rotate the screws counterclockwise.

      • Remove the twelve 9mm sheet metal screws by using a long Phillips #2 screwdriver to rotate the screws counterclockwise.

      crwdns2952109:0crwdne2952109:0

      crwdns2917038:0crwdne2917038:0

    2. Hover-1 H1 Power Button  Replacement: crwdns2935265:02crwdnd2935265:01crwdnd2935265:01crwdne2935265:0
      • Puncture the two black stickers by using the tip of a screwdriver.

      • Remove the two 9mm machine screws by using a long Phillips #2 screwdriver to rotate the screws counterclockwise.

      crwdns2952109:0crwdne2952109:0

      crwdns2917038:0crwdne2917038:0

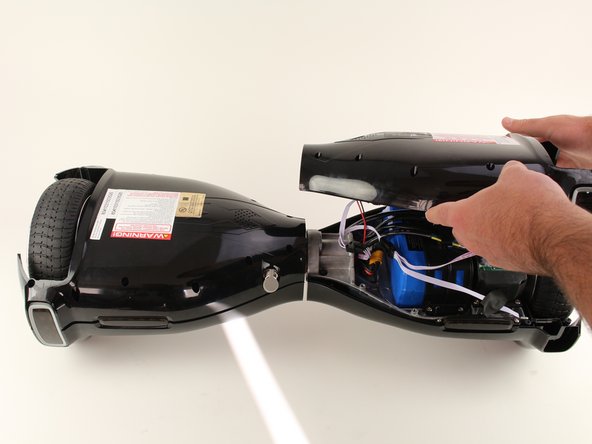
    3. Hover-1 H1 Power Button  Replacement: crwdns2935265:03crwdnd2935265:01crwdnd2935265:02crwdne2935265:0 Hover-1 H1 Power Button  Replacement: crwdns2935265:03crwdnd2935265:02crwdnd2935265:02crwdne2935265:0
      • Lift each side of the bottom shell by pulling up.

      • When lifting the shell, take care to not tear any cables from their connectors.

      crwdns2952109:0crwdne2952109:0

      crwdns2917038:0crwdne2917038:0

    4. Hover-1 H1 Power Button  Replacement: crwdns2935265:04crwdnd2935265:01crwdnd2935265:01crwdne2935265:0
      • Unplug the battery by pulling gently on both sides of the orange connector.

      crwdns2952109:0crwdne2952109:0

      crwdns2917038:0crwdne2917038:0

    1. Hover-1 H1 Power Button  Replacement, Power Button: crwdns2935265:05crwdnd2935265:01crwdnd2935265:01crwdne2935265:0
      • Unplug the power button connector by pinching the tab on the front and pulling directly upwards.

      • Pull the cable through the center section of the hoverboard.

      • For reassembly, you will have to feed the cable back through the center section. This can be done using a rigid wire or cable.

      crwdns2952109:0crwdne2952109:0

      crwdns2917038:0crwdne2917038:0

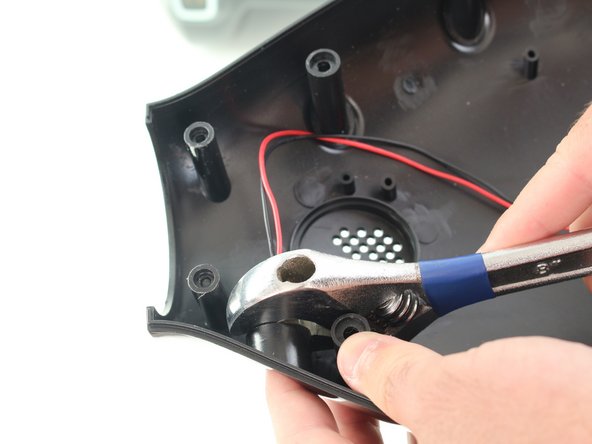
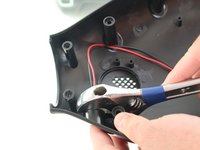
    2. Hover-1 H1 Power Button  Replacement: crwdns2935265:06crwdnd2935265:01crwdnd2935265:02crwdne2935265:0 Hover-1 H1 Power Button  Replacement: crwdns2935265:06crwdnd2935265:02crwdnd2935265:02crwdne2935265:0
      • Using an adjustable wrench, remove the nut on the back of the power button by rotating the nut counterclockwise.

      crwdns2952109:0crwdne2952109:0

      crwdns2917038:0crwdne2917038:0

    3. Hover-1 H1 Power Button  Replacement: crwdns2935265:07crwdnd2935265:01crwdnd2935265:01crwdne2935265:0
      • Pull the power button through the hole in the shell.

      crwdns2952109:0crwdne2952109:0

      crwdns2917038:0crwdne2917038:0

crwdns2915888:0crwdne2915888:0

To reassemble your device, follow these instructions in reverse order.

crwdns2935221:0crwdne2935221:0

crwdns2935227:0crwdne2935227:0

Christopher Bruni

crwdns2935283:010/08/18crwdne2935283:0

121 crwdns2915208:0crwdne2915208:0

crwdns2935295:0crwdne2935295:0

crwdns2935287:0crwdne2935287:0

Cal Poly, Team S17-G6, White Fall 2018 crwdns2935289:0Cal Poly, Team S17-G6, White Fall 2018crwdne2935289:0

CPSU-WHITE-F18S17G6

crwdns2931471:04crwdne2931471:0

crwdns2935297:084crwdne2935297:0

crwdns2947412:00crwdne2947412:0

crwdns2917038:0crwdne2917038:0

crwdns2936625:0crwdne2936625:0:

crwdns2936751:024crwdne2936751:0 2

crwdns2936753:07crwdne2936753:0 11

crwdns2936753:030crwdne2936753:0 50

crwdns2942667:0crwdne2942667:0 4,127