crwdns2915892:0crwdne2915892:0
This guide will show you how to replace the motor that turns the brush roller in the nozzle. You might need to do this if the brush roll is no longer spinning. Make sure that the device is turned off and the battery removed from it.
crwdns2942213:0crwdne2942213:0
-
-
Detach the rolling assembly from the body by pushing the button found at the base.
-
-
-
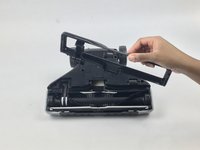
Remove the seven 7.5mm Phillips #1 screws from the brush retainer.
-
-
-
-
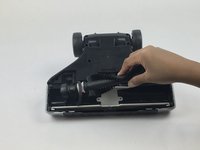
Remove the brush and retainer from the rolling assembly.
-
-
-
Remove the eight 4mm Phillips #1 screws from the bottom panel.
-


To reassemble your device, follow these instructions in reverse order.
crwdns2935221:0crwdne2935221:0
crwdns2935229:03crwdne2935229:0
crwdns2935287:0crwdne2935287:0

USF Tampa, Team S7-G4, Passmore Spring 2018 crwdns2935289:0USF Tampa, Team S7-G4, Passmore Spring 2018crwdne2935289:0
USFT-PASSMORE-S18S7G4
crwdns2931471:04crwdne2931471:0
crwdns2935297:012crwdne2935297:0
crwdns2947412:03crwdne2947412:0
Where does one get a new brush motor?
Thank you for the photos! They’ve been helpful as I’m putting my Linx back together and can’t quite remember how the wires go back in the nozzle assembly. When putting the top plate back on, it’s a very tight fit where the top will be pushed up if maligned.
In the elbow part- It looks like the positive lead is on the left in your photo, but it would be helpful if you would add that specification to your step.
Great Job!
In my case the (low quality) wires were broken and I had to just replace the wires from the motor to the contact points in the neck.