crwdns2933423:0crwdne2933423:0
crwdns2947577:0crwdnd2947577:0crwdne2947577:0

Honda CSC29 Brushes Replacement

crwdns2942213:0crwdne2942213:0

  1. Honda CSC29 Brushes Replacement, Alternator Front Cover: crwdns2935265:01crwdnd2935265:01crwdnd2935265:03crwdne2935265:0 Honda CSC29 Brushes Replacement, Alternator Front Cover: crwdns2935265:01crwdnd2935265:02crwdnd2935265:03crwdne2935265:0 Honda CSC29 Brushes Replacement, Alternator Front Cover: crwdns2935265:01crwdnd2935265:03crwdnd2935265:03crwdne2935265:0
    • Remove 4, 7.9mm nuts using a 7.9mm socket driver head

    • One of the nuts is placed underneath the L-Bracket. Remove the L-Bracket and the 3 circled nuts before attempting to remove the remaining nut

    • There are two covers that need to be removed from the alternator. This step describes how to remove the back cover.

    crwdns2952109:0crwdne2952109:0

    crwdns2917038:0crwdne2917038:0

  2. Honda CSC29 Brushes Replacement: crwdns2935265:02crwdnd2935265:01crwdnd2935265:03crwdne2935265:0 Honda CSC29 Brushes Replacement: crwdns2935265:02crwdnd2935265:02crwdnd2935265:03crwdne2935265:0 Honda CSC29 Brushes Replacement: crwdns2935265:02crwdnd2935265:03crwdnd2935265:03crwdne2935265:0
    • Pull cover off the body of the alternator

    • Once you have done this, you should be able to see the internal components of the alternator, particularly the bridge assembly that houses the rectifier, voltage regulator and brushes.

    crwdns2952109:0crwdne2952109:0

    crwdns2917038:0crwdne2917038:0

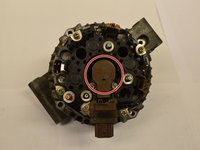
  3. Honda CSC29 Brushes Replacement, Brushes: crwdns2935265:03crwdnd2935265:01crwdnd2935265:03crwdne2935265:0 Honda CSC29 Brushes Replacement, Brushes: crwdns2935265:03crwdnd2935265:02crwdnd2935265:03crwdne2935265:0 Honda CSC29 Brushes Replacement, Brushes: crwdns2935265:03crwdnd2935265:03crwdnd2935265:03crwdne2935265:0
    • You should now be able to see the recifier assembly, the brushes are located in the middle of the recifier assembly.

    • Remove the brush assembly by unscrewing 2, 6mm center screws using a #2 Phillips head screw driver

    crwdns2952109:0crwdne2952109:0

    crwdns2917038:0crwdne2917038:0

  4. Honda CSC29 Brushes Replacement: crwdns2935265:04crwdnd2935265:01crwdnd2935265:03crwdne2935265:0 Honda CSC29 Brushes Replacement: crwdns2935265:04crwdnd2935265:02crwdnd2935265:03crwdne2935265:0 Honda CSC29 Brushes Replacement: crwdns2935265:04crwdnd2935265:03crwdnd2935265:03crwdne2935265:0
    • Remove the brush assembly by pulling it out.

    crwdns2952109:0crwdne2952109:0

    crwdns2917038:0crwdne2917038:0

  5. Honda CSC29 Brushes Replacement: crwdns2935265:05crwdnd2935265:01crwdnd2935265:01crwdne2935265:0
    • Inspect the brushes. If they are scored and not smooth you will need to replace the entire assembly.

    • When reinserting the brushes, make sure the springs keep the brushes in contact with the stator.

    crwdns2952109:0crwdne2952109:0

    crwdns2917038:0crwdne2917038:0

crwdns2915888:0crwdne2915888:0

To reassemble your device, follow these instructions in reverse order.

crwdns2935221:0crwdne2935221:0

crwdns2935229:03crwdne2935229:0

Raymond Akagi

crwdns2935283:004/11/16crwdne2935283:0

238 crwdns2915208:0crwdne2915208:0

crwdns2935295:0crwdne2935295:0

crwdns2935287:0crwdne2935287:0

Cal Poly, Team 25-1, Maness Spring 2016 crwdns2935289:0Cal Poly, Team 25-1, Maness Spring 2016crwdne2935289:0

CPSU-MANESS-S16S25G1

crwdns2931471:04crwdne2931471:0

crwdns2935297:015crwdne2935297:0

crwdns2947412:00crwdne2947412:0

crwdns2917038:0crwdne2917038:0

crwdns2936625:0crwdne2936625:0:

crwdns2936751:024crwdne2936751:0 2

crwdns2936753:07crwdne2936753:0 7

crwdns2936753:030crwdne2936753:0 36

crwdns2942667:0crwdne2942667:0 1,852