crwdns2933423:0crwdne2933423:0

Honda 3000 Watt Inverter Generator EU3000IS1AWK Front Frame Disassembly

crwdns2862623:0crwdne2862623:0
crwdns2942641:0crwdne2942641:0

crwdns2942213:0crwdne2942213:0

  1. Honda 3000 Watt Inverter Generator EU3000IS1AWK Front Frame Disassembly, Disassembly tip: crwdns2935265:01crwdnd2935265:01crwdnd2935265:01crwdne2935265:0
    • At this point, it may be helpful to temporarily re-attach the control panel back onto the front frame with some 10 mm bolts.

  2. Honda 3000 Watt Inverter Generator EU3000IS1AWK Front Frame Disassembly, Release the choke cable bushing: crwdns2935265:02crwdnd2935265:01crwdnd2935265:03crwdne2935265:0 Honda 3000 Watt Inverter Generator EU3000IS1AWK Front Frame Disassembly, Release the choke cable bushing: crwdns2935265:02crwdnd2935265:02crwdnd2935265:03crwdne2935265:0 Honda 3000 Watt Inverter Generator EU3000IS1AWK Front Frame Disassembly, Release the choke cable bushing: crwdns2935265:02crwdnd2935265:03crwdnd2935265:03crwdne2935265:0
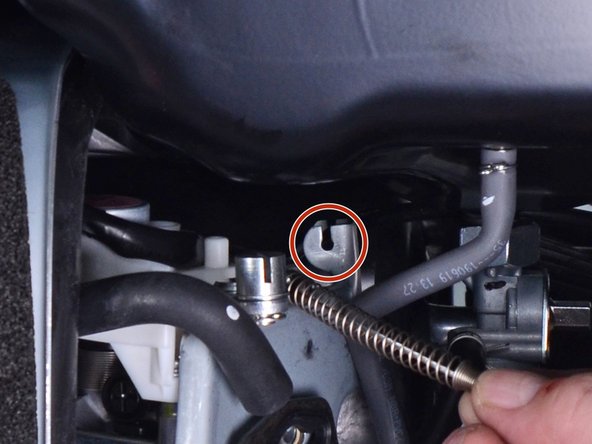
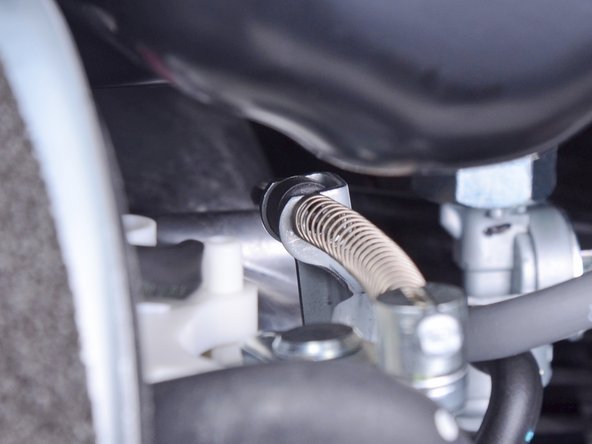
    • Lift up and release the choke cable's rubber bushing from the choke stay.

    • During reassembly, make sure that the choke cable's rubber bushing is properly seated on the choke stay.

  3. Honda 3000 Watt Inverter Generator EU3000IS1AWK Front Frame Disassembly, Loosen the front frame: crwdns2935265:03crwdnd2935265:01crwdnd2935265:01crwdne2935265:0
    • Use a 10 mm socket to remove the three frame bolts securing the bottom of the front frame.

  4. Honda 3000 Watt Inverter Generator EU3000IS1AWK Front Frame Disassembly: crwdns2935265:04crwdnd2935265:01crwdnd2935265:01crwdne2935265:0
    • Use a 10 mm socket to remove the four bolts securing the top of the front frame.

  5. Honda 3000 Watt Inverter Generator EU3000IS1AWK Front Frame Disassembly: crwdns2935265:05crwdnd2935265:01crwdnd2935265:02crwdne2935265:0 Honda 3000 Watt Inverter Generator EU3000IS1AWK Front Frame Disassembly: crwdns2935265:05crwdnd2935265:02crwdnd2935265:02crwdne2935265:0
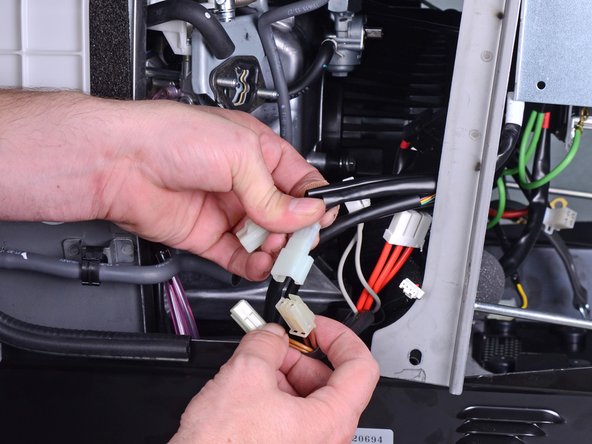
    • Pull and disconnect the starter motor's black barrel and white barrel connectors.

    • During reassembly, the wires should be reconnected to their respective colors.

  6. Honda 3000 Watt Inverter Generator EU3000IS1AWK Front Frame Disassembly: crwdns2935265:06crwdnd2935265:01crwdnd2935265:01crwdne2935265:0
    • Unplug the two-wire oil switch connector.

  7. Honda 3000 Watt Inverter Generator EU3000IS1AWK Front Frame Disassembly: crwdns2935265:07crwdnd2935265:01crwdnd2935265:01crwdne2935265:0
    • Unplug the four-wire regulator connector from the bottom edge of the control panel.

  8. Honda 3000 Watt Inverter Generator EU3000IS1AWK Front Frame Disassembly: crwdns2935265:08crwdnd2935265:01crwdnd2935265:02crwdne2935265:0 Honda 3000 Watt Inverter Generator EU3000IS1AWK Front Frame Disassembly: crwdns2935265:08crwdnd2935265:02crwdnd2935265:02crwdne2935265:0
    • Unplug the two winding connectors.

    • These connectors all have brown wiring in black sleeves.

  9. Honda 3000 Watt Inverter Generator EU3000IS1AWK Front Frame Disassembly: crwdns2935265:09crwdnd2935265:01crwdnd2935265:03crwdne2935265:0 Honda 3000 Watt Inverter Generator EU3000IS1AWK Front Frame Disassembly: crwdns2935265:09crwdnd2935265:02crwdnd2935265:03crwdne2935265:0 Honda 3000 Watt Inverter Generator EU3000IS1AWK Front Frame Disassembly: crwdns2935265:09crwdnd2935265:03crwdnd2935265:03crwdne2935265:0
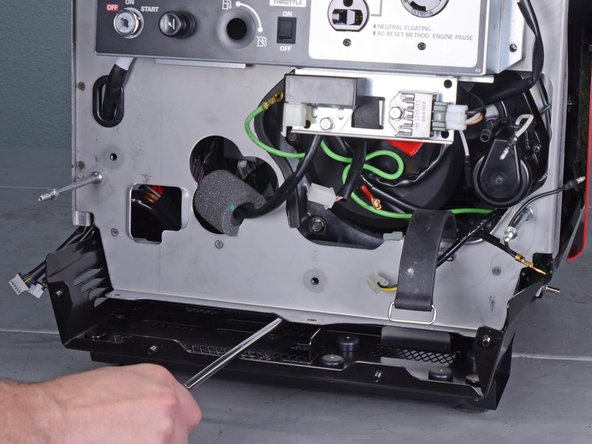
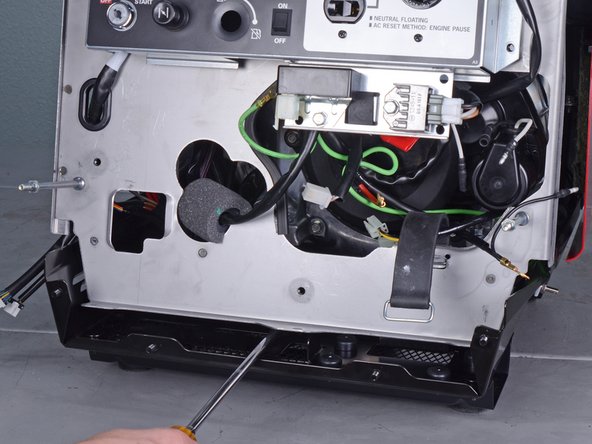
    • Insert the edge of a large flathead screwdriver under the bottom edge of the front frame.

    • Pry up and outward to release the bottom edge of the front frame.

  10. Honda 3000 Watt Inverter Generator EU3000IS1AWK Front Frame Disassembly: crwdns2935265:010crwdnd2935265:01crwdnd2935265:02crwdne2935265:0 Honda 3000 Watt Inverter Generator EU3000IS1AWK Front Frame Disassembly: crwdns2935265:010crwdnd2935265:02crwdnd2935265:02crwdne2935265:0
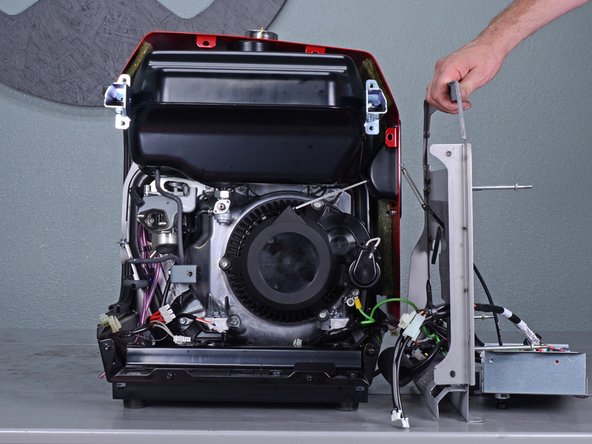
    • Carefully swing the front frame to the right side of the generator.

    • While the images show the control panel unbolted from the front frame, you can keep it bolted to the frame.

    • The front frame is still connected to the generator by many wires. Be careful not to strain any wires.

crwdns2915888:0crwdne2915888:0

To reassemble your device, follow these instructions in reverse order.

Arthur Shi

crwdns2935283:001/03/18crwdne2935283:0

284.714 crwdns2915208:0crwdne2915208:0

crwdns2935297:0588crwdne2935297:0

crwdns2915084:0crwdne2915084:0

iFixit crwdns2935289:0iFixitcrwdne2935289:0

Staff

crwdns2931471:0120crwdne2931471:0

crwdns2935297:020.002crwdne2935297:0

crwdns2947412:00crwdne2947412:0

crwdns2917038:0crwdne2917038:0

crwdns2936625:0crwdne2936625:0:

crwdns2936751:024crwdne2936751:0 0

crwdns2936753:07crwdne2936753:0 0

crwdns2936753:030crwdne2936753:0 4

crwdns2942667:0crwdne2942667:0 28