crwdns2933423:0crwdne2933423:0

Holmes HEH8031 Thermostat Replacement

crwdns2942213:0crwdne2942213:0

  1. Holmes HEH8031 Thermostat Replacement, Housing: crwdns2935265:01crwdnd2935265:01crwdnd2935265:01crwdne2935265:0
    • Ensure the device is unplugged from the wall outlet.

  2. Holmes HEH8031 Thermostat Replacement: crwdns2935265:02crwdnd2935265:01crwdnd2935265:01crwdne2935265:0
    • Remove eight 12-mm Phillips #2 screws from the back cover.

  3. Holmes HEH8031 Thermostat Replacement: crwdns2935265:03crwdnd2935265:01crwdnd2935265:02crwdne2935265:0 Holmes HEH8031 Thermostat Replacement: crwdns2935265:03crwdnd2935265:02crwdnd2935265:02crwdne2935265:0
    • Turn heater over so the controls are facing up.

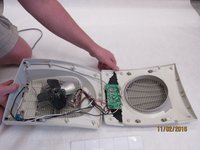
    • Lift the front housing away from the back of the fan and slowly fold the front housing back down to the floor.

    • Internal wires are connected to both halves of the housing. Be careful when separating the housing.

  4. Holmes HEH8031 Thermostat Replacement, Circuit Board Removal: crwdns2935265:04crwdnd2935265:01crwdnd2935265:01crwdne2935265:0
    • Remove four 12mm Phillips #2 screws from the circuit board.

  5. Holmes HEH8031 Thermostat Replacement, Fan: crwdns2935265:05crwdnd2935265:01crwdnd2935265:01crwdne2935265:0
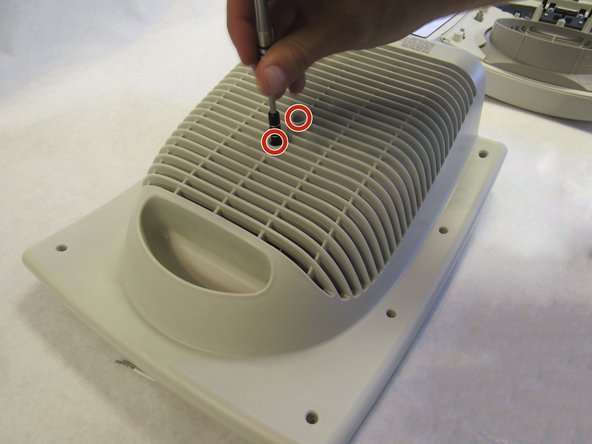
    • Remove two Phillips #2 12mm screws from housing

  6. Holmes HEH8031 Thermostat Replacement: crwdns2935265:06crwdnd2935265:01crwdnd2935265:01crwdne2935265:0
    • Remove zip tie from wire with pliers

  7. Holmes HEH8031 Thermostat Replacement: crwdns2935265:07crwdnd2935265:01crwdnd2935265:01crwdne2935265:0
    • Separate fan assembly from heating coil

  8. Holmes HEH8031 Thermostat Replacement, Thermostat: crwdns2935265:08crwdnd2935265:01crwdnd2935265:01crwdne2935265:0
    • Remove 1 Phillips #2 screw

  9. Holmes HEH8031 Thermostat Replacement: crwdns2935265:09crwdnd2935265:01crwdnd2935265:01crwdne2935265:0
    • Remove thermostat from rear housing

  10. Holmes HEH8031 Thermostat Replacement: crwdns2935265:010crwdnd2935265:01crwdnd2935265:01crwdne2935265:0
    • remove solder from thermostat wire on circuit board

    • Soldering iron will be hot

crwdns2915888:0crwdne2915888:0

To reassemble your device, follow these instructions in reverse order.

crwdns2935227:0crwdne2935227:0

Richard S Woodruff

crwdns2935283:010/12/16crwdne2935283:0

142 crwdns2915208:0crwdne2915208:0

crwdns2935295:0crwdne2935295:0

crwdns2915084:0crwdne2915084:0

IUPUI, Team 2-1, Baechle Fall 2016 crwdns2935289:0IUPUI, Team 2-1, Baechle Fall 2016crwdne2935289:0

IUPUI-BAECHLE-F16S2G1

crwdns2931471:04crwdne2931471:0

crwdns2935297:016crwdne2935297:0

crwdns2944067:00crwdne2944067:0

crwdns2917038:0crwdne2917038:0

crwdns2936625:0crwdne2936625:0:

crwdns2936751:024crwdne2936751:0 1

crwdns2936753:07crwdne2936753:0 2

crwdns2936753:030crwdne2936753:0 9

crwdns2942667:0crwdne2942667:0 1,284