crwdns2915892:0crwdne2915892:0
This guide will allow users to replace the screen components on the tablet. This is a moderately simple process. Users will need a replacement screen to complete the process.
crwdns2942213:0crwdne2942213:0
-
-
Using the PH#00 screwdriver, remove the two 0.145 inch Phillips head screws.
-
-
-
Place the small suction cup on your screen.
-
-
-
Insert the plastic opening tool between the screen cover and rear cover of the tablet.
-
Grasp the small suction cup.
-
-
-
Slide the plastic opening tool along device edge to separate the screen cover from the rear cover.
-
Pull upward on the small suction cup handle while sliding the opening tool.
-
-
-
-
Use the plastic opening tool to remove the speaker from the rear cover.
-
-
-
Once the speaker is disconnected, the cover removal is complete.
-
-
-
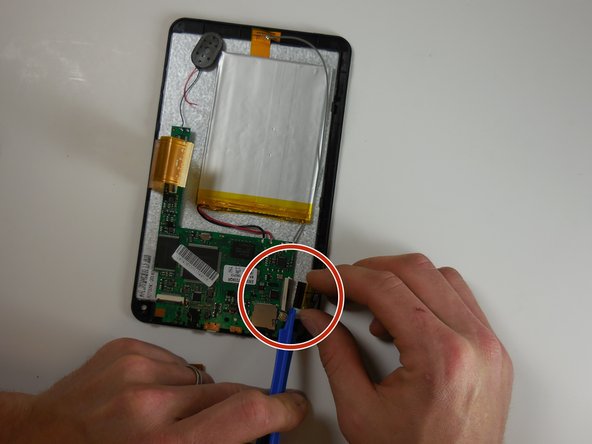
Lift the hinges on the three ribbon connector clips and disconnect the ribbon connector.
-
-
-
Using the PH#00 screwdriver, remove the three 0.145 inch circuit board screws.
-
-
-
Remove battery, speaker and circuit board from screen.
-
-
-
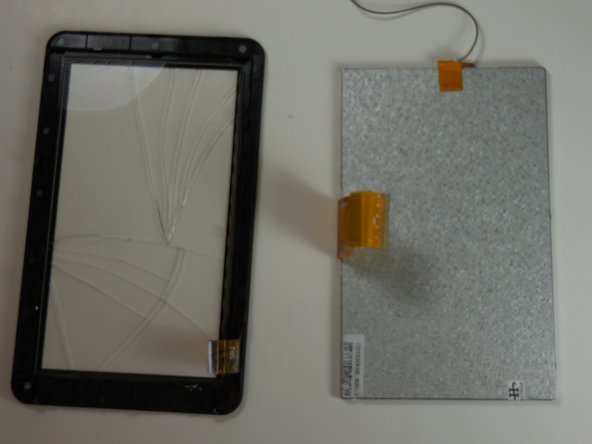
Use plastic opening tools to remove screen from front cover.
-
-
-
Remove screen solder connector with solder removal tool.
-
Solder new screen wire to circuit board with soldering tool.
-


To reassemble your device, follow these instructions in reverse order.
To reassemble your device, follow these instructions in reverse order.
crwdns2935221:0crwdne2935221:0
crwdns2935229:05crwdne2935229:0
crwdns2915084:0crwdne2915084:0

Colorado Springs, Team 5-6, Panko Spring 2015 crwdns2935289:0Colorado Springs, Team 5-6, Panko Spring 2015crwdne2935289:0
UCCS-PANKO-S15S5G6
crwdns2931471:03crwdne2931471:0
crwdns2935297:010crwdne2935297:0
crwdns2944067:02crwdne2944067:0
Your step 11 is irrelevant since this look like it is the wifi antenna.
The other end of this wire is not connected to the screen. I suggested removing gently the other end from the casing (it's held with adhesive) and so, no soldering at all to do.
Otherwise, great guide! Thanks!
OK, so I cracked my screen and I cracked it today so I went on there to do the usual, you know? Well when I turned it on, my password lock started bugging out! (I thought a was being hacked) I am worried to do this (Step - Step thing) because I am just a child (NOT A SMALL ONE DON'T REALLY WORRY!) and my parents will be disappointed in me, I got this for my birthday! But this one is a white HipStreet tablet, one of those fancy new ones, I checked it out to see if it was actually a crack so I took off my screen protector and I felt it, but no, no! It was a crack but I couldn't feel it! I thought it was REALLY in the tablet, like through the hard-drive and wires and stuff like that, please help me I don't want to get in trouble, I can't really afford another one, and my parents say "You better protect this with your entire life, because if you break this one..YOU WON'T GET ANOTHER!" (I had 2 tablets along time ago, I broke them both, OH PLEASE I WAS A SMALL CHILD!) So please help me, Thank - You!