crwdns2942213:0crwdne2942213:0
-
-
Remove the stickers covering the screws. These are located on both corners of the screen. (Two in total)
-
Remove the two 7mm screws.
-
-
-
-
Use a plastic opening tool to pull the plastic screen bezel forward.
-
Remove the 4 7mm screws in the corners holding the screen up.
-
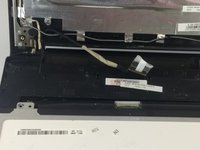
Use a plastic oping tool to pry the screen forward. Lay it on the keyboard.
-
-
-
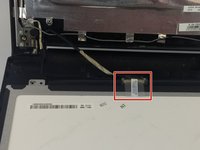
Peel off the tape that connects the chord to the screen.
-
Carefully unplug chord.
-


To reassemble your device, follow these instructions in reverse order.
To reassemble your device, follow these instructions in reverse order.
crwdns2935221:0crwdne2935221:0
crwdns2935227:0crwdne2935227:0
crwdns2915084:0crwdne2915084:0

USF Tampa, Team S6-G6, Eyestone Spring 2018 crwdns2935289:0USF Tampa, Team S6-G6, Eyestone Spring 2018crwdne2935289:0
USFT-EYESTONE-S18S6G6
crwdns2931471:03crwdne2931471:0
crwdns2935297:018crwdne2935297:0