crwdns2915892:0crwdne2915892:0
If you need to access the insides of your speaker, you first have to take apart the device. This guide walks you through how to take apart the front panel.
crwdns2942213:0crwdne2942213:0
-
-
Using a plastic opening tool, pry off the front grill by wedging it in the notch on the front of the device.
-
-
-
Remove the five 14.4 mm T10 Torx screws.
-
-
-
-
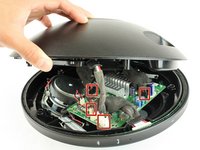
Gently pull the front apart from the back.
-
-
-
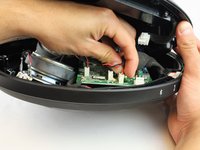
Remove the four wires connecting the front and back panels.
-
Pinch the connector tab and pull gently upwards.
-
Repeat for the other three connectors.
-


To reassemble, follow these steps in reverse order.
crwdns2935221:0crwdne2935221:0
crwdns2935229:02crwdne2935229:0
crwdns2935287:0crwdne2935287:0

USF Tampa, Team 16-5, Blackwell Spring 2017 crwdns2935289:0USF Tampa, Team 16-5, Blackwell Spring 2017crwdne2935289:0
USFT-BLACKWELL-S17S16G5
crwdns2931471:03crwdne2931471:0
crwdns2935297:024crwdne2935297:0
crwdns2947410:01crwdne2947410:0
Hi, I have the ONYX STUDIO with the silver ring that serves as the stand and the handle at the same time. After removing the front grill, I find the same five holes as it is shown on your pics but there are no screws. I can just see a bottom made of plastic. Do you have experience with that? Is that just some cover I can get thru using a screwdriver and I find the screws beneath?
I want to look inside as I am facing the problem with not working battery. As soon as I unplug the power source, it stops working.
Thank you for your comments.