crwdns2933423:0crwdne2933423:0

Hannspree SN12E2 Hard Drive Replacement

crwdns2942213:0crwdne2942213:0

  1. Hannspree SN12E2 Hard Drive Replacement, Battery: crwdns2935265:01crwdnd2935265:01crwdnd2935265:01crwdne2935265:0
    • Unplug and power off your laptop.

  2. Hannspree SN12E2 Hard Drive Replacement: crwdns2935265:02crwdnd2935265:01crwdnd2935265:01crwdne2935265:0
    • Close your laptop .

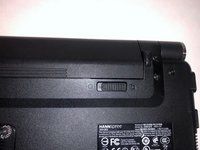
    • Place your laptop face down on a flat surface.

  3. Hannspree SN12E2 Hard Drive Replacement: crwdns2935265:03crwdnd2935265:01crwdnd2935265:03crwdne2935265:0 Hannspree SN12E2 Hard Drive Replacement: crwdns2935265:03crwdnd2935265:02crwdnd2935265:03crwdne2935265:0 Hannspree SN12E2 Hard Drive Replacement: crwdns2935265:03crwdnd2935265:03crwdnd2935265:03crwdne2935265:0
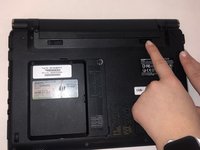
    • Unlatch the lock on the top right of your laptop first.

    • You will need to pull on the lock on the left side and remove the battery at the same time

    • The left lock is a spring lock and needs constant pressure applied in order to stay open.

  4. Hannspree SN12E2 Hard Drive Replacement, Hard Drive Access Door: crwdns2935265:04crwdnd2935265:01crwdnd2935265:01crwdne2935265:0
    • Remove the three 3mm Phillips #0 screws.

  5. Hannspree SN12E2 Hard Drive Replacement: crwdns2935265:05crwdnd2935265:01crwdnd2935265:01crwdne2935265:0
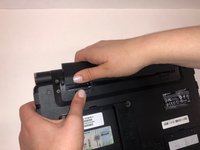
    • Gently pull on the access panel to remove it.

  6. Hannspree SN12E2 Hard Drive Replacement, Hard Drive: crwdns2935265:06crwdnd2935265:01crwdnd2935265:01crwdne2935265:0
    • Remove the four 4mm Phillips #0 retaining screws.

    • The hard drive caddy is the large piece of metal with black circles.

  7. Hannspree SN12E2 Hard Drive Replacement: crwdns2935265:07crwdnd2935265:01crwdnd2935265:01crwdne2935265:0
    • Next, lift up the hard drive and pull towards you. Lift up the end of the hard drive that is not plugged into the computer.

  8. Hannspree SN12E2 Hard Drive Replacement: crwdns2935265:08crwdnd2935265:01crwdnd2935265:02crwdne2935265:0 Hannspree SN12E2 Hard Drive Replacement: crwdns2935265:08crwdnd2935265:02crwdnd2935265:02crwdne2935265:0
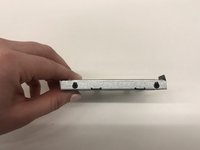
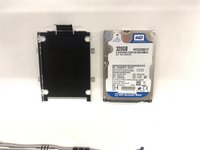
    • Slide your hard drive out of the metal piece by unscrewing the sides.

crwdns2915888:0crwdne2915888:0

To reassemble your device, follow these instructions in reverse order.

Kyle Duby

crwdns2935283:003/26/19crwdne2935283:0

193 crwdns2915208:0crwdne2915208:0

crwdns2935297:02crwdne2935297:0

crwdns2915084:0crwdne2915084:0

UMass Dartmouth, Team S2-G2, Simcock Spring 2019 crwdns2935289:0UMass Dartmouth, Team S2-G2, Simcock Spring 2019crwdne2935289:0

UMASSD-SIMCOCK-S19S2G2

crwdns2931471:04crwdne2931471:0

crwdns2935297:09crwdne2935297:0

crwdns2944067:00crwdne2944067:0

crwdns2917038:0crwdne2917038:0

crwdns2936625:0crwdne2936625:0:

crwdns2936751:024crwdne2936751:0 0

crwdns2936753:07crwdne2936753:0 2

crwdns2936753:030crwdne2936753:0 4

crwdns2942667:0crwdne2942667:0 176