crwdns2933423:0crwdne2933423:0

Hamilton Beach 48464 Heating Plate Replacement

crwdns2942213:0crwdne2942213:0

  1. Hamilton Beach 48464 Heating Plate Replacement, Heating Plate: crwdns2935265:01crwdnd2935265:01crwdnd2935265:01crwdne2935265:0
    • To begin, carefully open the top lid of the Brew Station.

  2. Hamilton Beach 48464 Heating Plate Replacement: crwdns2935265:02crwdnd2935265:01crwdnd2935265:01crwdne2935265:0
    • Gently pull out the filter basket from the Brew Station and set it to the side.

  3. Hamilton Beach 48464 Heating Plate Replacement: crwdns2935265:03crwdnd2935265:01crwdnd2935265:01crwdne2935265:0
    • Grab the handle and pull up to remove the top container.

    • Set this piece close by as you will be needing it for a future step.

  4. Hamilton Beach 48464 Heating Plate Replacement: crwdns2935265:04crwdnd2935265:01crwdnd2935265:02crwdne2935265:0 Hamilton Beach 48464 Heating Plate Replacement: crwdns2935265:04crwdnd2935265:02crwdnd2935265:02crwdne2935265:0
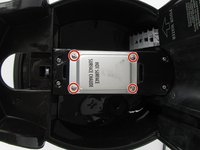
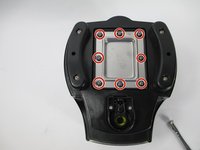
    • Using the Crown Bolt #8 Steel Spanner, unscrew the four 8-mm screws labeled in a red outline.

  5. Hamilton Beach 48464 Heating Plate Replacement: crwdns2935265:05crwdnd2935265:01crwdnd2935265:02crwdne2935265:0 Hamilton Beach 48464 Heating Plate Replacement: crwdns2935265:05crwdnd2935265:02crwdnd2935265:02crwdne2935265:0
    • Check again to make sure that the coffee maker is not plugged in.

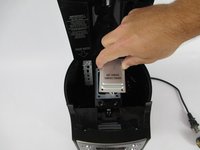
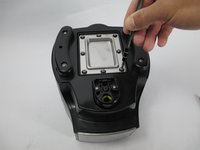
    • Once the screws are removed, carefully pull off the metal piece.

    • Once the piece is removed, you will be able to access the heater.

  6. Hamilton Beach 48464 Heating Plate Replacement: crwdns2935265:06crwdnd2935265:01crwdnd2935265:02crwdne2935265:0 Hamilton Beach 48464 Heating Plate Replacement: crwdns2935265:06crwdnd2935265:02crwdnd2935265:02crwdne2935265:0
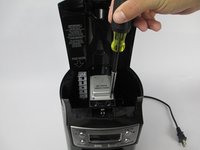
    • This step involves using the top contained that you put aside in step 3.

    • Using the Philips 2 Screwdriver, unscrew the eight 8-mm screws labeled in a red outline.

  7. Hamilton Beach 48464 Heating Plate Replacement: crwdns2935265:07crwdnd2935265:01crwdnd2935265:01crwdne2935265:0
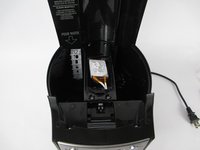
    • Once screws are removed, carefully pull out the metal piece from the unit. This is the top part of the heater in the Brew Staton.

    • There are rubber washers inside each of the 8 holes on the piece of metal. Be careful to not let any fall out when handling the piece.

crwdns2915888:0crwdne2915888:0

To reassemble your device, follow these instructions in reverse order.

crwdns2935227:0crwdne2935227:0

Michael Damico

crwdns2935283:002/10/16crwdne2935283:0

661 crwdns2915208:0crwdne2915208:0

crwdns2935297:06crwdne2935297:0

crwdns2915084:0crwdne2915084:0

USF Tampa, Team 14-1, Lacy Spring 2016 crwdns2935289:0USF Tampa, Team 14-1, Lacy Spring 2016crwdne2935289:0

USFT-LACY-S16S14G1

crwdns2931471:04crwdne2931471:0

crwdns2935297:018crwdne2935297:0

crwdns2947412:00crwdne2947412:0

crwdns2917038:0crwdne2917038:0

crwdns2936625:0crwdne2936625:0:

crwdns2936751:024crwdne2936751:0 0

crwdns2936753:07crwdne2936753:0 3

crwdns2936753:030crwdne2936753:0 10

crwdns2942667:0crwdne2942667:0 1,094