crwdns2915892:0crwdne2915892:0
This guide describes the steps to replace the motherboard in an HTC myTouch 3G.
All of the electronic components of the device will connect to the motherboard, including the processor, memory, RAM, screen, battery, and peripherals like wireless networks as well as connection ports.
Replacing the motherboard can extend the life of your device, and improve performance. This process also allows you to access other parts of your phone for repair or replacement.
crwdns2942213:0crwdne2942213:0
-
-
Press both thumbs on each side of the upper corners, and apply pressure in a downward motion.
-
While applying downward pressure, slide the back cover down and off the phone.
-
-
-
Remove the battery.
-
Remove the SIM card.
-
-
-
Push the SD card in to eject it.
-
Pull the SD card out.
-
-
-
-
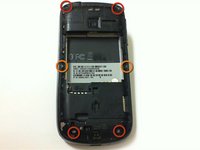
Remove the four 6 mm T5 Torx screws from the four corners on the back of the phone.
-
Remove the two 4 mm T5 Torx screws from the middle of the back of the phone.
-
-
-
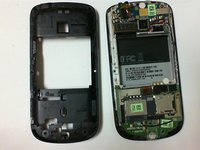
Pull out the antenna cover to access the motherboard.
-
-
-
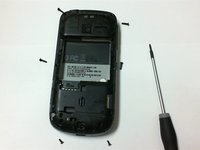
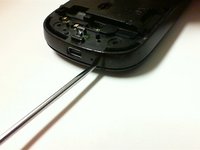
Insert a spudger into the gap between the frame and cover. Push downward with the spudger to separate the back plate from the phone.
-
With the spudger in the gap between the frame and cover, move the spudger around the edge of the of the phone to finish removing the back plate.
-
-
-
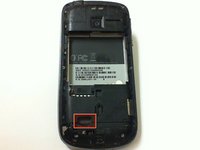
Remove the 3 mm Phillips screw located on the side of the bottom left-hand corner of the phone.
-
Remove the 3 mm Phillips screw located on the top right-hand corner of the phone.
-
-
-
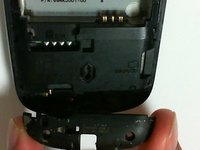
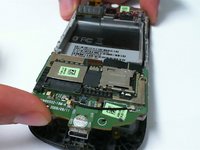
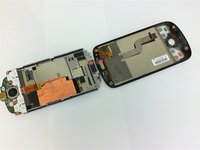
Place a finger between the circuit board and front cover, and lift the circuit board gently.
-
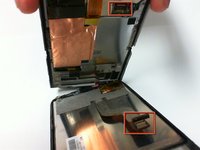
Separate the circuit board from the front cover and screen to access the ribbon cable holding them together. Detach the ribbon cable.
-
Finish separating the circuit board from the front panel.
-


To reassemble your device, follow these instructions in reverse order.
crwdns2935221:0crwdne2935221:0
crwdns2935229:02crwdne2935229:0
crwdns2935287:0crwdne2935287:0

Cal Poly, Team 2-9, Propen Fall 2012 crwdns2935289:0Cal Poly, Team 2-9, Propen Fall 2012crwdne2935289:0
CPSU-PROPEN-F12S2G9
crwdns2931471:03crwdne2931471:0
crwdns2935297:010crwdne2935297:0