crwdns2933423:0crwdne2933423:0

HTC Wizard 100 Back Case Replacement

crwdns2942213:0crwdne2942213:0

  1. HTC Wizard 100 Back Case Replacement, Battery: crwdns2935265:01crwdnd2935265:01crwdnd2935265:02crwdne2935265:0 HTC Wizard 100 Back Case Replacement, Battery: crwdns2935265:01crwdnd2935265:02crwdnd2935265:02crwdne2935265:0
    • Power the phone off.

    • Use your thumb to gently press downward and away from the camera to remove the battery cover.

  2. HTC Wizard 100 Back Case Replacement: crwdns2935265:02crwdnd2935265:01crwdnd2935265:02crwdne2935265:0 HTC Wizard 100 Back Case Replacement: crwdns2935265:02crwdnd2935265:02crwdnd2935265:02crwdne2935265:0
    • Pull on the plastic tab to release the battery.

  3. HTC Wizard 100 Back Case Replacement, Back Case: crwdns2935265:03crwdnd2935265:01crwdnd2935265:02crwdne2935265:0 HTC Wizard 100 Back Case Replacement, Back Case: crwdns2935265:03crwdnd2935265:02crwdnd2935265:02crwdne2935265:0
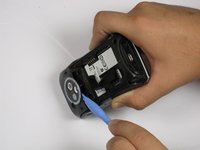
    • Use a plastic opening tool to remove the camera cover.

    • Work around the corners to avoid breaking the plastic clips that hold the camera cover on.

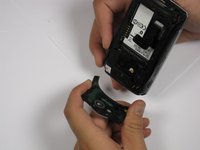
    • Lift the camera cover off of the phone.

  4. HTC Wizard 100 Back Case Replacement: crwdns2935265:04crwdnd2935265:01crwdnd2935265:01crwdne2935265:0
    • Remove the stylus from the phone.

    • Remove the four 5.5 mm screws with the T6 Torx Screwdriver.

    • One of the screws might be under a sticker, which will void your warranty.

  5. HTC Wizard 100 Back Case Replacement: crwdns2935265:05crwdnd2935265:01crwdnd2935265:03crwdne2935265:0 HTC Wizard 100 Back Case Replacement: crwdns2935265:05crwdnd2935265:02crwdnd2935265:03crwdne2935265:0 HTC Wizard 100 Back Case Replacement: crwdns2935265:05crwdnd2935265:03crwdnd2935265:03crwdne2935265:0
    • Be Careful! Do not insert the spudger in between the keyboard and screen. This could break the keyboard off the phone.

    • If your phone contains a memory card, you may want to remove it before proceeding with this step.

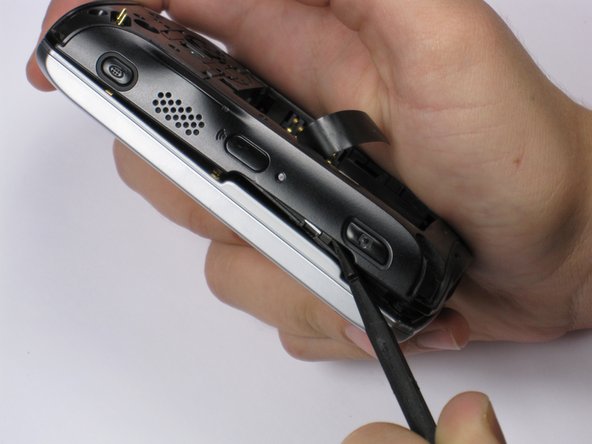
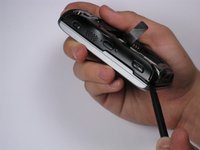
    • Insert spudger in the bottom corner as seen in the picture. Carefully slide the spudger from the bottom towards the top as seen in the second picture.

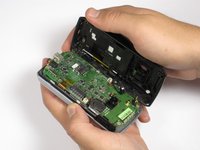
    • Lift the back case off completely.

    • The speakers might be dangling and unsecured.

crwdns2915888:0crwdne2915888:0

To reassemble your device, follow these instructions in reverse order.

Eric W

crwdns2935283:009/22/11crwdne2935283:0

41 crwdns2915208:0crwdne2915208:0

crwdns2935297:03crwdne2935297:0

crwdns2915084:0crwdne2915084:0

Cal Poly, Team 20-28, Maness Fall 2011 crwdns2935289:0Cal Poly, Team 20-28, Maness Fall 2011crwdne2935289:0

CPSU-MANESS-F11S20G28

crwdns2931471:04crwdne2931471:0

crwdns2935297:015crwdne2935297:0

crwdns2944067:00crwdne2944067:0

crwdns2917038:0crwdne2917038:0

crwdns2936625:0crwdne2936625:0:

crwdns2936751:024crwdne2936751:0 1

crwdns2936753:07crwdne2936753:0 1

crwdns2936753:030crwdne2936753:0 13

crwdns2942667:0crwdne2942667:0 810