crwdns2933423:0crwdne2933423:0

HTC Warhawk Screen Replacement

crwdns2942213:0crwdne2942213:0

  1. HTC Warhawk Screen Replacement, Screen: crwdns2935265:01crwdnd2935265:01crwdnd2935265:01crwdne2935265:0
    • Take the back cover off the phone and take the battery out.

  2. HTC Warhawk Screen Replacement: crwdns2935265:02crwdnd2935265:01crwdnd2935265:01crwdne2935265:0
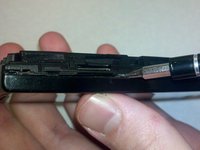
    • Take a SL#2.5 screwdriver and pop the black piece off shown here.

  3. HTC Warhawk Screen Replacement: crwdns2935265:03crwdnd2935265:01crwdnd2935265:01crwdne2935265:0
    • Take a T5 screwdriver and unscrew the two screws seen here

  4. HTC Warhawk Screen Replacement: crwdns2935265:04crwdnd2935265:01crwdnd2935265:01crwdne2935265:0
    • Unscrew the two screws on the back of the phone with a T5 screwdriver

  5. HTC Warhawk Screen Replacement: crwdns2935265:05crwdnd2935265:01crwdnd2935265:02crwdne2935265:0 HTC Warhawk Screen Replacement: crwdns2935265:05crwdnd2935265:02crwdnd2935265:02crwdne2935265:0
    • Take the SL#2.5 screwdriver and pry off the back cover

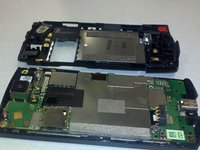
    • The phone should now look like the second picture

  6. HTC Warhawk Screen Replacement: crwdns2935265:06crwdnd2935265:01crwdnd2935265:02crwdne2935265:0 HTC Warhawk Screen Replacement: crwdns2935265:06crwdnd2935265:02crwdnd2935265:02crwdne2935265:0
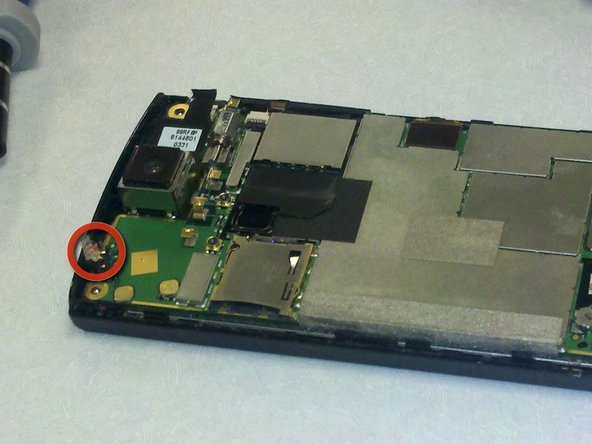
    • Next lift up the camera lens from the board.

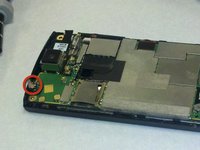
    • Then pry off the circuit circled in red on the second picture

  7. HTC Warhawk Screen Replacement: crwdns2935265:07crwdnd2935265:01crwdnd2935265:01crwdne2935265:0
    • Take the SL#2.5 screwdriver and pry off the volume buttons on the side of the phone

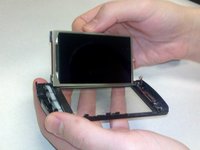
    • The circuit board should now be detached from the LCD part of the phone

  8. HTC Warhawk Screen Replacement: crwdns2935265:08crwdnd2935265:01crwdnd2935265:01crwdne2935265:0
    • Next take the SL#2.5 screwdriver and pry the grey fabric sticker off on the LCD side of the phone

  9. HTC Warhawk Screen Replacement: crwdns2935265:09crwdnd2935265:01crwdnd2935265:02crwdne2935265:0 HTC Warhawk Screen Replacement: crwdns2935265:09crwdnd2935265:02crwdnd2935265:02crwdne2935265:0
    • Next take the SL#2.5 screwdriver and pry the screen from the front plastic cover

    • The screen should come out with ease and be completely detached from the rest of the cover.

    • Replace screen with a new one.

crwdns2915888:0crwdne2915888:0

To reassemble your device, follow these instructions in reverse order.

Meuwissenm

crwdns2935283:010/04/11crwdne2935283:0

16 crwdns2915208:0crwdne2915208:0

crwdns2935295:0crwdne2935295:0

crwdns2915084:0crwdne2915084:0

UW Stout, Team 5-3, Zhou Fall 2011 crwdns2935289:0UW Stout, Team 5-3, Zhou Fall 2011crwdne2935289:0

UWSTOUT-ZHOU-F11S5G3

crwdns2931471:04crwdne2931471:0

crwdns2935297:06crwdne2935297:0

crwdns2944067:00crwdne2944067:0

crwdns2917038:0crwdne2917038:0

crwdns2936625:0crwdne2936625:0:

crwdns2936751:024crwdne2936751:0 0

crwdns2936753:07crwdne2936753:0 0

crwdns2936753:030crwdne2936753:0 12

crwdns2942667:0crwdne2942667:0 1,436