crwdns2915892:0crwdne2915892:0
Use this guide to remove or replace the front panel on the HTC Vive controller. Be careful not to tear the ribbon cables or any of the connectors they correspond to while removing the front panel.
crwdns2942213:0crwdne2942213:0
-
-
Turn over the Vive controller so that the bottom saucer is facing up.
-
Use the T5 Torx screwdriver to remove three black 21mm screws from the bottom saucer.
-
-
-
Use the nylon spudger to separate the top and bottom saucer covers all around the edges.
-
Remove only the top saucer cover by pulling up with your hand.
My top saucer was REALLY stubborn. Don’t force it with your hand, use the spudger to separate it at the seam. Try not to poke your spudger in too deep, there are internals just inside the seam.
The second time around, I learned why it was so stubborn. The picture suggests that you should start at the base of the saucer and work your way around, but that’s backwards.
Start separating with your spudger at the distal side of the saucer and work your way toward the handle. Then for the last part, pull the piece up and away, like peeling a banana. See the second picture for the bottom half of the saucer, below. Do the same on the top.
-
-
-
Use the Phillips 00 screwdriver to remove the three silver 12.8mm screws from the exposed upper sensor panel.
It’s Phillips 0, not 00.
You do not need to remove these screws to remove the bottom saucer. They provide stability to the two halves of the donut.
I had the same experience. Putting the screws back in made the bottom shell easier to remove.
I concur, you don’t need to remove these screws to take the bottom shell off.
I found mine had ph#000 screws size, not ph#00.
please do not remove the Phillips-head screws it is not necessary to remove them.
-
-
-
Carefully pull away the bottom saucer cover with your hand.
I found the re-assembly of this difficult until I concentrated on two areas - the lugs which go into the handle first, then the central ring. My earlier concern was for the optical sensors on the wings but these snapped into place easily as the central ring was manoeuvred.
From what I can tell, there are two clicks on each side? one is quite easy, then the other one seems to require considerable force pushing down and on the side, I had to do it one side at a time and found two YouTube videos performing this step to use as reference. I have the vive pro wands and not the originals, so this may explain the difference. This felt very wrong to me.
-
-
-
-
Use the T5 Torx screwdriver to remove the two black 5.2mm screws on the back gray panel.
-
-
-
Turn over the Vive controller so that the exposed bottom saucer panel is facing up.
-
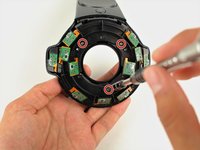
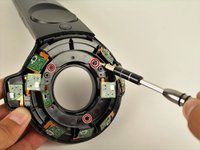
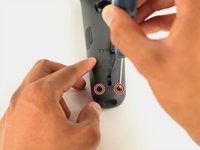
Use the T5 Torx screwdriver to remove the three black 5.2mm screws.
Leave the middle screw where it is (the one being unscrewed in the picture). That screw holds the two halves of the photodiode assembly together, not the case.
five screws… two at bottom
I concur with trevosklar, don’t need to remove center screw to remove front panel (pad cover).
-
-
-
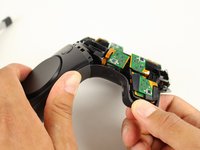
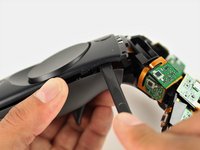
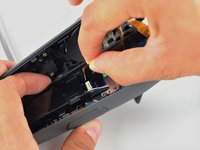
Use the nylon spudger to separate the front panel gently by running the spudger around the edges of the handle.
-
Gently lift the right side of the panel to the left.
-
-
-
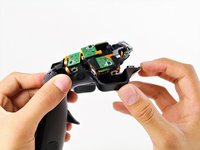
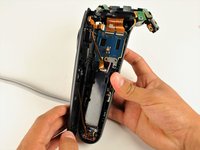
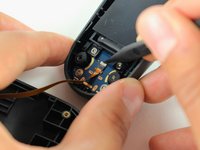
Disconnect the upper ribbon cable gently by pulling the ribbon up and away from the motherboard with two fingers.
You do not have to remove the ribbon cables from the plugs…you can carefully work the battery holder around them and remove it…being very gentle. And the black part of the handle will stay attached to the cables and be in the way. But removing the cables does make it easier to access the area for the battery, just not completely necessary.
-
-
-
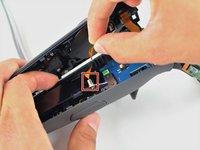
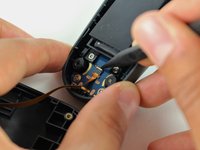
Disconnect the middle ribbon cable gently by pulling the ribbon cable up and away from the motherboard with two fingers.
-
-
-
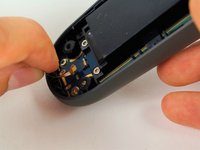
Use the nylon spudger to lift the white tab by 90 degrees.
-
Disconnect the bottom ribbon cable gently by pulling the ribbon cable down with two fingers.
Hallo what is the name of this conector because i Broker it
Yeah I did as instructed only to realize after that my gen 1 vive controller does not do that, and i desoldered the power button ribbon. That cable, does NOT detach on my model. destroyed.
On my controllers, there was yellow tape over these? and in some other places as well? Why?
-


To reassemble your device, follow these instructions in reverse order.
To reassemble your device, follow these instructions in reverse order.
crwdns2935221:0crwdne2935221:0
crwdns2935229:011crwdne2935229:0
crwdns2915084:0crwdne2915084:0

Cal Poly, Team S15-G5, Livingston Fall 2017 crwdns2935289:0Cal Poly, Team S15-G5, Livingston Fall 2017crwdne2935289:0
CPSU-LIVINGSTON-F17S15G5
crwdns2931471:04crwdne2931471:0
crwdns2935297:051crwdne2935297:0
crwdns2947410:01crwdne2947410:0
Hi, I recently broke my HTC vive contrôler and the ribbon cables of the touchpad is now disconnect from the front panel. Is it dead or I can plug it on is place ?
Where can I buy new t5 21 mm screws? Mine are getting stripped out!
jeremyvanwoerden - crwdns2934203:0crwdne2934203:0
Where can you get replacement batteries?
Mike Justice - crwdns2934203:0crwdne2934203:0
The middle bottom screw may have some form of warranty sticker on it if you have a Vive Pro wand (which is purple). Mine had this. Easy enough to remove and get on with it.
sodiboo - crwdns2934203:0crwdne2934203:0