crwdns2915892:0crwdne2915892:0
The HTC Vive controller battery may be weak or faulty from extended use and causing power or functionality problems. The battery is essential for the remote to power up and perform. It is important not to puncture the battery while removing. This guide will show you how to replace the battery.
crwdns2942213:0crwdne2942213:0
-
-
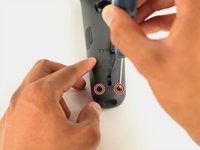
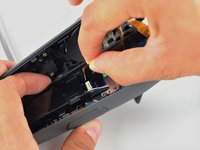
Turn over the Vive controller so that the bottom saucer is facing up.
-
Use the T5 Torx screwdriver to remove three black 21mm screws from the bottom saucer.
-
-
-
Use the nylon spudger to separate the top and bottom saucer covers all around the edges.
-
Remove only the top saucer cover by pulling up with your hand.
-
-
-
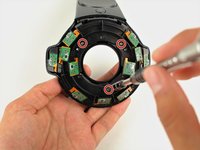
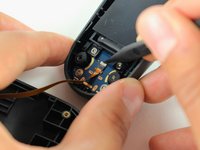
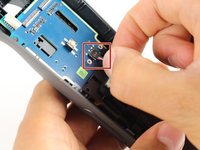
Use the Phillips 00 screwdriver to remove the three silver 12.8mm screws from the exposed upper sensor panel.
-
-
-
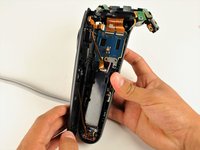
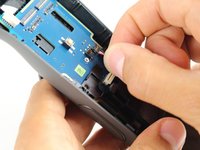
Carefully pull away the bottom saucer cover with your hand.
-
-
-
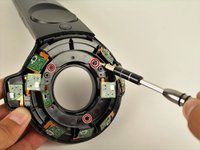
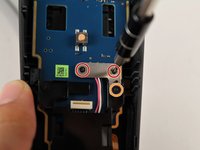
Use the T5 Torx screwdriver to remove the two black 5.2mm screws on the back gray panel.
-
-
-
Turn over the Vive controller so that the exposed bottom saucer panel is facing up.
-
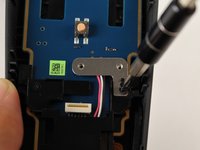
Use the T5 Torx screwdriver to remove the three black 5.2mm screws.
-
-
-
-
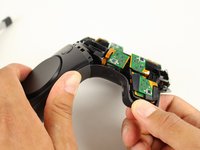
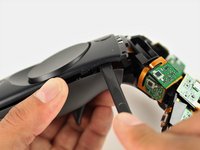
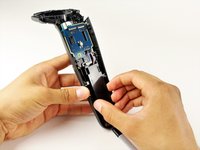
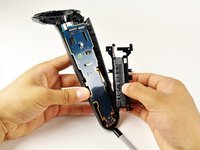
Use the nylon spudger to separate the front panel gently by running the spudger around the edges of the handle.
-
Gently lift the right side of the panel to the left.
-
-
-
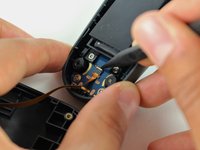
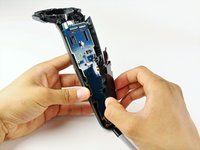
Disconnect the upper ribbon cable gently by pulling the ribbon up and away from the motherboard with two fingers.
-
-
-
Disconnect the middle ribbon cable gently by pulling the ribbon cable up and away from the motherboard with two fingers.
-
-
-
Use the nylon spudger to lift the white tab by 90 degrees.
-
Disconnect the bottom ribbon cable gently by pulling the ribbon cable down with two fingers.
-
-
-
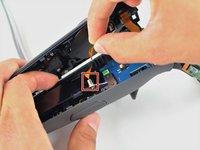
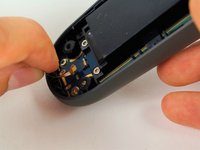
Use the Phillips 00 screwdriver to remove two black 2.8mm screws from the silver plate.
-
Use the Phillips 00 screwdriver to remove the black 5.8mm screw from the bottom right corner of the silver plate.
-
-
-
Remove the silver plate by pinching it with two fingers and lifting up.
-
-
-
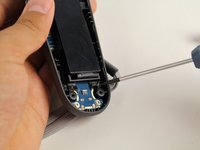
Use the Phillips 00 screwdriver to remove the black 5.8mm screw from the top left of the battery frame.
-
-
-
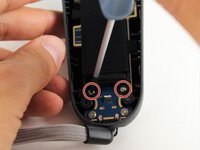
Use the T5 Torx screwdriver to remove the two silver 4.2mm screws from the bottom of the battery frame.
-
-
-
Disconnect the three-pin cable gently by pinching the cable with two fingers and pulling up.
-
-
-
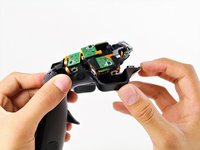
Lift the battery frame to remove the battery from the Vive controller
-


To reassemble your device, follow these instructions in reverse order.
crwdns2935221:0crwdne2935221:0
crwdns2935229:033crwdne2935229:0
crwdns2935287:0crwdne2935287:0

Cal Poly, Team S15-G5, Livingston Fall 2017 crwdns2935289:0Cal Poly, Team S15-G5, Livingston Fall 2017crwdne2935289:0
CPSU-LIVINGSTON-F17S15G5
crwdns2931471:04crwdne2931471:0
crwdns2935297:051crwdne2935297:0
crwdns2947412:014crwdne2947412:0
well if theres no parts…then theres no point…
So, where do I get a replacement battery from? Does anyone know the part number?
This helped me ALOT. i had a controller stop charging or powering on. Decided to use this guide to pull just pull power and re seed the connection for the battery. The Battery connection IS NOT CLIPPED IN. TAPE holds down the connection to the terminals. So it can easy come loose over jolts and shocks or normal use
battery is 3.85vdc 960ma
HTC model boplh100
3.69Whr
Part number 35H00244-00M
With all the comments and steps, I easily took apart and rebuilt my controller. Thank you!!
Also, I used this cheap repair kit they sell at walmart if you dont have the tools and don't want to order them online.