crwdns2933423:0crwdne2933423:0

HTC One Mini 2 Back Plate Replacement

crwdns2942213:0crwdne2942213:0

  1. HTC One Mini 2 Back Plate Replacement, Sim and MicroSD Card: crwdns2935265:01crwdnd2935265:01crwdnd2935265:03crwdne2935265:0 HTC One Mini 2 Back Plate Replacement, Sim and MicroSD Card: crwdns2935265:01crwdnd2935265:02crwdnd2935265:03crwdne2935265:0 HTC One Mini 2 Back Plate Replacement, Sim and MicroSD Card: crwdns2935265:01crwdnd2935265:03crwdnd2935265:03crwdne2935265:0
    • Insert the end of a paper clip into the holes on each side of the phone to eject the SIM card and Micro SD card.

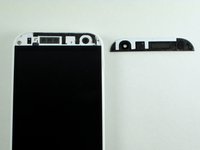
    • Set the cardholders aside.

  2. HTC One Mini 2 Back Plate Replacement: crwdns2935265:02crwdnd2935265:01crwdnd2935265:01crwdne2935265:0
    • Heat up the top grey speaker plate with the iFixit iOpener for two minutes.

  3. HTC One Mini 2 Back Plate Replacement, Front Plate: crwdns2935265:03crwdnd2935265:01crwdnd2935265:03crwdne2935265:0 HTC One Mini 2 Back Plate Replacement, Front Plate: crwdns2935265:03crwdnd2935265:02crwdnd2935265:03crwdne2935265:0 HTC One Mini 2 Back Plate Replacement, Front Plate: crwdns2935265:03crwdnd2935265:03crwdnd2935265:03crwdne2935265:0
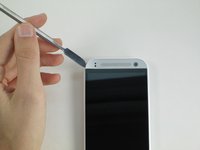
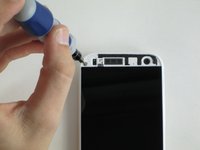
    • Use a metal spudger to pry up the left edge of the upper grey front plate.

    • Place the spudger between the inside white plastic edge and the grey plate. Do not pry between the two white plastic frames.

    • Don’t pry against the glass. Pry against only the left side as there is a delicate antenna under the plate.

    • Use the narrow plastic pry tool to carefully separate the black ribbon antenna from the grey plate.

  4. HTC One Mini 2 Back Plate Replacement: crwdns2935265:04crwdnd2935265:01crwdnd2935265:02crwdne2935265:0 HTC One Mini 2 Back Plate Replacement: crwdns2935265:04crwdnd2935265:02crwdnd2935265:02crwdne2935265:0
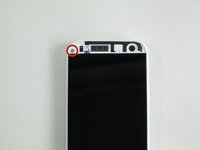
    • Remove the 2mm screw with a T5 torx screwdriver head from the iFixit tool kit.

  5. HTC One Mini 2 Back Plate Replacement: crwdns2935265:05crwdnd2935265:01crwdnd2935265:02crwdne2935265:0 HTC One Mini 2 Back Plate Replacement: crwdns2935265:05crwdnd2935265:02crwdnd2935265:02crwdne2935265:0
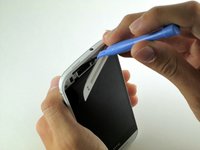
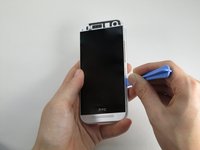
    • Use the plastic pry tool to pry around the edge of the phone.

    • Pry carefully around the card slots.

    • Slowly pull up from the right side of the screen like opening a book.

    • The plastic piece for the power button may fall out. Set it aside for reassembly.

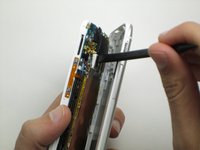
    • Use the plastic spudger to peel the foam adhesive around the camera away from the back plate.

crwdns2915888:0crwdne2915888:0

To reassemble your device, follow these instructions in reverse order.

crwdns2935229:05crwdne2935229:0

Caleb Kelsay

crwdns2935283:010/14/14crwdne2935283:0

590 crwdns2915208:0crwdne2915208:0

crwdns2935295:0crwdne2935295:0

crwdns2915084:0crwdne2915084:0

Cal Poly, Team 4-48, Amido Fall 2014 crwdns2935289:0Cal Poly, Team 4-48, Amido Fall 2014crwdne2935289:0

CPSU-AMIDO-F14S4G48

crwdns2931471:05crwdne2931471:0

crwdns2935297:017crwdne2935297:0

crwdns2917034:0crwdne2917034:0

what is the black ribbon antenna on the front

deancvijic90 - crwdns2934203:0crwdne2934203:0

crwdns2917038:0crwdne2917038:0

crwdns2936625:0crwdne2936625:0:

crwdns2936751:024crwdne2936751:0 1

crwdns2936753:07crwdne2936753:0 9

crwdns2936753:030crwdne2936753:0 11

crwdns2942667:0crwdne2942667:0 10,298