crwdns2915892:0crwdne2915892:0
Remove the rear inner frame to gain access to the internals of the HTC Evo 4G.
crwdns2942213:0crwdne2942213:0
-
-
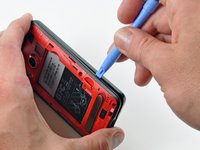
Gently insert an iPod opening tool between the rear panel and the inner rear frame near the headphone jack.
-
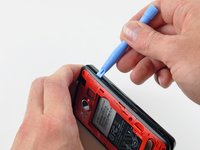
Use your iPod opening tool to pry up the rear case around the perimeter of the Evo.
-
-
-
Lift the rear panel off of the inner rear frame.
-
-
-
Using the tip of your finger, lift the battery from the end closest to the camera.
-
Remove the battery from the rear inner frame.
-
-
-
Use the flat end of a spudger to pry up the red MicroSD retainer attached to the inner frame.
-
-
-
crwdns2935267:0crwdne2935267:0Tweezers$4.99
-
Use a pair of tweezers to carefully pull the MicroSD card out of its slot in the inner rear frame.
-
-
-
Remove six T5 Torx screws securing the rear inner frame to the inner case.
-
-
-
Gently insert an iPod opening tool between the rear inner frame and its plastic surround near the Micro HDMI port.
-
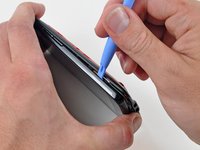
Carefully pry the top edge of the rear inner frame away from the front surround of the Evo.
-
-
-
Insert the iPod opening tool between the rear inner frame and its plastic surround and pry up at several points along the left edge of the Evo.
-
-
-
Continue the prying procedure, now focusing on detaching the plastic surround from the bottom of the Evo.
-
Pry up the rear inner frame along the right edge using the method described in previous steps.
-
Eventually work around the entire perimeter of the rear inner frame until it is lifted slightly from the inner case.
-
-
-
Remove the rear inner frame from the rest of the Evo.
-


To reassemble your device, follow these instructions in reverse order.
To reassemble your device, follow these instructions in reverse order.
crwdns2935221:0crwdne2935221:0
crwdns2935229:09crwdne2935229:0

crwdns2947410:01crwdne2947410:0
You may want people to also know they have to remove the lcd panel and the rear speaker to install them in their new rear inner panel.