crwdns2933423:0crwdne2933423:0

HTC Desire 610 Charging Port Replacement

crwdns2942213:0crwdne2942213:0

  1. HTC Desire 610 Charging Port Replacement, Black Plastic Circuit Cover: crwdns2935265:01crwdnd2935265:01crwdnd2935265:03crwdne2935265:0 HTC Desire 610 Charging Port Replacement, Black Plastic Circuit Cover: crwdns2935265:01crwdnd2935265:02crwdnd2935265:03crwdne2935265:0 HTC Desire 610 Charging Port Replacement, Black Plastic Circuit Cover: crwdns2935265:01crwdnd2935265:03crwdnd2935265:03crwdne2935265:0
    • Using a plastic opening tool, take off the back cover of the phone.

  2. HTC Desire 610 Charging Port Replacement: crwdns2935265:02crwdnd2935265:01crwdnd2935265:01crwdne2935265:0
    • Remove the four black 4mm torx screws using the Torx T5 bit.

  3. HTC Desire 610 Charging Port Replacement: crwdns2935265:03crwdnd2935265:01crwdnd2935265:01crwdne2935265:0
    • Remove the four silver 5mm torx head screws using the Torx T5 screwdriver.

  4. HTC Desire 610 Charging Port Replacement: crwdns2935265:04crwdnd2935265:01crwdnd2935265:01crwdne2935265:0
    • Remove the two 2.5mm phillips head screws using the Phillips 000 screwdriver.

  5. HTC Desire 610 Charging Port Replacement: crwdns2935265:05crwdnd2935265:01crwdnd2935265:01crwdne2935265:0
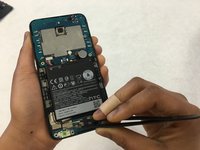
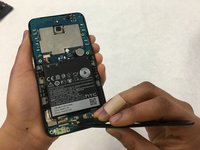
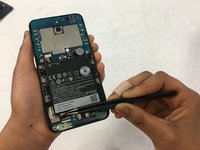
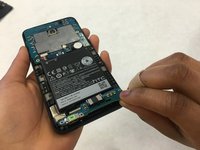
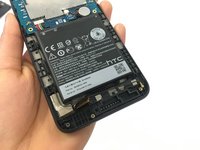
    • Remove the black plastic circuit cover using a plastic opening tool.

  6. HTC Desire 610 Charging Port Replacement, Charging Port: crwdns2935265:06crwdnd2935265:01crwdnd2935265:01crwdne2935265:0
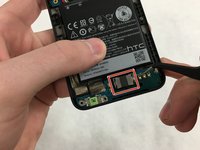
    • Remove the 4mm black Torx screw using a Torx T5 screwdriver.

  7. HTC Desire 610 Charging Port Replacement: crwdns2935265:07crwdnd2935265:01crwdnd2935265:01crwdne2935265:0
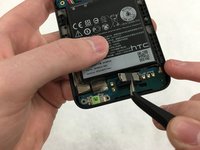
    • Using a pair of tweezers, disconnect the antenna wire.

  8. HTC Desire 610 Charging Port Replacement: crwdns2935265:08crwdnd2935265:01crwdnd2935265:03crwdne2935265:0 HTC Desire 610 Charging Port Replacement: crwdns2935265:08crwdnd2935265:02crwdnd2935265:03crwdne2935265:0 HTC Desire 610 Charging Port Replacement: crwdns2935265:08crwdnd2935265:03crwdnd2935265:03crwdne2935265:0
    • Peel back the gray adhesive strip using the precision tweezers.

  9. HTC Desire 610 Charging Port Replacement: crwdns2935265:09crwdnd2935265:01crwdnd2935265:01crwdne2935265:0
    • Pull up on the white strip so it sits 90 degrees using a pair of precision tweezers.

  10. HTC Desire 610 Charging Port Replacement: crwdns2935265:010crwdnd2935265:01crwdnd2935265:03crwdne2935265:0 HTC Desire 610 Charging Port Replacement: crwdns2935265:010crwdnd2935265:02crwdnd2935265:03crwdne2935265:0 HTC Desire 610 Charging Port Replacement: crwdns2935265:010crwdnd2935265:03crwdnd2935265:03crwdne2935265:0
    • Pry up the circuit board and pull it out using a pair of precision tweezers.

  11. HTC Desire 610 Charging Port Replacement: crwdns2935265:011crwdnd2935265:01crwdnd2935265:03crwdne2935265:0 HTC Desire 610 Charging Port Replacement: crwdns2935265:011crwdnd2935265:02crwdnd2935265:03crwdne2935265:0 HTC Desire 610 Charging Port Replacement: crwdns2935265:011crwdnd2935265:03crwdnd2935265:03crwdne2935265:0
    • Remove the loud speaker using a pair of precision tweezers.

    • The loud speaker is attached with adhesive and may require more force than expected to remove.

    • The prongs on the speaker should be sticking up towards the top of the phone when you put the speaker on the new circuit board.

crwdns2915888:0crwdne2915888:0

To reassemble your device, follow these instructions in reverse order.

crwdns2935229:02crwdne2935229:0

Kaycee Hammond

crwdns2935283:002/11/17crwdne2935283:0

273 crwdns2915208:0crwdne2915208:0

crwdns2935297:02crwdne2935297:0

crwdns2915084:0crwdne2915084:0

IUPUI, Team S1-G1, Wilson Spring 2017 crwdns2935289:0IUPUI, Team S1-G1, Wilson Spring 2017crwdne2935289:0

IUPUI-WILSON-S17S1G1

crwdns2931471:04crwdne2931471:0

crwdns2935297:06crwdne2935297:0

crwdns2917034:0crwdne2917034:0

crwdns2917038:0crwdne2917038:0

crwdns2936625:0crwdne2936625:0:

crwdns2936751:024crwdne2936751:0 0

crwdns2936753:07crwdne2936753:0 1

crwdns2936753:030crwdne2936753:0 2

crwdns2942667:0crwdne2942667:0 1,219