crwdns2915892:0crwdne2915892:0
Is the screen on your laptop malfunctioning? Here are some possible problems with your screen. If you determine that the screen needs to be replaced, follow this replacement guide!
crwdns2942213:0crwdne2942213:0
-
-
Flip the laptop over.
-
Slide the lever with the battery symbol beside it firmly until the battery pops out.
-
Remove the battery from the laptop.
-
-
crwdns2935267:0crwdne2935267:0Tweezers$4.99
-
Orient the laptop keyboard-side up.
-
Use tweezers to remove the adhesive covers for the screws.
-
-
-
-
Remove the two 6mm screws with a Phillips #0 screwdriver.
-
-
-
Remove the four 3mm screws with a Phillips #0 screwdriver near the corners of the screen to remove the display.
-
-
-
Gently lower the screen and lay it face down on the keyboard.
-
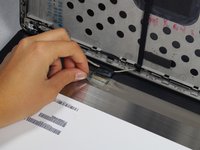
Lift the corners of the tape closest to the top of the screen and peel toward the center carefully.
-
Slowly pull the tape away from the sides.
-
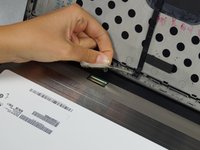
Lift the tape and disconnect the screen connector.
-


To reassemble your device, follow these instructions in reverse order.
To reassemble your device, follow these instructions in reverse order.
crwdns2935221:0crwdne2935221:0
crwdns2935229:09crwdne2935229:0
crwdns2915084:0crwdne2915084:0

Cal Poly, Team 8-43, Amido Winter 2015 crwdns2935289:0Cal Poly, Team 8-43, Amido Winter 2015crwdne2935289:0
CPSU-AMIDO-W15S8G43
crwdns2931471:04crwdne2931471:0
crwdns2935297:015crwdne2935297:0
crwdns2947412:03crwdne2947412:0
Worked great! Only caution that I would add is that on one of the machines I took apart, the adhesive strip behind the bottom of the bezel stuck to the bezel and not the circuit board behind. I had to carefully slide my finger between the adhesive strip and the bezel to separate them. Once the bezel was removed, I was able to stick the adhesive back down. I think this laptop may have been exposed to some sort of liquid, so this may not be a common issue.
My ZBook 15u g5 does not have any adhesive covers around the screen. How do I replace?
Hello can i replace my hd screen with another fhd one?