crwdns2933423:0crwdne2933423:0

HP Sprocket 2-in-1 Outer Casing Replacement

crwdns2942213:0crwdne2942213:0

  1. HP Sprocket 2-in-1 Outer Casing Replacement, Outer Casing: crwdns2935265:01crwdnd2935265:01crwdnd2935265:02crwdne2935265:0 HP Sprocket 2-in-1 Outer Casing Replacement, Outer Casing: crwdns2935265:01crwdnd2935265:02crwdnd2935265:02crwdne2935265:0
    • Remove the back cover and any printer paper inside the device.

  2. HP Sprocket 2-in-1 Outer Casing Replacement: crwdns2935265:02crwdnd2935265:01crwdnd2935265:02crwdne2935265:0 HP Sprocket 2-in-1 Outer Casing Replacement: crwdns2935265:02crwdnd2935265:02crwdnd2935265:02crwdne2935265:0
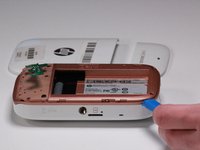
    • Using the Jimmy, slowly pry open the outer edge of the remaining white plastic on the back.

    • Remove the plastic from the device once it lifts out freely.

  3. HP Sprocket 2-in-1 Outer Casing Replacement: crwdns2935265:03crwdnd2935265:01crwdnd2935265:03crwdne2935265:0 HP Sprocket 2-in-1 Outer Casing Replacement: crwdns2935265:03crwdnd2935265:02crwdnd2935265:03crwdne2935265:0 HP Sprocket 2-in-1 Outer Casing Replacement: crwdns2935265:03crwdnd2935265:03crwdnd2935265:03crwdne2935265:0
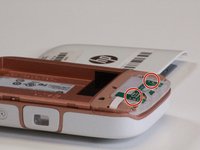
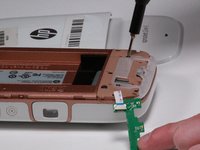
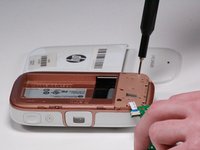
    • Remove two 2.5mm JIS #00 located on the small circuit board in view.

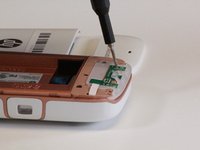
    • Use the Jimmy to remove the board after the screws have been removed.

    • Be careful not to crease or damage the ribbon cable.

  4. HP Sprocket 2-in-1 Outer Casing Replacement: crwdns2935265:04crwdnd2935265:01crwdnd2935265:03crwdne2935265:0 HP Sprocket 2-in-1 Outer Casing Replacement: crwdns2935265:04crwdnd2935265:02crwdnd2935265:03crwdne2935265:0 HP Sprocket 2-in-1 Outer Casing Replacement: crwdns2935265:04crwdnd2935265:03crwdnd2935265:03crwdne2935265:0
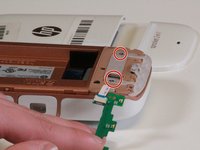
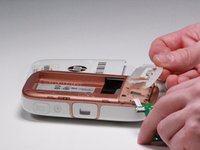
    • Remove two 2.5mm JIS #00 screws from the translucent plastic bracket.

    • One will be located beneath the ribbon cable.

    • Remove the translucent plastic bracket by hand.

  5. HP Sprocket 2-in-1 Outer Casing Replacement: crwdns2935265:05crwdnd2935265:01crwdnd2935265:02crwdne2935265:0 HP Sprocket 2-in-1 Outer Casing Replacement: crwdns2935265:05crwdnd2935265:02crwdnd2935265:02crwdne2935265:0
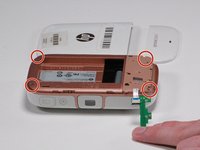
    • Remove four 2.5mm JIS #00 screws from the beige casing.

  6. HP Sprocket 2-in-1 Outer Casing Replacement: crwdns2935265:06crwdnd2935265:01crwdnd2935265:03crwdne2935265:0 HP Sprocket 2-in-1 Outer Casing Replacement: crwdns2935265:06crwdnd2935265:02crwdnd2935265:03crwdne2935265:0 HP Sprocket 2-in-1 Outer Casing Replacement: crwdns2935265:06crwdnd2935265:03crwdnd2935265:03crwdne2935265:0
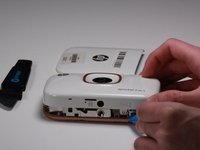
    • Use the iFixit opening tool to slowly work between the white and beige casing around the device.

    • Flip the device over and seperate the white casing from the rest of the device.

    • Be careful not to break the plastic while removing the case.

    • Gently remove the white casing as there is a ribbon cable connecting the two pieces.

  7. HP Sprocket 2-in-1 Outer Casing Replacement: crwdns2935265:07crwdnd2935265:01crwdnd2935265:01crwdne2935265:0
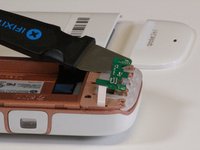
    • Carefully remove the ribbon cable that connects the flash to the outer casing.

crwdns2915888:0crwdne2915888:0

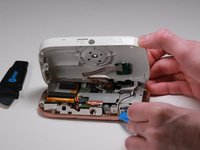
To reassemble your device, follow these instructions in reverse order.

Kevin Steward

crwdns2935283:002/05/19crwdne2935283:0

178 crwdns2915208:0crwdne2915208:0

crwdns2935295:0crwdne2935295:0

crwdns2915084:0crwdne2915084:0

University of Michigan, Team S1-G4, Li Winter 2019 crwdns2935289:0University of Michigan, Team S1-G4, Li Winter 2019crwdne2935289:0

UMIC-LI-W19S1G4

crwdns2931471:04crwdne2931471:0

crwdns2935297:010crwdne2935297:0

crwdns2944067:00crwdne2944067:0

crwdns2917038:0crwdne2917038:0

crwdns2936625:0crwdne2936625:0:

crwdns2936751:024crwdne2936751:0 4

crwdns2936753:07crwdne2936753:0 5

crwdns2936753:030crwdne2936753:0 14

crwdns2942667:0crwdne2942667:0 340