crwdns2915892:0crwdne2915892:0
If your HP Spectre x360 13-ac023dx laptop starts getting hot for long periods of time, abruptly shuts down on its own, and you hear its fan constantly working at full speed, you most likely are experiencing troubles with its cooling fan which requires replacement.
A functional cooling fan allows air to flow in your laptop to keep its internal components cool and from overheating. When your laptop overheats, it can physically damage your components. This may cause your laptop to stop working entirely. If you notice your laptop overheating frequently, use this guide to replace its cooling fan.
To avoid injury, make sure your device is turned off and cooled down before you begin.
crwdns2942213:0crwdne2942213:0
-
-
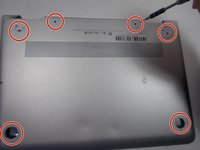
Flip the laptop over so the model sticker faces the ceiling.
-
-
-
Use a Torx #5 screwdriver to remove the six 3.5 mm screws holding the back cover to the laptop.
-
-
-
-
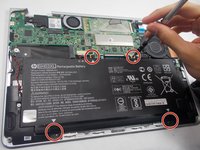
Use the Phillips #000 screwdriver to remove the four 3.5 mm screws holding the battery.
-
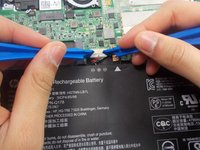
After removing the screws, detach the battery wire from the mother board with the iFixit opening tool.
-
Then, carefully lift the battery off with the iFixit opening tool.
-
-
-
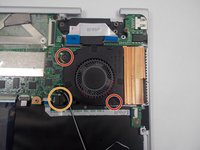
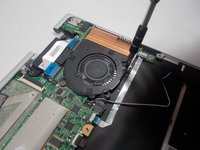
Locate the Cooling Fan in the device.
-
-
-
Use the Phillips #000 screwdriver to remove the 3mm screws holding the fan in place.
-
Remove the wires connecting to the motherboard, using the iFixit opening tool.
-


To reassemble your device, follow these instructions in reverse order.
crwdns2935287:0crwdne2935287:0

UMass Dartmouth, Team S1-G6, Botvin Fall 2019 crwdns2935289:0UMass Dartmouth, Team S1-G6, Botvin Fall 2019crwdne2935289:0
UMASSD-BOTVIN-F19S1G6
crwdns2931471:03crwdne2931471:0
crwdns2935297:011crwdne2935297:0