crwdns2915892:0crwdne2915892:0
This guide will give you step-by-step instructions on how to remove your touchpad. Make sure you have a clean, dry, uncluttered, and roomy work space that has good lighting before you start. Also, make sure that your touchpad actually needs to be replaced by consulting our troubleshooting guide.
crwdns2942213:0crwdne2942213:0
-
crwdns2935267:0crwdne2935267:0Magnetic Project Mat$19.95
-
Turn the computer upside down.
-
Use the T5 Torx Screwdriver to remove the eight 3.3 mm screws.
-
-
-
Use an opening tool to pry up and loosen the back case from the laptop.
-
Remove the back case.
-
-
-
Remove the four 2mm Phillips #00 screws securing the battery.
-
-
-
-
Peel off the adhesive on the left side of the battery holding the speaker wire down.
-
Move the battery slightly to gain access to the battery plug, located on the left edge of the battery.
-
Carefully unplug the battery by pulling the connector towards the battery.
-
Remove the battery.
-
-
-
Using a plastic opening tool, lift the locking bar on the trackpad ZIF connector.
-
Gently pull the cable out.
-
-
-
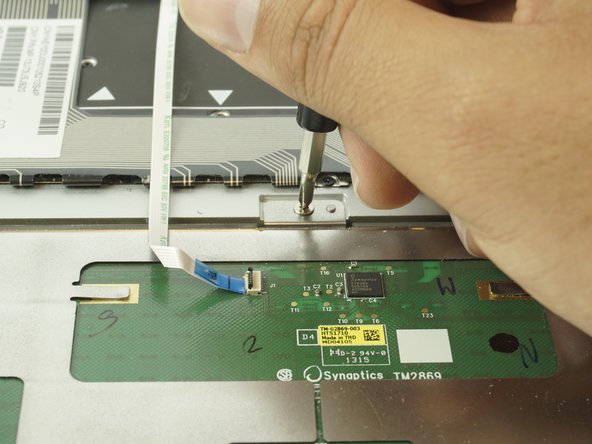
Using the PH00 Screwdriver, remove the five 2.0 mm screws indicated in the picture.
-
-
-
Using a plastic opening tool, carefully lift up on the lower center metal piece of the touchpad.
-
Using both hands, gently lift up on the touchpad until it is completely removed.
-


To reassemble your device, follow these instructions in reverse order.
To reassemble your device, follow these instructions in reverse order.
crwdns2935221:0crwdne2935221:0
crwdns2935229:02crwdne2935229:0

crwdns2915084:0crwdne2915084:0

USF Tampa, Team S5-G4, Passmore Spring 2018 crwdns2935289:0USF Tampa, Team S5-G4, Passmore Spring 2018crwdne2935289:0
USFT-PASSMORE-S18S5G4
crwdns2931471:03crwdne2931471:0
crwdns2935297:08crwdne2935297:0