crwdns2933423:0crwdne2933423:0

HP Spectre 13 4003dx x360 Display Assembly Replacement

crwdns2942213:0crwdne2942213:0

  1. HP Spectre 13 4003dx x360 Display Assembly Replacement, Battery: crwdns2935265:01crwdnd2935265:01crwdnd2935265:02crwdne2935265:0 HP Spectre 13 4003dx x360 Display Assembly Replacement, Battery: crwdns2935265:01crwdnd2935265:02crwdnd2935265:02crwdne2935265:0
    crwdns2935267:0crwdne2935267:0
    Magnetic Project Mat
    $19.95
    crwdns2942207:0crwdne2942207:0
    • Before you begin, be sure to turn off your laptop and discharge the battery down to 25%.

    • Turn the computer upside down.

    • Use the T5 Torx Screwdriver to remove the eight 3.3 mm screws.

    • Make sure to use the magnetic project mat to help you keep track of the small screws.

  2. HP Spectre 13 4003dx x360 Display Assembly Replacement: crwdns2935265:02crwdnd2935265:01crwdnd2935265:02crwdne2935265:0 HP Spectre 13 4003dx x360 Display Assembly Replacement: crwdns2935265:02crwdnd2935265:02crwdnd2935265:02crwdne2935265:0
    • Use an opening tool to pry up and loosen the back case from the laptop.

    • If the back case doesn't loosen easily, there may be screws hidden underneath the rubber feet. Carefully pry a foot up and remove any hidden screws.

    • Remove the back case.

  3. HP Spectre 13 4003dx x360 Display Assembly Replacement: crwdns2935265:03crwdnd2935265:01crwdnd2935265:02crwdne2935265:0 HP Spectre 13 4003dx x360 Display Assembly Replacement: crwdns2935265:03crwdnd2935265:02crwdnd2935265:02crwdne2935265:0
    • Remove the four 2mm Phillips #00 screws securing the battery.

    • The screw locations are marked by small white arrows on the battery.

  4. HP Spectre 13 4003dx x360 Display Assembly Replacement: crwdns2935265:04crwdnd2935265:01crwdnd2935265:03crwdne2935265:0 HP Spectre 13 4003dx x360 Display Assembly Replacement: crwdns2935265:04crwdnd2935265:02crwdnd2935265:03crwdne2935265:0 HP Spectre 13 4003dx x360 Display Assembly Replacement: crwdns2935265:04crwdnd2935265:03crwdnd2935265:03crwdne2935265:0
    • Peel off the adhesive on the left side of the battery holding the speaker wire down.

    • Move the battery slightly to gain access to the battery plug, located on the left edge of the battery.

    • Carefully unplug the battery by pulling the connector towards the battery.

    • Pull parallel to the battery, not straight up.

    • Remove the battery.

    • It is normal for your battery to flex and bend a bit where the wider section meets the narrower section.

  5. HP Spectre 13 4003dx x360 Display Assembly Replacement, Display Assembly: crwdns2935265:05crwdnd2935265:01crwdnd2935265:03crwdne2935265:0 HP Spectre 13 4003dx x360 Display Assembly Replacement, Display Assembly: crwdns2935265:05crwdnd2935265:02crwdnd2935265:03crwdne2935265:0 HP Spectre 13 4003dx x360 Display Assembly Replacement, Display Assembly: crwdns2935265:05crwdnd2935265:03crwdnd2935265:03crwdne2935265:0
    • Remove the two 2mm Phillips #00 screws from the fan.

    • Disconnect the fan from the motherboard.

  6. HP Spectre 13 4003dx x360 Display Assembly Replacement: crwdns2935265:06crwdnd2935265:01crwdnd2935265:03crwdne2935265:0 HP Spectre 13 4003dx x360 Display Assembly Replacement: crwdns2935265:06crwdnd2935265:02crwdnd2935265:03crwdne2935265:0 HP Spectre 13 4003dx x360 Display Assembly Replacement: crwdns2935265:06crwdnd2935265:03crwdnd2935265:03crwdne2935265:0
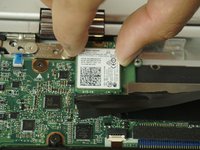
    • Using minimal force, disconnect both WiFi antennae cables.

    • Remove the single Phillips #00 screw that secures the WiFi card.

    • Slide the WiFi card up until it is completely removed.

    • Do not pull up on the wireless module while it is still seated. You may inadvertently damage it.

  7. HP Spectre 13 4003dx x360 Display Assembly Replacement: crwdns2935265:07crwdnd2935265:01crwdnd2935265:02crwdne2935265:0 HP Spectre 13 4003dx x360 Display Assembly Replacement: crwdns2935265:07crwdnd2935265:02crwdnd2935265:02crwdne2935265:0
    • Remove the four hinge screw with a Phillips #00 screwdriver.

  8. HP Spectre 13 4003dx x360 Display Assembly Replacement: crwdns2935265:08crwdnd2935265:01crwdnd2935265:02crwdne2935265:0 HP Spectre 13 4003dx x360 Display Assembly Replacement: crwdns2935265:08crwdnd2935265:02crwdnd2935265:02crwdne2935265:0
    • Grip the black tape and pull up to unplug.

  9. HP Spectre 13 4003dx x360 Display Assembly Replacement: crwdns2935265:09crwdnd2935265:01crwdnd2935265:01crwdne2935265:0
    • Separate the display assembly from the body of the computer.

    • As a result of the orientation of the hinges, you may need to rotate open the laptop to around 270 degrees to clear them.

crwdns2915888:0crwdne2915888:0

To reassemble your device, follow these instructions in reverse order.

crwdns2935229:07crwdne2935229:0

Ethan Plumer

crwdns2935283:001/29/18crwdne2935283:0

605 crwdns2915208:0crwdne2915208:0

crwdns2935297:02crwdne2935297:0

crwdns2915084:0crwdne2915084:0

USF Tampa, Team S5-G4, Passmore Spring 2018 crwdns2935289:0USF Tampa, Team S5-G4, Passmore Spring 2018crwdne2935289:0

USFT-PASSMORE-S18S5G4

crwdns2931471:03crwdne2931471:0

crwdns2935297:08crwdne2935297:0

crwdns2944067:02crwdne2944067:0

You forgot to mention that some people may have to remove the heatsink like I did before the screen will come off.

Wargaming Super Noob - crwdns2934203:0crwdne2934203:0

Anyone have any tips on reconnecting the WIFI antennas? I finally gave up and just decided to get a USB dongle… worked out well otherwise. I did also have to remove the heatsink like Wargaming Super Noob mentioned.

David Bergeron - crwdns2934203:0crwdne2934203:0

crwdns2917038:0crwdne2917038:0

crwdns2936625:0crwdne2936625:0:

crwdns2936751:024crwdne2936751:0 1

crwdns2936753:07crwdne2936753:0 14

crwdns2936753:030crwdne2936753:0 48

crwdns2942667:0crwdne2942667:0 9,744