crwdns2933423:0crwdne2933423:0
crwdns2947577:0crwdnd2947577:0crwdne2947577:0

HP ProOne 600 G1 Fan Replacement

crwdns2869540:0crwdne2869540:0: 2.9K

crwdns2959988:0crwdne2959988:0

crwdns2959990:0crwdne2959990:0
3
crwdns2959992:0crwdne2959992:0
29
crwdns2959994:0crwdne2959994:0
128
crwdns2959996:0crwdne2959996:0
2,877
crwdns2955950:0crwdne2955950:0: 0

crwdns2959998:0crwdne2959998:0

crwdns2960000:0crwdne2960000:0
crwdns2959984:0crwdne2959984:0: 0

crwdns2959956:0crwdne2959956:0

crwdns2959986:0crwdne2959986:0: 0

crwdns2959958:0crwdne2959958:0

crwdns2955944:0crwdne2955944:0: crwdns2931287:010crwdne2931287:0
crwdns2955970:0crwdne2955970:0: crwdns2937801:0crwdne2937801:0
HP ProOne 600 G1 Fan Replacement

crwdns2915892:0crwdne2915892:0

crwdns2959928:0crwdne2959928:0 ↓

If your computer frequently gets very hot and overheats you may need to replace the fan. Before performing any work remember to completely turn off your computer and disconnect it from any power source.

crwdns2959930:0crwdne2959930:0

crwdns2943213:0crwdne2943213:0

crwdns2943215:0crwdne2943215:0

    1. HP ProOne 600 G1 Fan Replacement, Back Removal: crwdns2935265:01crwdnd2935265:01crwdnd2935265:02crwdne2935265:0 HP ProOne 600 G1 Fan Replacement, Back Removal: crwdns2935265:01crwdnd2935265:02crwdnd2935265:02crwdne2935265:0
      • Push the unlock tabs on the back of the monitor in and towards each other while sliding the back cover up.

      crwdns2952109:0crwdne2952109:0

      crwdns2917038:0crwdne2917038:0

    2. HP ProOne 600 G1 Fan Replacement: crwdns2935265:02crwdnd2935265:01crwdnd2935265:02crwdne2935265:0 HP ProOne 600 G1 Fan Replacement: crwdns2935265:02crwdnd2935265:02crwdnd2935265:02crwdne2935265:0
      • Loosen the two 1/2" screws , with the T15 Torx Screwdriver, on each side of the stand. Remove stand.

      crwdns2952109:0crwdne2952109:0

      crwdns2917038:0crwdne2917038:0

    3. HP ProOne 600 G1 Fan Replacement: crwdns2935265:03crwdnd2935265:01crwdnd2935265:01crwdne2935265:0
      • Take out the single 3/8" screw, with the T15 Torx Screwdriver, from the middle of the backplate.

      crwdns2952109:0crwdne2952109:0

      crwdns2917038:0crwdne2917038:0

    4. HP ProOne 600 G1 Fan Replacement: crwdns2935265:04crwdnd2935265:01crwdnd2935265:01crwdne2935265:0
      • Remove the backplate by pulling it back towards you.

      • Small plastic tabs hold in the backplate, pull these up to remove it.

      crwdns2952109:0crwdne2952109:0

      crwdns2917038:0crwdne2917038:0

    1. HP ProOne 600 G1 Fan Replacement, Fan: crwdns2935265:05crwdnd2935265:01crwdnd2935265:03crwdne2935265:0 HP ProOne 600 G1 Fan Replacement, Fan: crwdns2935265:05crwdnd2935265:02crwdnd2935265:03crwdne2935265:0 HP ProOne 600 G1 Fan Replacement, Fan: crwdns2935265:05crwdnd2935265:03crwdnd2935265:03crwdne2935265:0
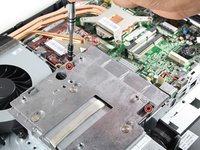
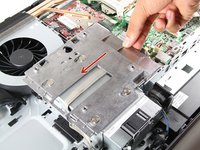
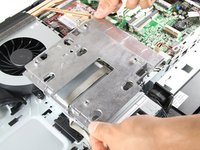
      • Remove both 3/8" screws using the T15 Torx Screwdriver from the metal plate, and slide the plate to the left.

      crwdns2952109:0crwdne2952109:0

      crwdns2917038:0crwdne2917038:0

    2. HP ProOne 600 G1 Fan Replacement: crwdns2935265:06crwdnd2935265:01crwdnd2935265:03crwdne2935265:0 HP ProOne 600 G1 Fan Replacement: crwdns2935265:06crwdnd2935265:02crwdnd2935265:03crwdne2935265:0 HP ProOne 600 G1 Fan Replacement: crwdns2935265:06crwdnd2935265:03crwdnd2935265:03crwdne2935265:0
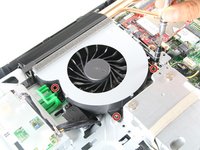
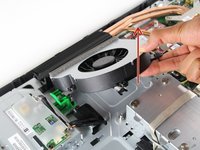
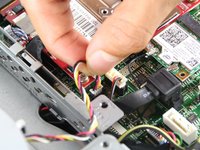
      • Unscrew three surrounding 1/4" screws, with the T15 Torx Screwdriver. Pull out the fan and attached wires.

      crwdns2952109:0crwdne2952109:0

      crwdns2917038:0crwdne2917038:0

crwdns2915888:0crwdne2915888:0

To reassemble your device, follow these instructions in reverse order.

crwdns2935221:0crwdne2935221:0

Victor Chacon

crwdns2935283:010/01/15crwdne2935283:0

116 crwdns2915208:0crwdne2915208:0

crwdns2935295:0crwdne2935295:0

crwdns2935287:0crwdne2935287:0

Cal Poly, Team 1-20, Maness Fall 2015 crwdns2935289:0Cal Poly, Team 1-20, Maness Fall 2015crwdne2935289:0

CPSU-MANESS-F15S1G20

crwdns2931471:04crwdne2931471:0

crwdns2935297:072crwdne2935297:0

crwdns2947412:00crwdne2947412:0

crwdns2917038:0crwdne2917038:0

crwdns2936625:0crwdne2936625:0:

crwdns2936751:024crwdne2936751:0 3

crwdns2936753:07crwdne2936753:0 29

crwdns2936753:030crwdne2936753:0 128

crwdns2959996:0crwdne2959996:0 2,877