crwdns2915892:0crwdne2915892:0
Hard Drives are main components of your laptop. A bad hard drive can affect the speed of your computer. If you are experiencing slow loading times when opening programs or saved files, you should replace your hard drive.
crwdns2942213:0crwdne2942213:0
-
-
Flip the device over, so that the bottom cover is exposed.
-
Slide the black locking mechanism into its unlock position.
-
-
-
After unlocking the mechanism, slide the battery out of its compartment.
-
-
-
-
With the battery removed, the back cover can be taken off with your hand.
-
-
-
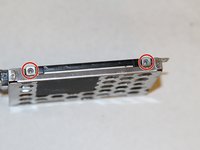
Use your Phillips 0 screwdriver to remove the four 2.5mm Phillips screws which hold the hard drive in place. You can see the 4 screws in the picture circled in red.
-
-
-
To disconnect the hard drive from the motherboard, pull the black tab as seen in the picture.
This step #5 is completely wrong! You have to detach the SATA-connector from the HDD/SSD, NOT from the Mainboard! If you first execeute step #6 you can disconnect the SATA-connector from the HDD/SSD much easier because the metal cage will not block the connector anymore.
-
-
-
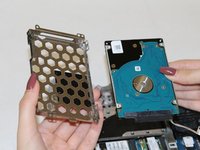
After removing the enclosure from the device, use your Phillips 0 screwdriver to remove four 3mm Phillips screws. There are two screws on each side of the hard drive enclosure.
-


To reassemble your device, follow these instructions in reverse order.
To reassemble your device, follow these instructions in reverse order.
crwdns2935221:0crwdne2935221:0
crwdns2935227:0crwdne2935227:0
crwdns2915084:0crwdne2915084:0

UC Davis, Team S7-G1, Lore Fall 2018 crwdns2935289:0UC Davis, Team S7-G1, Lore Fall 2018crwdne2935289:0
UCD-LORE-F18S7G1
crwdns2931471:03crwdne2931471:0
crwdns2935297:04crwdne2935297:0
crwdns2947410:01crwdne2947410:0
Schritt 5 ist leider komplett falsch. Der SATA-Stecker muss von der Festplatte/SSD gezogen werden. Nicht irgendein Kabel vom Motherboard. Den Stecker zieht man einfacher von der HDD/SSD weg, wenn man zuerst Schritt #6 ausführt, dann ist die Metall-Lasche am Kopf des Steckers nicht mehr im Weg.