crwdns2915892:0crwdne2915892:0
If you need to replace hard drive in your HP Pavilion g7-1150us use this guide. The hard drive holds all the information stored on your laptop so if you have error saying your hard drive has been corrupted try replacing it. You will need an iFixit opening tool and Phillips #0 screwdriver. No steps are difficult but make sure to remove the battery first so you don’t hurt your laptop or yourself.
crwdns2942213:0crwdne2942213:0
-
-
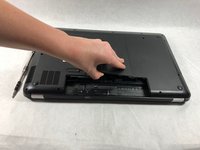
Slide the battery removal switch towards the center of the laptop until the battery pops out.
-
-
-
Remove the battery from the computer.
-
-
-
Unscrew the two 4mm Phillips #0 screws found in the surface panel.
-
-
-
-
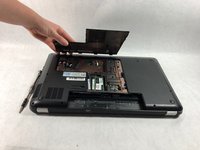
Using the spudger, pry the surface panel off starting from the side where the battery was located.
-
Pry the remainder of the panel off by sliding the spudger underneath the panel and gently lifting.
-
-
-
Lift the pried surface panel off of the computer.
-
-
-
Grab the hard drive gently on either side. The left side is where the hard drive is connected to the laptop.
-
-
-
Gently pull the hard drive to the right away from the connector. When fully disconnected you have safely removed the hard drive!
-


To reassemble your device, follow these instructions in reverse order.
To reassemble your device, follow these instructions in reverse order.
crwdns2935221:0crwdne2935221:0
crwdns2935229:02crwdne2935229:0
crwdns2915084:0crwdne2915084:0

UMass Dartmouth, Team S6-G3, Peak Spring 2019 crwdns2935289:0UMass Dartmouth, Team S6-G3, Peak Spring 2019crwdne2935289:0
UMASSD-PEAK-S19S6G3
crwdns2931471:03crwdne2931471:0
crwdns2935297:05crwdne2935297:0