crwdns2915892:0crwdne2915892:0
Please note that this device did not have a physical hard drive to work with, so some photos are missing.
crwdns2942213:0crwdne2942213:0
-
-
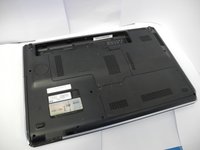
Place the laptop upside down on a flat surface so that the bottom is facing up.
-
-
-
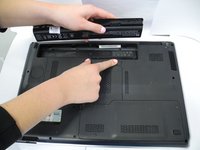
Slide the battery latch to the left to release the battery.
-
-
-
Carefully pull out the battery while holding the latch to the open position with your finger.
-
-
-
-
Loosen the four screws that secure the hard drive panel with a Phillips head screwdriver.
-
-
-
Lift the drive cover to expose the hard drive.
-
-
-
Gently tug on the black tabs located on each end of the hard drive in order to loosen the hard drive from the motherboard.
-
-
-
Separate the hard drive from the cable by firmly gripping the hard drive and the black plug.
-
-
-
Remove the four Phillips screws that secure the hard drive to its carrier.
-
-
-
Lift and remove the hard drive from the metal surrounding its perimeter.
-


To reassemble your device, follow these instructions in reverse order.
crwdns2935221:0crwdne2935221:0
crwdns2935229:03crwdne2935229:0
crwdns2935287:0crwdne2935287:0

Ohio State, Team 1-5, Wilder Spring 2017 crwdns2935289:0Ohio State, Team 1-5, Wilder Spring 2017crwdne2935289:0
OSU-WILDER-S17S1G5
crwdns2931471:04crwdne2931471:0
crwdns2935297:05crwdne2935297:0