crwdns2933423:0crwdne2933423:0

HP Pavilion dv6000 Optical Drive Assembly Replacement

crwdns2942213:0crwdne2942213:0

  1. HP Pavilion dv6000 Optical Drive Assembly Replacement, Optical Drive: crwdns2935265:01crwdnd2935265:01crwdnd2935265:01crwdne2935265:0
    • Before proceeding, it is recommended to remove the battery to prevent any electrical damage to components.

    • Remove the single 5.6 mm Phillips screw securing the optical drive to the lower case.

  2. HP Pavilion dv6000 Optical Drive Assembly Replacement: crwdns2935265:02crwdnd2935265:01crwdnd2935265:01crwdne2935265:0
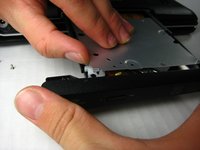
    • Insert the tip of an unrolled paper clip into the small hole located on the side of the optical drive.

    • The tray will partially pop out of the laptop.

    • Firmly pull the drive straight away from the laptop.

    • While pulling the drive out, be careful not to bend the sliding rails on both sides of the optical drive.

    • At this point you can remove the entire optical drive, or you can continue to disassemble the optical drive assembly.

  3. HP Pavilion dv6000 Optical Drive Assembly Replacement, Optical Drive Assembly: crwdns2935265:03crwdnd2935265:01crwdnd2935265:02crwdne2935265:0 HP Pavilion dv6000 Optical Drive Assembly Replacement, Optical Drive Assembly: crwdns2935265:03crwdnd2935265:02crwdnd2935265:02crwdne2935265:0
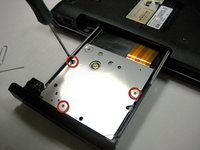
    • Remove the three 3.2 mm screws securing the top plate of the optical drive.

    • Lift and remove the top plate up off the optical drive.

  4. HP Pavilion dv6000 Optical Drive Assembly Replacement: crwdns2935265:04crwdnd2935265:01crwdnd2935265:01crwdne2935265:0
    • Lift and remove the optical drive assembly.

    • It may be helpful to gently "rock" the drive assembly side to side to dislodge it from its recess.

    • For the rest of the guide, be careful to not touch any of the circuitry on the board as well as the laser lens!

  5. HP Pavilion dv6000 Optical Drive Assembly Replacement: crwdns2935265:05crwdnd2935265:01crwdnd2935265:01crwdne2935265:0
    • Flip the drive over.

    • Pull the small ribbon cable straight away from its socket on the optical drive assembly board.

  6. HP Pavilion dv6000 Optical Drive Assembly Replacement: crwdns2935265:06crwdnd2935265:01crwdnd2935265:01crwdne2935265:0
    • Use your fingernail to flip up the cable retaining flap on the ZIF socket for the larger ribbon cable.

    • Pull the larger ribbon cable straight out of its socket on the optical drive assembly board.

  7. HP Pavilion dv6000 Optical Drive Assembly Replacement: crwdns2935265:07crwdnd2935265:01crwdnd2935265:01crwdne2935265:0
    • Lift and remove the optical drive assembly from the optical drive framework.

    • Optical drive assembly remains.

crwdns2915888:0crwdne2915888:0

To reassemble your device, follow these instructions in reverse order.

crwdns2935229:02crwdne2935229:0

Ben Hirsch

crwdns2935283:010/05/10crwdne2935283:0

3,826 crwdns2915208:0crwdne2915208:0

crwdns2935297:010crwdne2935297:0

crwdns2915084:0crwdne2915084:0

Cal Poly, Team 21-33, Regan Fall 2010 crwdns2935289:0Cal Poly, Team 21-33, Regan Fall 2010crwdne2935289:0

CPSU-REGAN-F10S21G33

crwdns2931471:04crwdne2931471:0

crwdns2935297:012crwdne2935297:0

crwdns2944067:00crwdne2944067:0

crwdns2917038:0crwdne2917038:0

crwdns2936625:0crwdne2936625:0:

crwdns2936751:024crwdne2936751:0 0

crwdns2936753:07crwdne2936753:0 0

crwdns2936753:030crwdne2936753:0 1

crwdns2942667:0crwdne2942667:0 6,862