crwdns2933423:0crwdne2933423:0

HP Pavilion dv6-6180us Motherboard Replacement

crwdns2942213:0crwdne2942213:0

  1. HP Pavilion dv6-6180us Motherboard Replacement, Hard Drive: crwdns2935265:01crwdnd2935265:01crwdnd2935265:01crwdne2935265:0
    • Turn off and unplug the device before starting.

    • Flip your device over so the bottom panel is facing up.

  2. HP Pavilion dv6-6180us Motherboard Replacement: crwdns2935265:02crwdnd2935265:01crwdnd2935265:01crwdne2935265:0
    • Slide the lock switch to the right.

    • The panel will pop open at the top corner.

  3. HP Pavilion dv6-6180us Motherboard Replacement: crwdns2935265:03crwdnd2935265:01crwdnd2935265:01crwdne2935265:0
    • Use the plastic opening tool to remove the back panel.

    • Some force may be required to remove the panel from the case. Use caution when prying to avoid breaking the panel or the plastic tabs securing it in place.

  4. HP Pavilion dv6-6180us Motherboard Replacement: crwdns2935265:04crwdnd2935265:01crwdnd2935265:01crwdne2935265:0
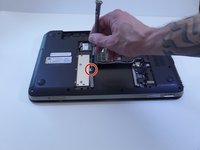
    • Use the PH 1 screwdriver to remove the four 3.5 mm screws securing the hard drive.

  5. HP Pavilion dv6-6180us Motherboard Replacement: crwdns2935265:05crwdnd2935265:01crwdnd2935265:01crwdne2935265:0
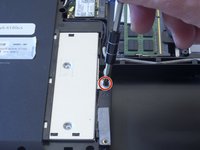
    • Lift the corner bracket to remove the hard drive.

  6. HP Pavilion dv6-6180us Motherboard Replacement: crwdns2935265:06crwdnd2935265:01crwdnd2935265:01crwdne2935265:0
    • Unplug the hard drive wire to detach the hard drive.

  7. HP Pavilion dv6-6180us Motherboard Replacement, Motherboard: crwdns2935265:07crwdnd2935265:01crwdnd2935265:02crwdne2935265:0 HP Pavilion dv6-6180us Motherboard Replacement, Motherboard: crwdns2935265:07crwdnd2935265:02crwdnd2935265:02crwdne2935265:0
    • Remove a 3.5 mm screw that is securing DVD player with screwdriver PH1.

  8. HP Pavilion dv6-6180us Motherboard Replacement: crwdns2935265:08crwdnd2935265:01crwdnd2935265:01crwdne2935265:0
    • Slide DVD player to the left and pull to remove completely.

  9. HP Pavilion dv6-6180us Motherboard Replacement: crwdns2935265:09crwdnd2935265:01crwdnd2935265:01crwdne2935265:0
    • Unscrew four 3.5 mm screws from the inside of the battery compartment with PH 1 screwdriver.

    • Unscrew nine 5 mm screws with PH 1 screwdriver.

    • Unscrew four 4 mm screws with PH 1 screwdriver.

  10. HP Pavilion dv6-6180us Motherboard Replacement: crwdns2935265:010crwdnd2935265:01crwdnd2935265:02crwdne2935265:0 HP Pavilion dv6-6180us Motherboard Replacement: crwdns2935265:010crwdnd2935265:02crwdnd2935265:02crwdne2935265:0
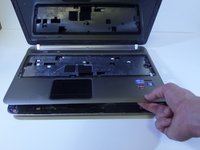
    • Flip side up and open laptop.

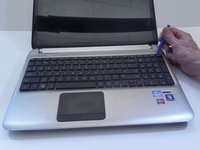
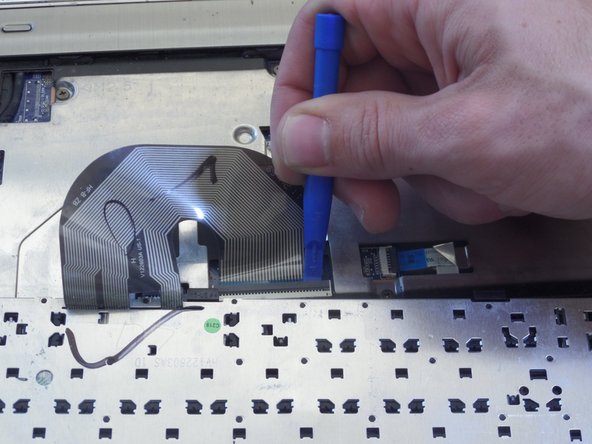
    • Pry open the keyboard using a plastic opening tool starting from the top.

    • Lift up keyboard gently because a silver ribbon is still attaching it to the laptop.

  11. HP Pavilion dv6-6180us Motherboard Replacement: crwdns2935265:011crwdnd2935265:01crwdnd2935265:03crwdne2935265:0 HP Pavilion dv6-6180us Motherboard Replacement: crwdns2935265:011crwdnd2935265:02crwdnd2935265:03crwdne2935265:0 HP Pavilion dv6-6180us Motherboard Replacement: crwdns2935265:011crwdnd2935265:03crwdnd2935265:03crwdne2935265:0
    • Place keyboard upside down.

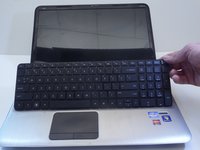
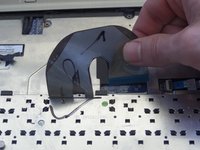
    • Lift up plastic cover over keyboard connector cable.

    • Pull ribbon cable up away from keyboard to completely remove.

  12. HP Pavilion dv6-6180us Motherboard Replacement: crwdns2935265:012crwdnd2935265:01crwdnd2935265:01crwdne2935265:0
    • Remove seven 4mm pannel screws with PH 1 screwdriver.

  13. HP Pavilion dv6-6180us Motherboard Replacement: crwdns2935265:013crwdnd2935265:01crwdnd2935265:01crwdne2935265:0
    • Place the computer on its side

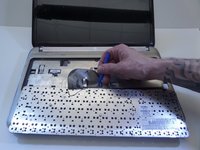
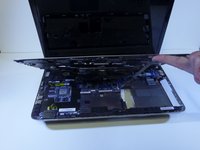
    • Separate top panel from bottom frame.

  14. HP Pavilion dv6-6180us Motherboard Replacement: crwdns2935265:014crwdnd2935265:01crwdnd2935265:02crwdne2935265:0 HP Pavilion dv6-6180us Motherboard Replacement: crwdns2935265:014crwdnd2935265:02crwdnd2935265:02crwdne2935265:0
    • Pop open rest palm assembly.

  15. HP Pavilion dv6-6180us Motherboard Replacement: crwdns2935265:015crwdnd2935265:01crwdnd2935265:01crwdne2935265:0
    • Pull ribbon to detach from bottom panel.

  16. HP Pavilion dv6-6180us Motherboard Replacement: crwdns2935265:016crwdnd2935265:01crwdnd2935265:01crwdne2935265:0
    • Remove two 5mm screws securing fan, using PH1 screwdriver.

  17. HP Pavilion dv6-6180us Motherboard Replacement: crwdns2935265:017crwdnd2935265:01crwdnd2935265:01crwdne2935265:0
    • Flip laptop over.

    • Remove two 4mm screws securing antenna using PH 1 screwdriver.

    • Pull antenna to the right to remove.

  18. HP Pavilion dv6-6180us Motherboard Replacement: crwdns2935265:018crwdnd2935265:01crwdnd2935265:01crwdne2935265:0
    • Flip laptop side up.

    • Pull off yellow insulating tape.

  19. HP Pavilion dv6-6180us Motherboard Replacement: crwdns2935265:019crwdnd2935265:01crwdnd2935265:02crwdne2935265:0 HP Pavilion dv6-6180us Motherboard Replacement: crwdns2935265:019crwdnd2935265:02crwdnd2935265:02crwdne2935265:0
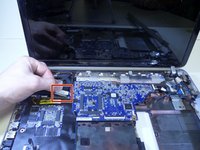
    • Grab tab on left top corner and remove black wire.

    • Remove white input attachment.

  20. HP Pavilion dv6-6180us Motherboard Replacement: crwdns2935265:020crwdnd2935265:01crwdnd2935265:01crwdne2935265:0
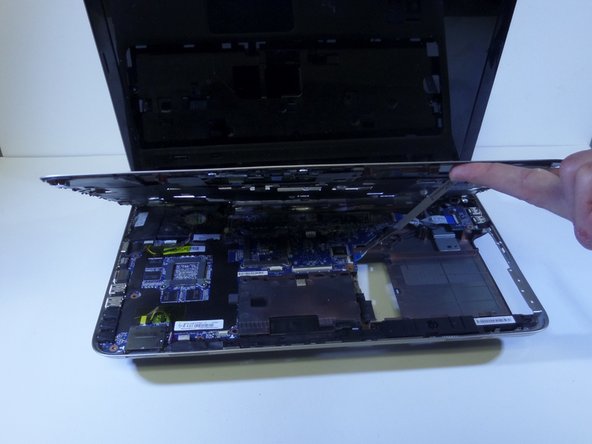
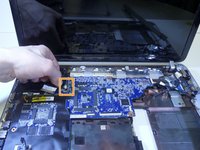
    • Hold the motherboard and pull to the right.

    • The plugs on the left may be difficult to snap out.

  21. HP Pavilion dv6-6180us Motherboard Replacement: crwdns2935265:021crwdnd2935265:01crwdnd2935265:01crwdne2935265:0
    • Remove entire motherboard.

crwdns2915888:0crwdne2915888:0

To reassemble your device, follow these instructions in reverse order.

crwdns2935229:010crwdne2935229:0

michelle pulido

crwdns2935283:009/15/16crwdne2935283:0

839 crwdns2915208:0crwdne2915208:0

crwdns2935297:04crwdne2935297:0

crwdns2915084:0crwdne2915084:0

CSU Fullerton, Team 1-2, Bruce Fall 2016 crwdns2935289:0CSU Fullerton, Team 1-2, Bruce Fall 2016crwdne2935289:0

CSUF-BRUCE-F16S1G2

crwdns2931471:04crwdne2931471:0

crwdns2935297:04crwdne2935297:0

crwdns2944067:05crwdne2944067:0

Nothing, thank you very much, it is a pleasure to help more people

Tomas - crwdns2934203:0crwdne2934203:0

very Excellent tutorial …… Thank you

Hussein Knani - crwdns2934203:0crwdne2934203:0

Excellent tutorial …. thank you

Hussein Knani - crwdns2934203:0crwdne2934203:0

Nothing, thank you very much, it is a pleasure to help more people

Tomas -

crwdns2917038:0crwdne2917038:0

crwdns2936625:0crwdne2936625:0:

crwdns2936751:024crwdne2936751:0 0

crwdns2936753:07crwdne2936753:0 1

crwdns2936753:030crwdne2936753:0 17

crwdns2942667:0crwdne2942667:0 5,190