crwdns2933423:0crwdne2933423:0

HP Pavilion dv6-6117dx RAM Replacement

crwdns2942213:0crwdne2942213:0

  1. HP Pavilion dv6-6117dx RAM Replacement, RAM: crwdns2935265:01crwdnd2935265:01crwdnd2935265:02crwdne2935265:0 HP Pavilion dv6-6117dx RAM Replacement, RAM: crwdns2935265:01crwdnd2935265:02crwdnd2935265:02crwdne2935265:0
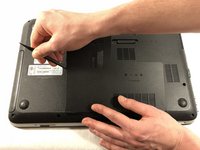
    • Begin removing the bottom cover by sliding the battery removal slider to the right to pop off the top of the cover.

  2. HP Pavilion dv6-6117dx RAM Replacement: crwdns2935265:02crwdnd2935265:01crwdnd2935265:02crwdne2935265:0 HP Pavilion dv6-6117dx RAM Replacement: crwdns2935265:02crwdnd2935265:02crwdnd2935265:02crwdne2935265:0
    • Slide a black spudger under the top of the cover to loosen the clips underneath.

  3. HP Pavilion dv6-6117dx RAM Replacement: crwdns2935265:03crwdnd2935265:01crwdnd2935265:03crwdne2935265:0 HP Pavilion dv6-6117dx RAM Replacement: crwdns2935265:03crwdnd2935265:02crwdnd2935265:03crwdne2935265:0 HP Pavilion dv6-6117dx RAM Replacement: crwdns2935265:03crwdnd2935265:03crwdnd2935265:03crwdne2935265:0
    • Slide the spudger down the left side of the cover to loosen the clips.

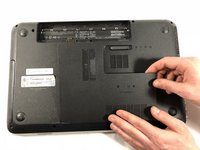
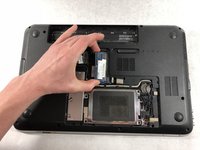
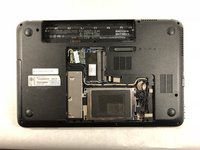
    • After the left side is loose, the rest of the cover should pop off, and you can remove it with your hands.

    • When reassembling, insert the bottom of the cover first, and then firmly press along the edges from bottom to top to secure it in place.

  4. HP Pavilion dv6-6117dx RAM Replacement: crwdns2935265:04crwdnd2935265:01crwdnd2935265:02crwdne2935265:0 HP Pavilion dv6-6117dx RAM Replacement: crwdns2935265:04crwdnd2935265:02crwdnd2935265:02crwdne2935265:0
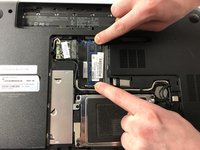
    • Push the tabs on both sides away from each other to free the RAM, which will raise to a 45º angle.

  5. HP Pavilion dv6-6117dx RAM Replacement: crwdns2935265:05crwdnd2935265:01crwdnd2935265:02crwdne2935265:0 HP Pavilion dv6-6117dx RAM Replacement: crwdns2935265:05crwdnd2935265:02crwdnd2935265:02crwdne2935265:0
    • Always handle RAM by the edges to avoid damaging the part.

    • Remove the RAM by grabbing it by the sides and pulling out at a 45º angle.

    • When inserting the new stick of RAM, you should insert it at this same angle.

crwdns2915888:0crwdne2915888:0

To reassemble your device, follow these instructions in reverse order.

Joshua Holme

crwdns2935283:003/19/18crwdne2935283:0

765 crwdns2915208:0crwdne2915208:0

crwdns2935297:04crwdne2935297:0

crwdns2915084:0crwdne2915084:0

UMass Dartmouth, Team S6-G3, Bernier Spring 2018 crwdns2935289:0UMass Dartmouth, Team S6-G3, Bernier Spring 2018crwdne2935289:0

UMASSD-BERNIER-S18S6G3

crwdns2931471:03crwdne2931471:0

crwdns2935297:04crwdne2935297:0

crwdns2944067:00crwdne2944067:0

crwdns2917038:0crwdne2917038:0

crwdns2936625:0crwdne2936625:0:

crwdns2936751:024crwdne2936751:0 0

crwdns2936753:07crwdne2936753:0 12

crwdns2936753:030crwdne2936753:0 27

crwdns2942667:0crwdne2942667:0 713