crwdns2915892:0crwdne2915892:0
This model's RAM is located in an unusual place, underneath the motherboard. The motherboard must first be carefully lifted before you can access the RAM.
crwdns2942213:0crwdne2942213:0
-
-
Slide the black battery latches inward to remove the battery.
-
-
-
Pull the battery out towards you while your fingers are still holding the latches in place.
-
-
-
Remove one 7 mm screw with a Phillips #1 screwdriver.
-
-
-
Use a metal spudger to push the CD drive out of its slot for removal.
-
-
-
Remove fifteen 7 mm screws with a Phillips #1 screwdriver.
-
-
-
Remove the thin plastic cover using the flat metal spudger to expose another screw.
-
Remove one 7 mm screw with a Phillips #0 screwdriver.
-
-
-
Use a metal spudger to remove the rubber "feet" to expose two screws.
-
-
-
Underneath each rubber foot, there is a screw.
-
Use the Phillips #1 screwdriver to remove a 4.8 mm screw on each side.
-
-
-
-
Remove the two black end caps to expose more screws.
-
-
-
Remove the following six screws with a Phillips #1 screwdriver:
-
Two 7 mm screws.
-
Two 7 mm screws.
-
Two 4.8 mm screws.
-
-
-
Remove two 2.4 mm broadhead screws from the CD Drive bay with a Phillips #0 screwdriver.
-
-
-
Flip the laptop back over. Then, with the laptop open, move the plastic prying tool around the top cover to pry it from the enclosure.
-
-
-
Partially lift the top cover from the enclosure.
-
-
-
Remove the ribbon connecting the power button to the motherboard.
-
-
-
Remove the ribbon connecting the mousepad to the motherboard.
-
-
-
Remove the ribbon connecting the keyboard to the motherboard.
-
You may now fully lift the front panel from the rest of the laptop.
-
-
-
Remove four 5.6 mm screws with a Phillips 1 screwdriver.
-
Remove one 3 mm screw with a Phillips 1 screwdriver.
-
-
-
Remove the ribbon connecting the optical drive bay to the motherboard.
-
-
-
Remove the ribbon connecting the hard drive to the motherboard.
-
-
-
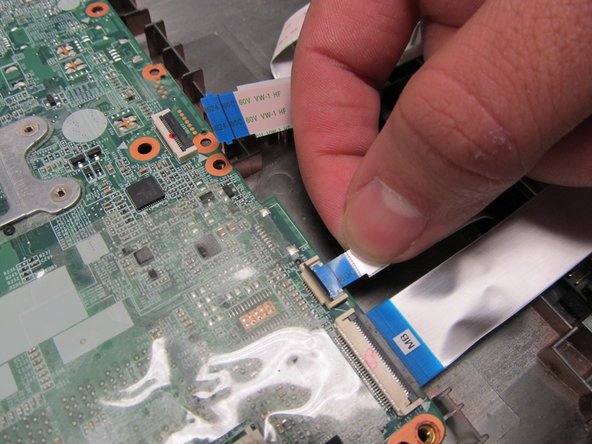
Disconnect the ribbon from the motherboard that passes over the hard drive.
-
-
-
Carefully lift the motherboard and lean it against the screen.
-
-
-
The motherboard has two slots for the RAM. The process for removing each one is the same
-
Pull the metal tabs away from the RAM.
-
-
-
Gently remove the RAM from its slot.
-


To reassemble your device, follow these instructions in reverse order.
To reassemble your device, follow these instructions in reverse order.
crwdns2935221:0crwdne2935221:0
crwdns2935229:04crwdne2935229:0
crwdns2915084:0crwdne2915084:0

UC Davis, Team 1-4, Oliver Fall 2016 crwdns2935289:0UC Davis, Team 1-4, Oliver Fall 2016crwdne2935289:0
UCD-OLIVER-F16S1G4
crwdns2931471:04crwdne2931471:0
crwdns2935297:08crwdne2935297:0