crwdns2915892:0crwdne2915892:0
If you are experiencing issues with your HP Pavilion’s audio system, such as audio cutting in and out, distorted audio, or even no audio at all, you might want to consider replacing the speaker system found inside the laptop. The process of replacing the speakers is simple and has very few requirements. One of the requirements is knowledge of how to use basic tools such as a Philips head screw driver. Replacing the speakers requires the removal of many small screws and other small components so the capability of organizing these parts and pieces is every important to ensure you do not misplace anything important and your computer goes back together properly. It is also suggested that the person replacing the speakers wear a static discharge bracelet around their wrist or ankle to reduce the risk of passing a charge to certain computer elements susceptible to these charges. For a relatively small amount of money and ten minutes of effort, you can make your laptop sound like it’s brand new.
crwdns2942213:0crwdne2942213:0
-
-
Slide the battery lock latch on the left to unlock. Slide from left to right to unlock.
-
-
-
Slide the battery release latch on the right with continuous force from right to left.
-
Once battery pops, you may release latch.
-
-
-
Grab the battery, rotating upwards and away from you. This will remove the battery.
-
-
-
Flip computer over so that the bottom is facing the ceiling and the hinges are farthest from you.
-
-
-
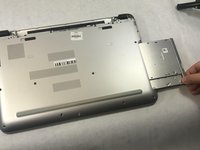
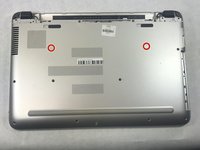
Using the Phillips #000 screwdriver, remove the 7 mm screw on the middle right.
-
-
-
Slide the drive out from the right side of the device.
-
-
-
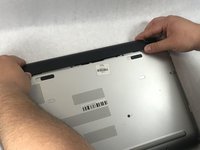
Using the Phillips #1 screwdriver, remove the two 12mm screws located on the hinge covers.
-
-
-
-
Lift the corner covers off of the computer using a prying tool.
-
-
-
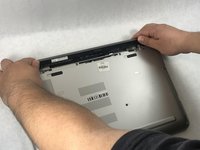
Remove the six 6.5mm screws using a Phillips #1 screwdriver that are located near the top of the laptop.
-
-
-
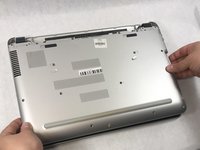
Remove the remaining seven 6.5mm screws using a Phillips #1 screwdriver that are securing the back cover.
-
-
-
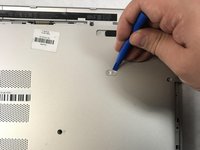
Use the Phillips #0 screwdriver to remove the two 2mm screws.
-
-
-
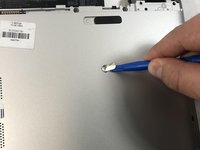
Use prying tools to pry the covers off of the screwholes.
-
Using the Phillips #1 screwdriver, remove the two 6.5mm screws.
-
-
-
Flip computer over and open so that the screen is facing you.
-
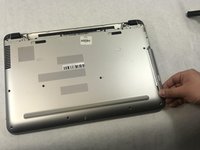
Starting at the bottom right corner, insert the prying tool and lift upwards to loosen the back panel.
-
Continue down all sides and corners of the device.
-
-
-
Flip laptop back over so that the bottom is facing up
-
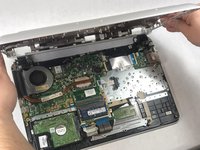
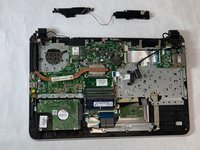
After all sides are loosened, remove the back panel from the device.
-
-
-
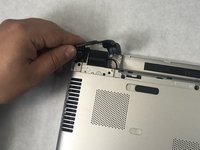
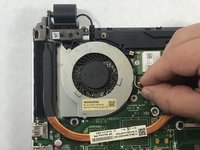
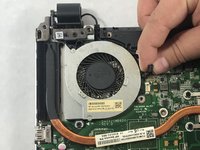
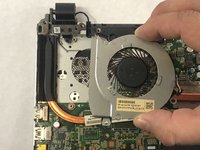
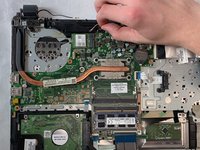
Disconnect fan cable from the motherboard.
-
-
-
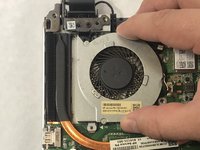
Remove both 3mm screws connected to the fan using Phillips #1 screwdriver.
-
-
-
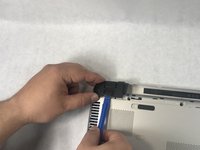
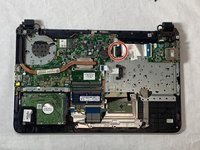
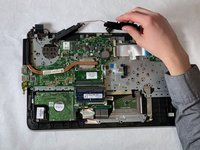
Disconnect the wiring harness that is routed through the speaker from the motherboard.
-
Remove the wiring harness from the groove in the speaker.
-
-
crwdns2935267:0crwdne2935267:0Tweezers$4.99
-
Disconnect the speaker wiring from the motherboard.
-


To reassemble your device, follow these instructions in reverse order.
To reassemble your device, follow these instructions in reverse order.
crwdns2915084:0crwdne2915084:0

IUPUI, Team S2-G1, Stella Fall 2019 crwdns2935289:0IUPUI, Team S2-G1, Stella Fall 2019crwdne2935289:0
IUPUI-STELLA-F19S2G1
crwdns2931471:04crwdne2931471:0
crwdns2935297:02crwdne2935297:0