crwdns2915892:0crwdne2915892:0
The motherboard should be replaced if the laptop will not turn on with the charger plugged in. To avoid damaging electronic components, use a static discharge wrist strap. The only skill needed to complete this project is knowing how to use a screwdriver. With twenty minutes and a new motherboard, you can repair your computer for a fraction of the cost of replacing it.
crwdns2942213:0crwdne2942213:0
-
-
Slide the battery lock latch on the left to unlock. Slide from left to right to unlock.
-
-
-
Slide the battery release latch on the right with continuous force from right to left.
-
Once battery pops, you may release latch.
-
-
-
Grab the battery, rotating upwards and away from you. This will remove the battery.
-
-
-
Flip computer over so that the bottom is facing the ceiling and the hinges are farthest from you.
-
-
-
Using the Phillips #000 screwdriver, remove the 7 mm screw on the middle right.
-
-
-
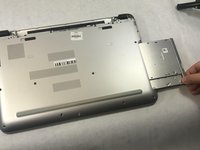
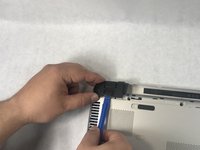
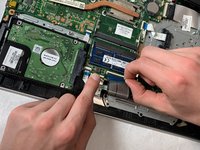
Slide the drive out from the right side of the device.
-
-
-
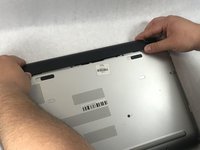
Using the Phillips #1 screwdriver, remove the two 12mm screws located on the hinge covers.
-
-
-
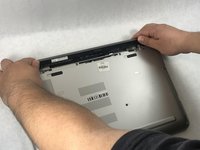
Lift the corner covers off of the computer using a prying tool.
-
-
-
-
Remove the six 6.5mm screws using a Phillips #1 screwdriver that are located near the top of the laptop.
-
-
-
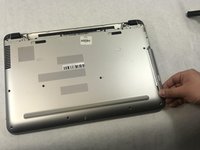
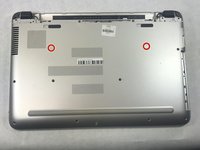
Remove the remaining seven 6.5mm screws using a Phillips #1 screwdriver that are securing the back cover.
-
-
-
Use the Phillips #0 screwdriver to remove the two 2mm screws.
-
-
-
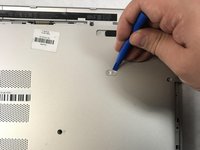
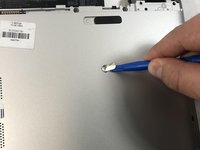
Use prying tools to pry the covers off of the screwholes.
-
Using the Phillips #1 screwdriver, remove the two 6.5mm screws.
-
-
-
Flip computer over and open so that the screen is facing you.
-
Starting at the bottom right corner, insert the prying tool and lift upwards to loosen the back panel.
-
Continue down all sides and corners of the device.
-
-
-
Flip laptop back over so that the bottom is facing up
-
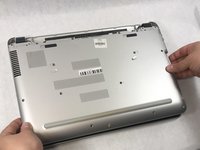
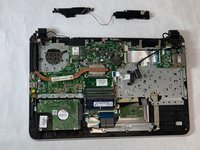
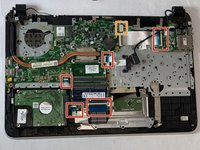
After all sides are loosened, remove the back panel from the device.
-
-
-
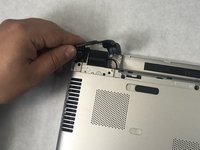
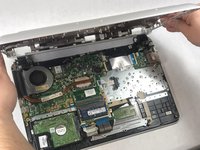
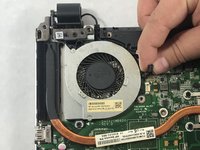
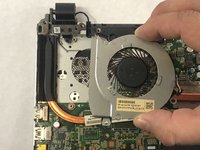
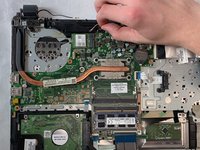
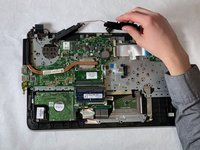
Disconnect fan cable from the motherboard.
-
-
-
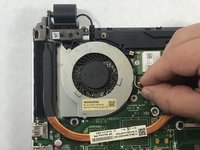
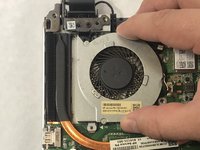
Remove both 3mm screws connected to the fan using Phillips #1 screwdriver.
-
-
-
Disconnect the wiring harness that is routed through the speaker from the motherboard.
-
Remove the wiring harness from the groove in the speaker.
-
-
crwdns2935267:0crwdne2935267:0Tweezers$4.99
-
Disconnect the speaker wiring from the motherboard.
-
-
-
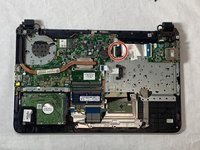
Use the #000 screwdriver to remove the four 6mm screws attaching the motherboard to the laptop case.
-
-
-
Unclip the wiring ribbons from the motherboard by pulling up on the blue tabs.
-
Unplug the wiring harness to the screen by gently pulling the beige connector.
-


To reassemble your device, follow these instructions in reverse order.
To reassemble your device, follow these instructions in reverse order.

crwdns2915084:0crwdne2915084:0

IUPUI, Team S2-G1, Stella Fall 2019 crwdns2935289:0IUPUI, Team S2-G1, Stella Fall 2019crwdne2935289:0
IUPUI-STELLA-F19S2G1
crwdns2931471:04crwdne2931471:0
crwdns2935297:02crwdne2935297:0
crwdns2947410:01crwdne2947410:0
A pleasure to greet you. Your contribution is very good. There is a possibility that I can make a backup copy of the BIOS of the model HP Pavilion 15-AB153NR Motherboard, in order to repair my laptop. I would be very grateful. Email: carlosjosemillan@gmail.com