crwdns2933423:0crwdne2933423:0

HP Pavilion 11 x360 Fan Replacement

crwdns2942213:0crwdne2942213:0

  1. HP Pavilion 11 x360 Fan Replacement, Remove Screws: crwdns2935265:01crwdnd2935265:01crwdnd2935265:02crwdne2935265:0 HP Pavilion 11 x360 Fan Replacement, Remove Screws: crwdns2935265:01crwdnd2935265:02crwdnd2935265:02crwdne2935265:0
    • Use the spudger to pry off the two rubber feet near the hinge of the laptop. This will reveal two hidden 9mm screws.

    • You must remove eleven screws.

    • Four 9mm screws with the PH0 screwdriver.

    • Seven 6mm screws with the PH0 screwdriver.

  2. HP Pavilion 11 x360 Fan Replacement, Remove Backing: crwdns2935265:02crwdnd2935265:01crwdnd2935265:03crwdne2935265:0 HP Pavilion 11 x360 Fan Replacement, Remove Backing: crwdns2935265:02crwdnd2935265:02crwdnd2935265:03crwdne2935265:0 HP Pavilion 11 x360 Fan Replacement, Remove Backing: crwdns2935265:02crwdnd2935265:03crwdnd2935265:03crwdne2935265:0
    • Use the spudger to pry the corners of the laptop near the display hinges.

    • Pry around the seam of the laptop with the plastic opening tool until the backing begins to pull apart.

    • When you lift the bottom cover, there is a cable connected between the motherboard and the bottom cover. Be careful not to pull the cable loose!

  3. HP Pavilion 11 x360 Fan Replacement, Detach Cable: crwdns2935265:03crwdnd2935265:01crwdnd2935265:02crwdne2935265:0 HP Pavilion 11 x360 Fan Replacement, Detach Cable: crwdns2935265:03crwdnd2935265:02crwdnd2935265:02crwdne2935265:0
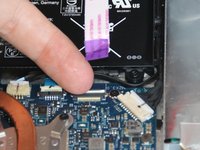
    • Use the plastic opening tool to lift the white tab up at the connection.

    • Pull the cable outwards.

  4. HP Pavilion 11 x360 Fan Replacement, Remove Screws: crwdns2935265:04crwdnd2935265:01crwdnd2935265:01crwdne2935265:0
    • Remove the two 3mm screws with the PH0 screwdriver.

  5. HP Pavilion 11 x360 Fan Replacement, Disconnect Cable: crwdns2935265:05crwdnd2935265:01crwdnd2935265:02crwdne2935265:0 HP Pavilion 11 x360 Fan Replacement, Disconnect Cable: crwdns2935265:05crwdnd2935265:02crwdnd2935265:02crwdne2935265:0
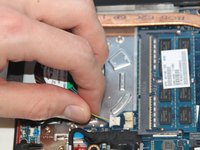
    • Use your fingernails to slowly loosen the fan connection cable.

    • After the cable is slightly pulled from the connection, grab the cable and pull it outwards.

crwdns2915888:0crwdne2915888:0

To reassemble your device, follow these instructions in reverse order.

crwdns2935229:06crwdne2935229:0

Natalie

crwdns2935283:001/22/15crwdne2935283:0

937 crwdns2915208:0crwdne2915208:0

crwdns2935297:04crwdne2935297:0

crwdns2915084:0crwdne2915084:0

Cal Poly, Team 19-9, Maness Winter 2015 crwdns2935289:0Cal Poly, Team 19-9, Maness Winter 2015crwdne2935289:0

CPSU-MANESS-W15S19G9

crwdns2931471:04crwdne2931471:0

crwdns2935297:012crwdne2935297:0

crwdns2944067:00crwdne2944067:0

crwdns2917038:0crwdne2917038:0

crwdns2936625:0crwdne2936625:0:

crwdns2936751:024crwdne2936751:0 1

crwdns2936753:07crwdne2936753:0 3

crwdns2936753:030crwdne2936753:0 17

crwdns2942667:0crwdne2942667:0 2,560