crwdns2933423:0crwdne2933423:0
crwdns2947577:0crwdnd2947577:0crwdne2947577:0

HP PSC 2355 Scanner Glass Replacement

crwdns2942213:0crwdne2942213:0

  1. HP PSC 2355 Scanner Glass Replacement, Scanner Lid: crwdns2935265:01crwdnd2935265:01crwdnd2935265:01crwdne2935265:0
    • Grasp the scanner lid cover from the front of the device and lift lid all the way up until it stands on its own.

    crwdns2952109:0crwdne2952109:0

    crwdns2917038:0crwdne2917038:0

  2. HP PSC 2355 Scanner Glass Replacement: crwdns2935265:02crwdnd2935265:01crwdnd2935265:01crwdne2935265:0
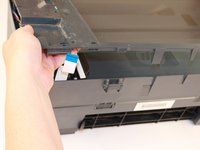
    • With two hands, grasp the lid on both sides near the hinges and lift straight up to release the lid from each hinge.

    crwdns2952109:0crwdne2952109:0

    crwdns2917038:0crwdne2917038:0

  3. HP PSC 2355 Scanner Glass Replacement, Scanner Glass: crwdns2935265:03crwdnd2935265:01crwdnd2935265:02crwdne2935265:0 HP PSC 2355 Scanner Glass Replacement, Scanner Glass: crwdns2935265:03crwdnd2935265:02crwdnd2935265:02crwdne2935265:0
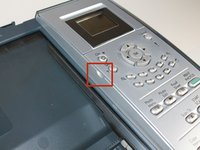
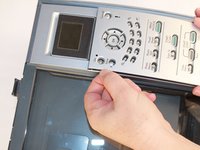
    • Locate the finger notch on the inside top left half of the bezel (control) panel cover.

    • Place your index finger in the notch and lift up to unsnap the panel.

    • Set the panel cover aside.

    crwdns2952109:0crwdne2952109:0

    crwdns2917038:0crwdne2917038:0

  4. HP PSC 2355 Scanner Glass Replacement: crwdns2935265:04crwdnd2935265:01crwdnd2935265:01crwdne2935265:0
    • Use a T9 Torx screwdriver to remove the 9 mm screw.

    crwdns2952109:0crwdne2952109:0

    crwdns2917038:0crwdne2917038:0

  5. HP PSC 2355 Scanner Glass Replacement: crwdns2935265:05crwdnd2935265:01crwdnd2935265:01crwdne2935265:0
    • From the front of the printer, remove the button panel by pulling it towards you while slightly lifting it up.

    crwdns2952109:0crwdne2952109:0

    crwdns2917038:0crwdne2917038:0

  6. HP PSC 2355 Scanner Glass Replacement: crwdns2935265:06crwdnd2935265:01crwdnd2935265:02crwdne2935265:0 HP PSC 2355 Scanner Glass Replacement: crwdns2935265:06crwdnd2935265:02crwdnd2935265:02crwdne2935265:0
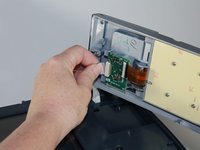
    • Disconnect the white ribbon cable by grasping it between your thumb and forefinger.

    • Gently pull to release the ribbon from the green circuit board.

    crwdns2952109:0crwdne2952109:0

    crwdns2917038:0crwdne2917038:0

  7. HP PSC 2355 Scanner Glass Replacement: crwdns2935265:07crwdnd2935265:01crwdnd2935265:01crwdne2935265:0
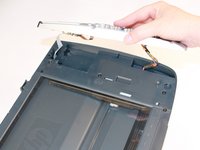
    • Next, use a spudger to pry the flat ribbon computer cable by the plastic connection end loose. Carefully separate it from the prongs on the button panel.

    • Now the whole button should be completely disconnected from the printer.

    • Set button panel aside.

    crwdns2952109:0crwdne2952109:0

    crwdns2917038:0crwdne2917038:0

  8. HP PSC 2355 Scanner Glass Replacement: crwdns2935265:08crwdnd2935265:01crwdnd2935265:01crwdne2935265:0
    • Use the T9 Torx screwdriver to remove the seven 9 mm screws on the top plastic frame around the glass.

    crwdns2952109:0crwdne2952109:0

    crwdns2917038:0crwdne2917038:0

  9. HP PSC 2355 Scanner Glass Replacement: crwdns2935265:09crwdnd2935265:01crwdnd2935265:01crwdne2935265:0
    • From the back of the printer, locate the two large plastic tabs as shown.

    • With your index fingers underneath each tab, gently and simultaneously pull the tabs towards you and upwards to release the tabs from the plastic clasps behind them.

    • Remove the whole plastic frame that holds the glass.

    crwdns2952109:0crwdne2952109:0

    crwdns2917038:0crwdne2917038:0

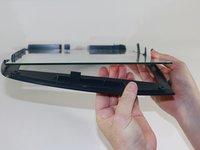
  10. HP PSC 2355 Scanner Glass Replacement: crwdns2935265:010crwdnd2935265:01crwdnd2935265:02crwdne2935265:0 HP PSC 2355 Scanner Glass Replacement: crwdns2935265:010crwdnd2935265:02crwdnd2935265:02crwdne2935265:0
    • Gently lift the glass/plastic bed from the edge on the side opposite of the button/control panel section.

    • As shown in the second image, gently lift the glass pane up so that it is above the plastic tab that holds it into place.

    crwdns2952109:0crwdne2952109:0

    crwdns2917038:0crwdne2917038:0

  11. HP PSC 2355 Scanner Glass Replacement: crwdns2935265:011crwdnd2935265:01crwdnd2935265:01crwdne2935265:0
    • Proceed to slide the glass pane out and over the plastic tab to remove it completely from the plastic bed.

    • Replace the glass with your new glass pane. To fully reassemble the printer, follow these instructions in reverse order.

    crwdns2952109:0crwdne2952109:0

    crwdns2917038:0crwdne2917038:0

crwdns2915888:0crwdne2915888:0

To reassemble your device, follow these instructions in reverse order.

crwdns2935221:0crwdne2935221:0

crwdns2935227:0crwdne2935227:0

Amber Gabaldon

crwdns2935283:001/28/14crwdne2935283:0

343 crwdns2915208:0crwdne2915208:0

crwdns2935297:03crwdne2935297:0

crwdns2935287:0crwdne2935287:0

New Mexico State, Team 1-4, Sheppard Spring 2014 crwdns2935289:0New Mexico State, Team 1-4, Sheppard Spring 2014crwdne2935289:0

NMSU-SHEPPARD-S14S1G4

crwdns2931471:03crwdne2931471:0

crwdns2935297:04crwdne2935297:0

crwdns2947412:00crwdne2947412:0

crwdns2917038:0crwdne2917038:0

crwdns2936625:0crwdne2936625:0:

crwdns2936751:024crwdne2936751:0 0

crwdns2936753:07crwdne2936753:0 5

crwdns2936753:030crwdne2936753:0 35

crwdns2942667:0crwdne2942667:0 1,274