crwdns2933423:0crwdne2933423:0

HP Omen 15-ax243dx Speaker Replacement

crwdns2942213:0crwdne2942213:0

  1. HP Omen 15-ax243dx Speaker Replacement, Battery: crwdns2935265:01crwdnd2935265:01crwdnd2935265:02crwdne2935265:0 HP Omen 15-ax243dx Speaker Replacement, Battery: crwdns2935265:01crwdnd2935265:02crwdnd2935265:02crwdne2935265:0
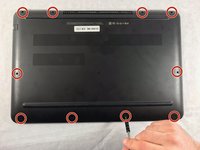
    • The rear panel is secured by 10 screws. Using a #00 Phillips Screwdriver, remove the ten 1.2 mm screws.

    • The screwdriver should be inserted at the same angle as the screws.

    • Be sure to keep track of the screws and where they came from. Some only fit in to one spot.

  2. HP Omen 15-ax243dx Speaker Replacement: crwdns2935265:02crwdnd2935265:01crwdnd2935265:02crwdne2935265:0 HP Omen 15-ax243dx Speaker Replacement: crwdns2935265:02crwdnd2935265:02crwdnd2935265:02crwdne2935265:0
    • Insert a plastic opening tool between the rear panel and the top case. Pry the opening tool upwards to separate the top case from the bottom case.

    • Slide the opening tool along the case perimeter to loosen the bottom case.

    • Gently pull the bottom case away from the laptop.

  3. HP Omen 15-ax243dx Speaker Replacement: crwdns2935265:03crwdnd2935265:01crwdnd2935265:02crwdne2935265:0 HP Omen 15-ax243dx Speaker Replacement: crwdns2935265:03crwdnd2935265:02crwdnd2935265:02crwdne2935265:0
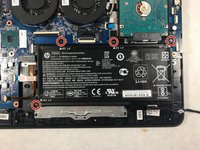
    • Remove the four 1.2 mm Phillips #00 screws around the battery.

  4. HP Omen 15-ax243dx Speaker Replacement: crwdns2935265:04crwdnd2935265:01crwdnd2935265:02crwdne2935265:0 HP Omen 15-ax243dx Speaker Replacement: crwdns2935265:04crwdnd2935265:02crwdnd2935265:02crwdne2935265:0
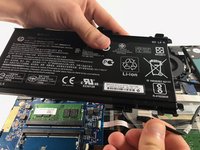
    • Pull the battery cable out from its motherboard socket.

    • Pull parallel to the motherboard, not straight up.

    • Remove the battery.

    • Disconnect the power cord from the battery and transfer it to your replacement battery.

  5. HP Omen 15-ax243dx Speaker Replacement, Hard-Drive: crwdns2935265:05crwdnd2935265:01crwdnd2935265:01crwdne2935265:0
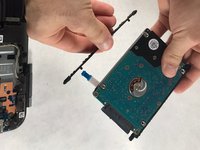
    • After the battery is removed, the hard drive will be easier to access in the top right hand corner.

  6. HP Omen 15-ax243dx Speaker Replacement: crwdns2935265:06crwdnd2935265:01crwdnd2935265:03crwdne2935265:0 HP Omen 15-ax243dx Speaker Replacement: crwdns2935265:06crwdnd2935265:02crwdnd2935265:03crwdne2935265:0 HP Omen 15-ax243dx Speaker Replacement: crwdns2935265:06crwdnd2935265:03crwdnd2935265:03crwdne2935265:0
    • With a opening tool, flip open the switch that locks in the hard drive ribbon cable into the device.

    • When lifting the cable out, lift straight up and out to prevent damage to the connector or cable.

  7. HP Omen 15-ax243dx Speaker Replacement: crwdns2935265:07crwdnd2935265:01crwdnd2935265:01crwdne2935265:0
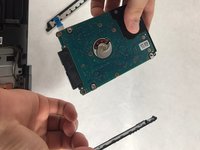
    • Lift the hard drive up to remove from the device

  8. HP Omen 15-ax243dx Speaker Replacement: crwdns2935265:08crwdnd2935265:01crwdnd2935265:03crwdne2935265:0 HP Omen 15-ax243dx Speaker Replacement: crwdns2935265:08crwdnd2935265:02crwdnd2935265:03crwdne2935265:0 HP Omen 15-ax243dx Speaker Replacement: crwdns2935265:08crwdnd2935265:03crwdnd2935265:03crwdne2935265:0
    • Remove the rubber guards on the side of the hard drive.

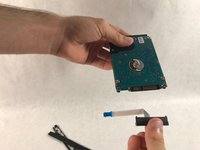
    • Gently pull the plastic connector out from the hard drive.

    • The hard drive can now be disposed of if needed.

    • Save the guards and connectors from this hard drive, they will be used on the replacement part.

  9. HP Omen 15-ax243dx Speaker Replacement, Ventilation Fans: crwdns2935265:09crwdnd2935265:01crwdnd2935265:01crwdne2935265:0
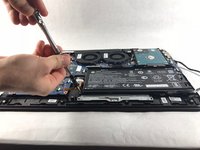
    • The two ventilation fans are secured with the system by 5 screws. Unscrew these five 1.2 mm screws using the Phillips #0 screwdriver.

    • When removing the screws, use a magnetic screwdriver to prevent the screws from falling behind the motherboard

  10. HP Omen 15-ax243dx Speaker Replacement: crwdns2935265:010crwdnd2935265:01crwdnd2935265:02crwdne2935265:0 HP Omen 15-ax243dx Speaker Replacement: crwdns2935265:010crwdnd2935265:02crwdnd2935265:02crwdne2935265:0
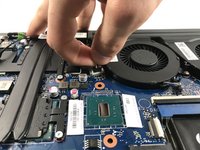
    • After removing all 5 screws, the fans are still connected with the system through 2 cables.

    • Carefully pull the fan cables out of the connectors on the motherboard.

    • Be cautious when pulling by the wires, this can permanently damage the fans beyond repair.

  11. HP Omen 15-ax243dx Speaker Replacement: crwdns2935265:011crwdnd2935265:01crwdnd2935265:01crwdne2935265:0
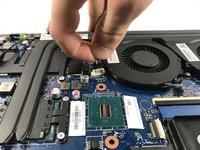
    • The fans can now be removed from the device.

  12. HP Omen 15-ax243dx Speaker Replacement, Speaker: crwdns2935265:012crwdnd2935265:01crwdnd2935265:03crwdne2935265:0 HP Omen 15-ax243dx Speaker Replacement, Speaker: crwdns2935265:012crwdnd2935265:02crwdnd2935265:03crwdne2935265:0 HP Omen 15-ax243dx Speaker Replacement, Speaker: crwdns2935265:012crwdnd2935265:03crwdnd2935265:03crwdne2935265:0
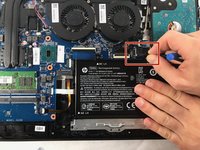
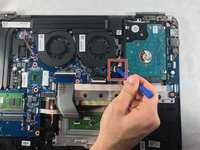
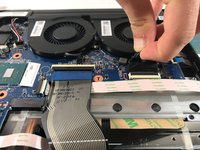
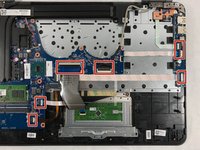
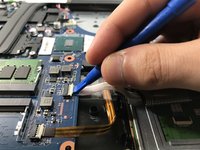
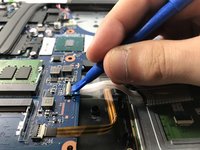
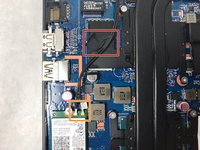
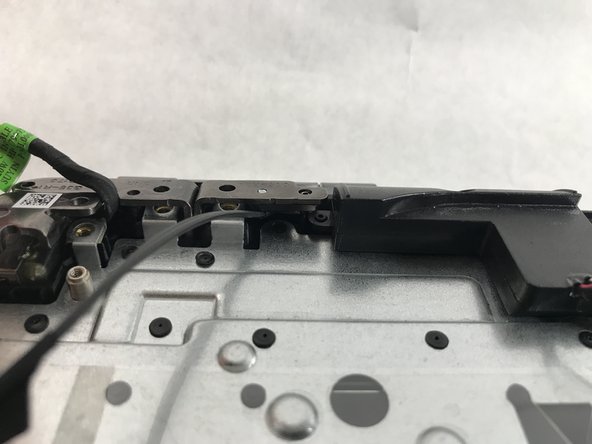
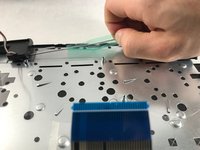
    • Disconnect all the ribbon cables highlighted.

    • Be sure to use the plastic opening tool when flipping the switches up on the cable connectors.

  13. HP Omen 15-ax243dx Speaker Replacement: crwdns2935265:013crwdnd2935265:01crwdnd2935265:03crwdne2935265:0 HP Omen 15-ax243dx Speaker Replacement: crwdns2935265:013crwdnd2935265:02crwdnd2935265:03crwdne2935265:0 HP Omen 15-ax243dx Speaker Replacement: crwdns2935265:013crwdnd2935265:03crwdnd2935265:03crwdne2935265:0
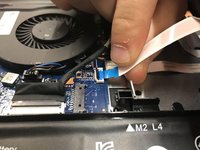
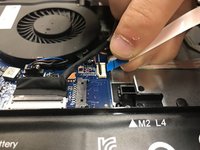
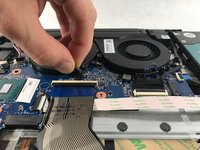
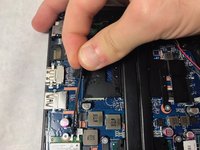
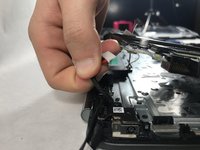
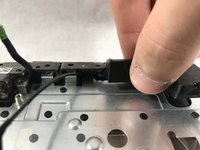
    • Unplug the wire the connects to the speakers.

  14. HP Omen 15-ax243dx Speaker Replacement: crwdns2935265:014crwdnd2935265:01crwdnd2935265:02crwdne2935265:0 HP Omen 15-ax243dx Speaker Replacement: crwdns2935265:014crwdnd2935265:02crwdnd2935265:02crwdne2935265:0
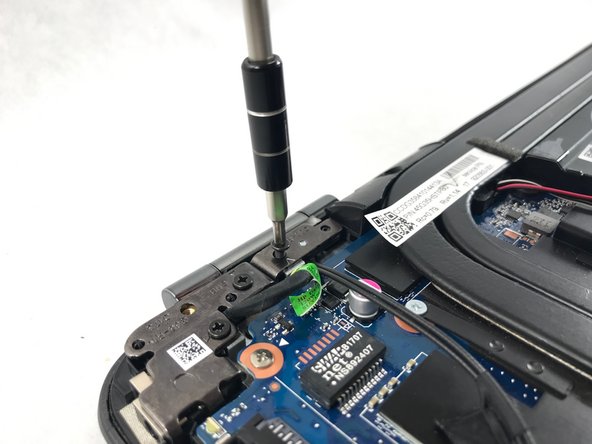
    • Unscrew the six 1.2 mm screws connecting the screen to the body using the #0 Phillips screwdriver.

    • Be cautious of where the screws come out from, some will only fit in the same location.

  15. HP Omen 15-ax243dx Speaker Replacement: crwdns2935265:015crwdnd2935265:01crwdnd2935265:03crwdne2935265:0 HP Omen 15-ax243dx Speaker Replacement: crwdns2935265:015crwdnd2935265:02crwdnd2935265:03crwdne2935265:0 HP Omen 15-ax243dx Speaker Replacement: crwdns2935265:015crwdnd2935265:03crwdnd2935265:03crwdne2935265:0
    • Remove the tape holding the wires down

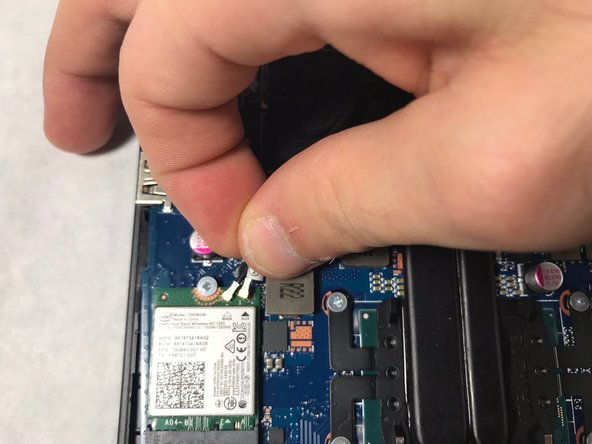
    • Disconnect the wires from the wifi chip

    • When removing the wires from the wifi chip, be careful to not damage the connectors.

  16. HP Omen 15-ax243dx Speaker Replacement: crwdns2935265:016crwdnd2935265:01crwdnd2935265:02crwdne2935265:0 HP Omen 15-ax243dx Speaker Replacement: crwdns2935265:016crwdnd2935265:02crwdnd2935265:02crwdne2935265:0
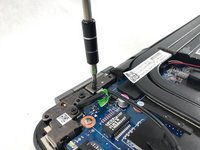
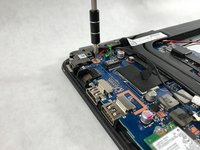
    • Unscrew the two 1.2 mm screws holding the motherboard to the front panel using the same screwdriver.

  17. HP Omen 15-ax243dx Speaker Replacement: crwdns2935265:017crwdnd2935265:01crwdnd2935265:01crwdne2935265:0
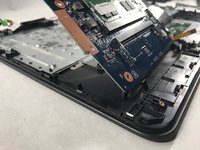
    • Lift the back of the motherboard up then slide the audio cable out between the heatsink and motherboard

  18. HP Omen 15-ax243dx Speaker Replacement: crwdns2935265:018crwdnd2935265:01crwdnd2935265:02crwdne2935265:0 HP Omen 15-ax243dx Speaker Replacement: crwdns2935265:018crwdnd2935265:02crwdnd2935265:02crwdne2935265:0
    • Lift the back of the motherboard up again and remove the charging adapter.

    • This wire is located in a tight spot. Pull it straight out and do not bend it, this will cause irreparable damage to the device.

  19. HP Omen 15-ax243dx Speaker Replacement: crwdns2935265:019crwdnd2935265:01crwdnd2935265:03crwdne2935265:0 HP Omen 15-ax243dx Speaker Replacement: crwdns2935265:019crwdnd2935265:02crwdnd2935265:03crwdne2935265:0 HP Omen 15-ax243dx Speaker Replacement: crwdns2935265:019crwdnd2935265:03crwdnd2935265:03crwdne2935265:0
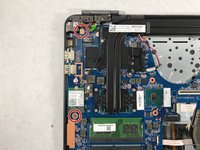
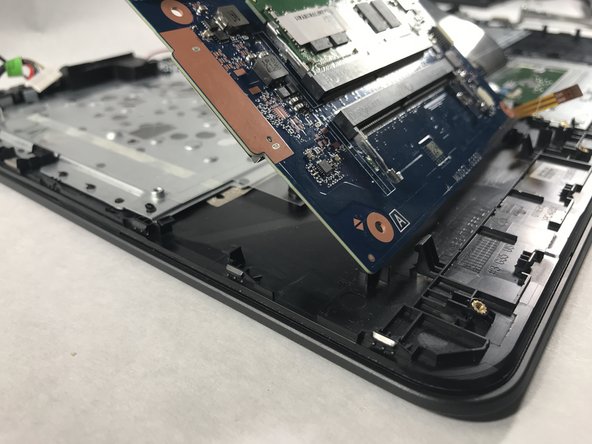
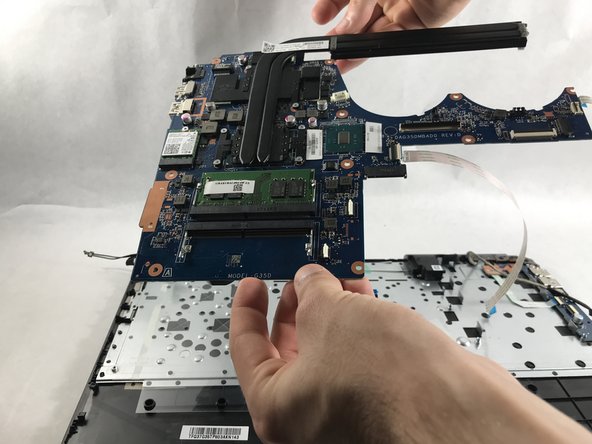
    • Slowly lift up the back of the motherboard.

    • The board is friction fit at the rotation point. Be careful to lift the board around this point.

    • The board will now lift out of the device.

  20. HP Omen 15-ax243dx Speaker Replacement: crwdns2935265:020crwdnd2935265:01crwdnd2935265:03crwdne2935265:0 HP Omen 15-ax243dx Speaker Replacement: crwdns2935265:020crwdnd2935265:02crwdnd2935265:03crwdne2935265:0 HP Omen 15-ax243dx Speaker Replacement: crwdns2935265:020crwdnd2935265:03crwdnd2935265:03crwdne2935265:0
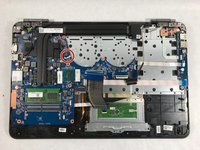
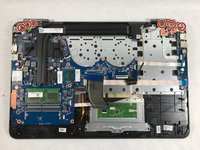
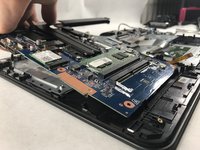
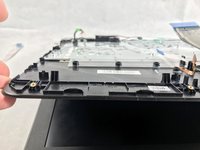
    • Lift up the keyboard panel of the device and set it back down.

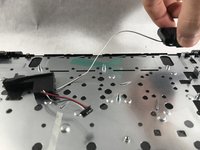
    • The speaker in the top left hand corner can be taken out of its place.

  21. HP Omen 15-ax243dx Speaker Replacement: crwdns2935265:021crwdnd2935265:01crwdnd2935265:02crwdne2935265:0 HP Omen 15-ax243dx Speaker Replacement: crwdns2935265:021crwdnd2935265:02crwdnd2935265:02crwdne2935265:0
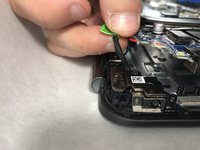
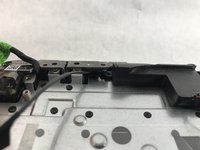
    • Remove the tape between the two speakers

    • The left speaker can now be removed.

    • The speakers can be disposed of if needed now.

crwdns2915888:0crwdne2915888:0

To reassemble your device, follow these instructions in reverse order.

crwdns2935227:0crwdne2935227:0

Dean Lee

crwdns2935283:010/19/17crwdne2935283:0

360 crwdns2915208:0crwdne2915208:0

crwdns2935297:02crwdne2935297:0

crwdns2915084:0crwdne2915084:0

UMass Dartmouth, Team S6-G7, Rockett Fall 2017 crwdns2935289:0UMass Dartmouth, Team S6-G7, Rockett Fall 2017crwdne2935289:0

UMASSD-ROCKETT-F17S6G7

crwdns2931471:03crwdne2931471:0

crwdns2935297:07crwdne2935297:0

crwdns2944067:00crwdne2944067:0

crwdns2917038:0crwdne2917038:0

crwdns2936625:0crwdne2936625:0:

crwdns2936751:024crwdne2936751:0 2

crwdns2936753:07crwdne2936753:0 9

crwdns2936753:030crwdne2936753:0 24

crwdns2942667:0crwdne2942667:0 2,666