crwdns2933423:0crwdne2933423:0

HP Officejet 4630 LCD Display Replacement

crwdns2942213:0crwdne2942213:0

  1. HP Officejet 4630 LCD Display Replacement, LCD Display: crwdns2935265:01crwdnd2935265:01crwdnd2935265:03crwdne2935265:0 HP Officejet 4630 LCD Display Replacement, LCD Display: crwdns2935265:01crwdnd2935265:02crwdnd2935265:03crwdne2935265:0 HP Officejet 4630 LCD Display Replacement, LCD Display: crwdns2935265:01crwdnd2935265:03crwdnd2935265:03crwdne2935265:0
    • There is a hidden screw underneath the model sticker on the front panel.

    • Peel the model sticker off the cover.

    • This will expose the T10 screw securing the panel.

  2. HP Officejet 4630 LCD Display Replacement: crwdns2935265:02crwdnd2935265:01crwdnd2935265:03crwdne2935265:0 HP Officejet 4630 LCD Display Replacement: crwdns2935265:02crwdnd2935265:02crwdnd2935265:03crwdne2935265:0 HP Officejet 4630 LCD Display Replacement: crwdns2935265:02crwdnd2935265:03crwdnd2935265:03crwdne2935265:0
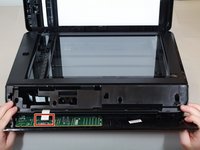
    • Remove the single 12mm-T10 screw securing the front panel to the printer body.

    • Loosen the panel cover from the printer body.

    • There is a ribbon cable connected to the backside of the cover. Disconnect the cable before separating the panel completely.

  3. HP Officejet 4630 LCD Display Replacement: crwdns2935265:03crwdnd2935265:01crwdnd2935265:03crwdne2935265:0 HP Officejet 4630 LCD Display Replacement: crwdns2935265:03crwdnd2935265:02crwdnd2935265:03crwdne2935265:0 HP Officejet 4630 LCD Display Replacement: crwdns2935265:03crwdnd2935265:03crwdnd2935265:03crwdne2935265:0
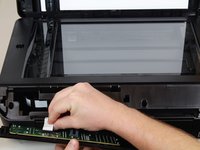
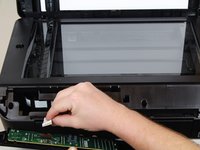
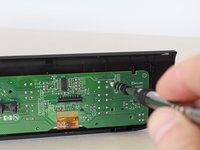
    • Gently remove the No-Fuss ribbon cable from the front panel.

  4. HP Officejet 4630 LCD Display Replacement: crwdns2935265:04crwdnd2935265:01crwdnd2935265:03crwdne2935265:0 HP Officejet 4630 LCD Display Replacement: crwdns2935265:04crwdnd2935265:02crwdnd2935265:03crwdne2935265:0 HP Officejet 4630 LCD Display Replacement: crwdns2935265:04crwdnd2935265:03crwdnd2935265:03crwdne2935265:0
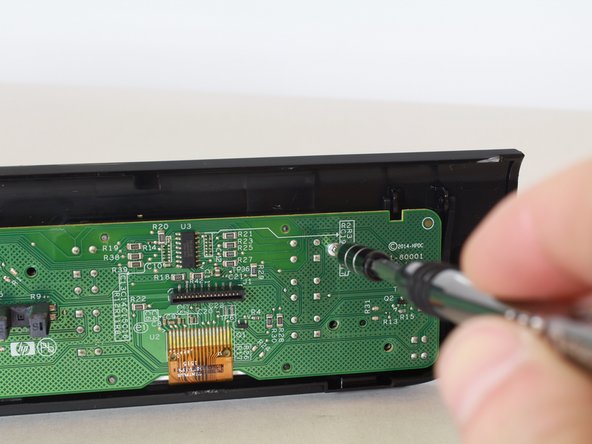
    • Remove the seven 8mm screws using the Torx T6 screwdriver.

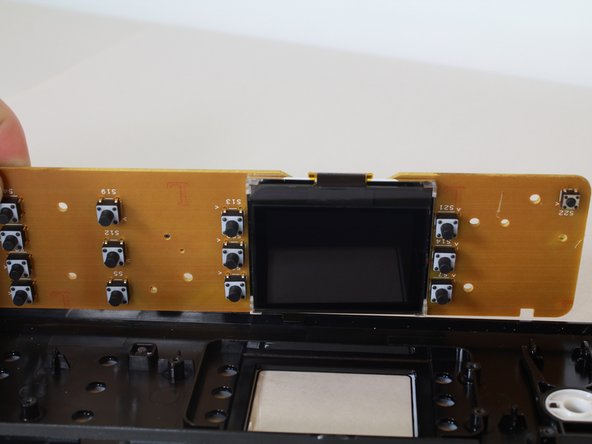
    • Remove the motherboard from the front-panel housing.

    • The LCD display is on the opposite side.

crwdns2915888:0crwdne2915888:0

To reassemble your device, follow these instructions in reverse order.

crwdns2935227:0crwdne2935227:0

Justin Engwall

crwdns2935283:001/23/18crwdne2935283:0

137 crwdns2915208:0crwdne2915208:0

crwdns2935295:0crwdne2935295:0

crwdns2915084:0crwdne2915084:0

Cal Poly, Team S18-G3, Livingston Winter 2018 crwdns2935289:0Cal Poly, Team S18-G3, Livingston Winter 2018crwdne2935289:0

CPSU-LIVINGSTON-W18S18G3

crwdns2931471:04crwdne2931471:0

crwdns2935297:018crwdne2935297:0

crwdns2944067:00crwdne2944067:0

crwdns2917038:0crwdne2917038:0

crwdns2936625:0crwdne2936625:0:

crwdns2936751:024crwdne2936751:0 0

crwdns2936753:07crwdne2936753:0 0

crwdns2936753:030crwdne2936753:0 25

crwdns2942667:0crwdne2942667:0 1,513