crwdns2933423:0crwdne2933423:0

HP Mobile Thin Client mt41 Fan Replacement

crwdns2942213:0crwdne2942213:0

  1. HP Mobile Thin Client mt41 Fan Replacement, Back Cover: crwdns2935265:01crwdnd2935265:01crwdnd2935265:02crwdne2935265:0 HP Mobile Thin Client mt41 Fan Replacement, Back Cover: crwdns2935265:01crwdnd2935265:02crwdnd2935265:02crwdne2935265:0
    • Remove the nine screws that keep the back cover secured using the T5 Torx screwdriver.

  2. HP Mobile Thin Client mt41 Fan Replacement: crwdns2935265:02crwdnd2935265:01crwdnd2935265:02crwdne2935265:0 HP Mobile Thin Client mt41 Fan Replacement: crwdns2935265:02crwdnd2935265:02crwdnd2935265:02crwdne2935265:0
    • Remove the middle plate using the iFixit opening tool.

    • This may require a bit of force. If it is not coming out try the other side.

  3. HP Mobile Thin Client mt41 Fan Replacement: crwdns2935265:03crwdnd2935265:01crwdnd2935265:01crwdne2935265:0
    • Pop the back cover off from its latches by separating the two parts along their seam using the iFixit opening tool.

    • Be gentle; the plastic can crack.

  4. HP Mobile Thin Client mt41 Fan Replacement: crwdns2935265:04crwdnd2935265:01crwdnd2935265:01crwdne2935265:0
    • Lift the back cover once all corners are unclasped from their latches.

    • Lifting the cover should not require much force.

  5. HP Mobile Thin Client mt41 Fan Replacement, Fan: crwdns2935265:05crwdnd2935265:01crwdnd2935265:02crwdne2935265:0 HP Mobile Thin Client mt41 Fan Replacement, Fan: crwdns2935265:05crwdnd2935265:02crwdnd2935265:02crwdne2935265:0
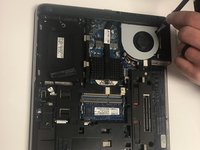
    • Using a J1 head for your screwdriver, remove the 4 surrounding screws.

  6. HP Mobile Thin Client mt41 Fan Replacement: crwdns2935265:06crwdnd2935265:01crwdnd2935265:01crwdne2935265:0
    • Keep your screws close by, and slowly remove the CPU fan.

  7. HP Mobile Thin Client mt41 Fan Replacement: crwdns2935265:07crwdnd2935265:01crwdnd2935265:01crwdne2935265:0
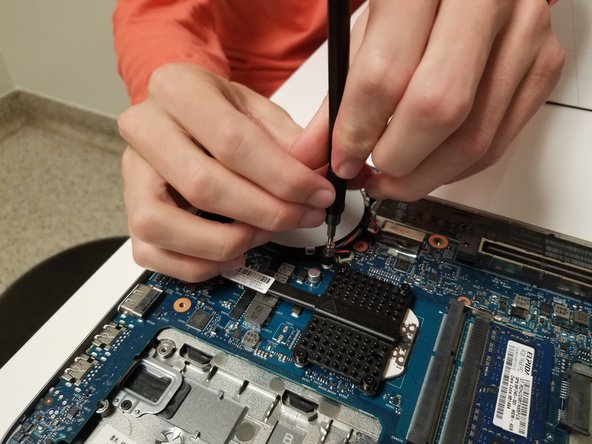
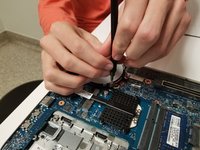
    • Be mindful of wires, the final step is to unplug the fan from the motherboard, at the base of red and blue wires.

crwdns2915888:0crwdne2915888:0

To reassemble your device, follow these instructions in reverse order.

crwdns2935227:0crwdne2935227:0

William Rapp

crwdns2935283:002/08/18crwdne2935283:0

171 crwdns2915208:0crwdne2915208:0

crwdns2935295:0crwdne2935295:0

crwdns2915084:0crwdne2915084:0

University of North Texas, Team S2-G5, Thomas Spring 2018 crwdns2935289:0University of North Texas, Team S2-G5, Thomas Spring 2018crwdne2935289:0

UNT-THOMAS-S18S2G5

crwdns2931471:05crwdne2931471:0

crwdns2935297:06crwdne2935297:0

crwdns2944067:00crwdne2944067:0

crwdns2917038:0crwdne2917038:0

crwdns2936625:0crwdne2936625:0:

crwdns2936751:024crwdne2936751:0 0

crwdns2936753:07crwdne2936753:0 0

crwdns2936753:030crwdne2936753:0 9

crwdns2942667:0crwdne2942667:0 371