crwdns2933423:0crwdne2933423:0

HP Mini 110-3131dx Keyboard Bezel Replacement

crwdns2942213:0crwdne2942213:0

    • Power off the laptop before trying to remove the battery.

    • Turn the laptop upside down, and locate the sliding tabs on the battery.

    • Slide both tabs in an inward direction, then slide the battery away from the laptop.

  1. HP Mini 110-3131dx Keyboard Bezel Replacement, Back Cover: crwdns2935265:02crwdnd2935265:01crwdnd2935265:02crwdne2935265:0 HP Mini 110-3131dx Keyboard Bezel Replacement, Back Cover: crwdns2935265:02crwdnd2935265:02crwdnd2935265:02crwdne2935265:0
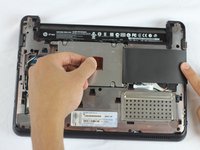
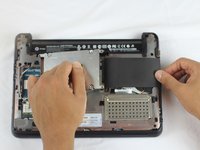
    • To remove the bottom cover pull the orange tab to the right until it clicks.

    • Carefully disconnect the clips as you lift the bottom cover.

  2. HP Mini 110-3131dx Keyboard Bezel Replacement, Hard Drive: crwdns2935265:03crwdnd2935265:01crwdnd2935265:01crwdne2935265:0
    • Remove the four screws holding down the hard drive using a Phillips #1 screwdriver.

  3. HP Mini 110-3131dx Keyboard Bezel Replacement: crwdns2935265:04crwdnd2935265:01crwdnd2935265:02crwdne2935265:0 HP Mini 110-3131dx Keyboard Bezel Replacement: crwdns2935265:04crwdnd2935265:02crwdnd2935265:02crwdne2935265:0
    • Lift the black flap covering the hard drive then slide it towards the left using the orange tab until it's released from its receptacle.

    • Pull the hard drive out of the laptop.

    • Put the hard drive in an anti-static bag to decrease the likelihood of harming it with static electricity.

  4. HP Mini 110-3131dx Keyboard Bezel Replacement, Keyboard: crwdns2935265:05crwdnd2935265:01crwdnd2935265:01crwdne2935265:0
    • Remove the three black screws marked by the keyboard symbol using a Phillips #1 screwdriver.

  5. HP Mini 110-3131dx Keyboard Bezel Replacement: crwdns2935265:06crwdnd2935265:01crwdnd2935265:03crwdne2935265:0 HP Mini 110-3131dx Keyboard Bezel Replacement: crwdns2935265:06crwdnd2935265:02crwdnd2935265:03crwdne2935265:0 HP Mini 110-3131dx Keyboard Bezel Replacement: crwdns2935265:06crwdnd2935265:03crwdnd2935265:03crwdne2935265:0
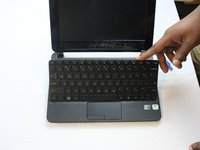
    • Turn the laptop upright and open it.

    • Disconnect the clips located around the perimeter of the keyboard.

    • Slide the iFixit opening tool between the top edge of the keyboard and the plastic bezel.

    • Start either above the esc key or the delete key.

    • Pull the keyboard with your fingers until it comes out on both sides.

    • Be careful not to pull the keyboard out too fast. There is a fragile ribbon cable that attaches to the motherboard behind the keyboard.

  6. HP Mini 110-3131dx Keyboard Bezel Replacement: crwdns2935265:07crwdnd2935265:01crwdnd2935265:01crwdne2935265:0
    • Tilt the keyboard toward you to reveal the ribbon cable.

    • Lift up the black tab on top of the keyboard ribbon cable to release the ribbon cable.

    • Pull the ribbon cable out of its container.

  7. HP Mini 110-3131dx Keyboard Bezel Replacement, Keyboard Bezel: crwdns2935265:08crwdnd2935265:01crwdnd2935265:02crwdne2935265:0 HP Mini 110-3131dx Keyboard Bezel Replacement, Keyboard Bezel: crwdns2935265:08crwdnd2935265:02crwdnd2935265:02crwdne2935265:0
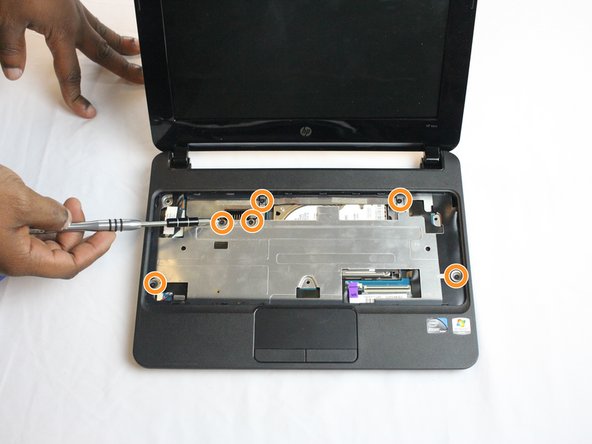
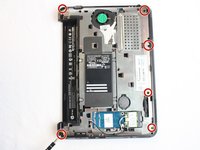
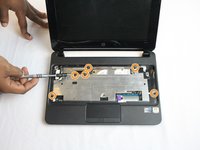
    • Remove the six black screws around the perimeter of the laptop using a Phillips #1 screwdriver.

    • Be sure to keep track of which screws go where as they are not all the same size.

    • Flip the laptop over and remove the six black screws.

  8. HP Mini 110-3131dx Keyboard Bezel Replacement: crwdns2935265:09crwdnd2935265:01crwdnd2935265:02crwdne2935265:0 HP Mini 110-3131dx Keyboard Bezel Replacement: crwdns2935265:09crwdnd2935265:02crwdnd2935265:02crwdne2935265:0
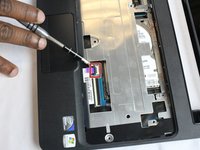
    • Using your fingernail or the iFixit opening tool, flip the black tab up to release the ribbon cable that connects the touchpad and motherboard.

    • Disconnect the red and black wires from the motherboard on the left-hand side of the bezel using your fingernail or iFixit opening tool.

  9. HP Mini 110-3131dx Keyboard Bezel Replacement: crwdns2935265:010crwdnd2935265:01crwdnd2935265:01crwdne2935265:0
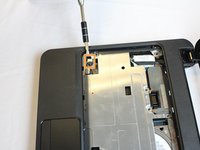
    • Lift the keyboard bezel from the back end and slide the iFixit opening tool around the perimeter of the bezel until it is fully released.

crwdns2915888:0crwdne2915888:0

To reassemble your device, follow these instructions in reverse order.

crwdns2935227:0crwdne2935227:0

aarondcollege

crwdns2935283:010/06/16crwdne2935283:0

1.297 crwdns2915208:0crwdne2915208:0

crwdns2935297:010crwdne2935297:0

crwdns2915084:0crwdne2915084:0

USF Tampa, Team 2-4, Cagle Fall 2016 crwdns2935289:0USF Tampa, Team 2-4, Cagle Fall 2016crwdne2935289:0

USFT-CAGLE-F16S2G4

crwdns2931471:05crwdne2931471:0

crwdns2935297:010crwdne2935297:0

crwdns2944067:00crwdne2944067:0

crwdns2917038:0crwdne2917038:0

crwdns2936625:0crwdne2936625:0:

crwdns2936751:024crwdne2936751:0 1

crwdns2936753:07crwdne2936753:0 1

crwdns2936753:030crwdne2936753:0 13

crwdns2942667:0crwdne2942667:0 423