crwdns2915892:0crwdne2915892:0
The keyboard in the HP Mini 110 is held in by three screws behind the battery, and will easily pop out with a little clever work with the spudger. Removing the keyboard is a must if you need to access any of the internals (except for the memory).
crwdns2942213:0crwdne2942213:0
-
-
-
Power-off the netbook fully before attempting to remove the battery.
-
Flip your netbook upside down, and locate the sliding tabs near the battery.
-
Slide both tabs inward so that the battery visibly moves away from the case of the computer.
-
Release the tabs and pull the battery out.
 crwdns2952109:0crwdne2952109:0
-
-
-
-
-
With the screen closed, turn your netbook around so that the battery slot is facing you.
-
Remove the three 2.9mm screws in the battery slot.
-
This step can be made easier by using a magnetic screwdriver.
-
-
-
-
Flip the netbook upright, and open the screen as far as it will go.
-
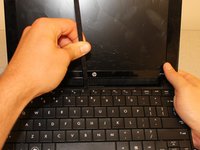
Pry up the keyboard from the middle of the top edge.
-
Insert the flat end of the spudger between middle of the the top edge of the keyboard and the plastic frame behind it.
-
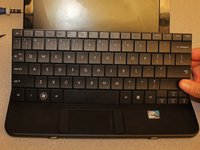
Pry the keyboard up until it pops out or until you can grab it with your fingers, and then pull gently until it pops out on both sides.
-
-
-
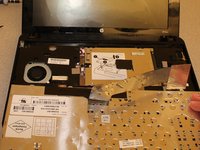
Flip the keyboard over (toward you) by pivoting it about the lower edge, and lay it upside down on top of the touchpad area to reveal the ribbon cable.
-
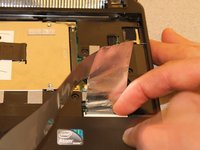
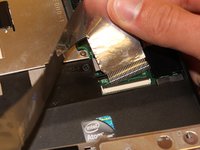
Lightly pull up on the black tab on top of the keyboard ribbon cable until it hinges toward you and releases the ribbon cable end.
-
Pull the ribbon cable backward and out of the receptacle. This should not require any effort.
-
-





To reassemble your device, follow these instructions in reverse order.
crwdns2935221:0crwdne2935221:0
crwdns2935229:02crwdne2935229:0

crwdns2935287:0crwdne2935287:0

Clemson, Team 14-1, Benson Fall 2013 crwdns2935289:0Clemson, Team 14-1, Benson Fall 2013crwdne2935289:0
CLEM-BENSON-F13S14G1
crwdns2931471:03crwdne2931471:0
crwdns2935297:012crwdne2935297:0
