crwdns2915892:0crwdne2915892:0
Is your HP Laserjet Pro 200 overheating when printing out important papers? If so, this guide demonstrates how to quickly replace the fan inside your printer. All you need is a Phillips #2 Screwdriver, iFixit Opening Tool, Metal Spudger, and a friend to help you with one of the steps!
crwdns2942213:0crwdne2942213:0
-
-
Turn the printer so that the front is facing to your left.
-
Flip the printer so that it is laying with its right side facing down and the bottom facing you.
-
-
-
Remove the 8 mm screw on the top edge of the printer using a #2 Phillips head screwdriver.
-
-
-
-
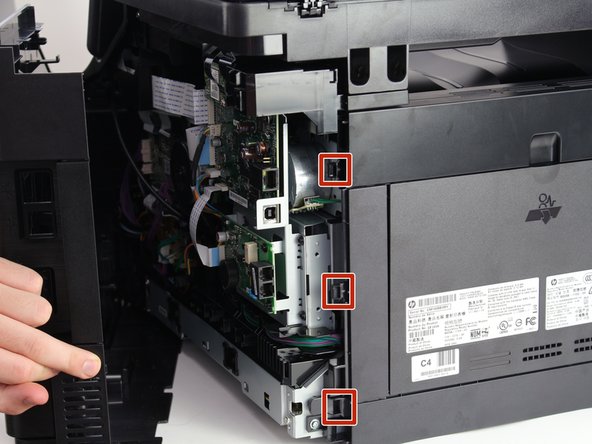
Use a flathead screwdriver to depress these tabs while lightly pulling the panel towards you.
-
Begin with the upmost tab and move your way down, individually depressing the tabs while simultaneously pulling the panel towards you, removing it from the printer.
-
-
-
Rotate the printer so you are facing the open side.
-
-
-
Gently pull out the plug that supplies power to the fan from the socket on the circuit board.
-
-
-
Push each tab outwards from the fan.
-
Simultaneously pull the fan towards you until the fan clears the face of the printer.
-


To reassemble your device, follow the instructions in reverse order.
To reassemble your device, follow the instructions in reverse order.
crwdns2935221:0crwdne2935221:0
crwdns2935229:02crwdne2935229:0
crwdns2915084:0crwdne2915084:0

Cal Poly, Team S9-G14, Maness Spring 2019 crwdns2935289:0Cal Poly, Team S9-G14, Maness Spring 2019crwdne2935289:0
CPSU-MANESS-S19S9G14
crwdns2931471:04crwdne2931471:0
crwdns2935297:011crwdne2935297:0