crwdns2933423:0crwdne2933423:0

HP G62-234DX RAM Replacement Replacement

crwdns2942213:0crwdne2942213:0

  1. HP G62-234DX RAM Replacement Replacement, Battery: crwdns2935265:01crwdnd2935265:01crwdnd2935265:01crwdne2935265:0
    • Make sure the computer is turned off, disconnected from the charger, and on a steady surface.

    • Unlock the battery by sliding the button just below it, to the left.

  2. HP G62-234DX RAM Replacement Replacement: crwdns2935265:02crwdnd2935265:01crwdnd2935265:01crwdne2935265:0
    • While pushing the lock button to the unlock position, slide the battery out and away from the laptop.

    • When sliding the new battery back into the socket, you'll know it's secure when you hear a click.

  3. HP G62-234DX RAM Replacement Replacement, RAM: crwdns2935265:03crwdnd2935265:01crwdnd2935265:03crwdne2935265:0 HP G62-234DX RAM Replacement Replacement, RAM: crwdns2935265:03crwdnd2935265:02crwdnd2935265:03crwdne2935265:0 HP G62-234DX RAM Replacement Replacement, RAM: crwdns2935265:03crwdnd2935265:03crwdnd2935265:03crwdne2935265:0
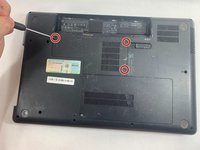
    • Use a Phillips #0 screwdriver to remove three screws from the back panel.

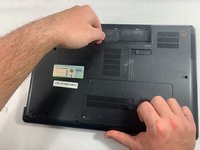
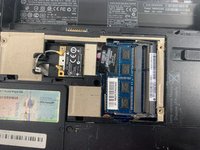
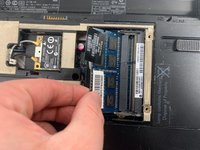
    • Carefully pull the panel off of the back of the laptop to reveal the RAM sticks.

  4. HP G62-234DX RAM Replacement Replacement: crwdns2935265:04crwdnd2935265:01crwdnd2935265:03crwdne2935265:0 HP G62-234DX RAM Replacement Replacement: crwdns2935265:04crwdnd2935265:02crwdnd2935265:03crwdne2935265:0 HP G62-234DX RAM Replacement Replacement: crwdns2935265:04crwdnd2935265:03crwdnd2935265:03crwdne2935265:0
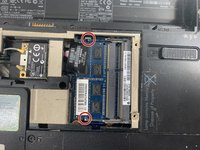
    • Two clips secure the RAM stick in place, one on each side. Using your fingers, spread the clips away from the RAM stick.

    • When released, the RAM stick will pop up at a slight angle.

    • Lift the RAM stick to an angle of about 30 degrees and slide it out.

    • When handling the RAM stick, only touch the outside edges. Take care not to touch the gold-colored contact points along the bottom edge.

    • To install a new RAM stick, slide it in place at about the same angle until it's snug, and then swing it downward until the two clips snap into place.

crwdns2915888:0crwdne2915888:0

To reassemble your device, follow these instructions in reverse order.

Cameron Popillo

crwdns2935283:003/20/23crwdne2935283:0

337 crwdns2915208:0crwdne2915208:0

crwdns2935297:04crwdne2935297:0

crwdns2915084:0crwdne2915084:0

UMass Dartmouth, Team 5-1, Ramos Spring 2023 crwdns2935289:0UMass Dartmouth, Team 5-1, Ramos Spring 2023crwdne2935289:0

UMASSD-RAMOS-S23S5G1

crwdns2931471:03crwdne2931471:0

crwdns2935297:04crwdne2935297:0

crwdns2944067:00crwdne2944067:0

crwdns2917038:0crwdne2917038:0

crwdns2936625:0crwdne2936625:0:

crwdns2936751:024crwdne2936751:0 0

crwdns2936753:07crwdne2936753:0 0

crwdns2936753:030crwdne2936753:0 7

crwdns2942667:0crwdne2942667:0 118