crwdns2933423:0crwdne2933423:0

HP G62-223CL Hard Drive Replacement

crwdns2942213:0crwdne2942213:0

  1. HP G62-223CL Hard Drive Replacement, Battery Removal: crwdns2935265:01crwdnd2935265:01crwdnd2935265:02crwdne2935265:0 HP G62-223CL Hard Drive Replacement, Battery Removal: crwdns2935265:01crwdnd2935265:02crwdnd2935265:02crwdne2935265:0
    • Removing the battery while the laptop is still on may corrupt your files.

    • Turn the device over to expose the bottom of the device.

    • Slide the battery release all the way to the left.

    • There will be a click and the battery will be released from its compartment.

  2. HP G62-223CL Hard Drive Replacement: crwdns2935265:02crwdnd2935265:01crwdnd2935265:01crwdne2935265:0
    • Carefully remove the battery from its compartment.

  3. HP G62-223CL Hard Drive Replacement, Hard Drive: crwdns2935265:03crwdnd2935265:01crwdnd2935265:02crwdne2935265:0 HP G62-223CL Hard Drive Replacement, Hard Drive: crwdns2935265:03crwdnd2935265:02crwdnd2935265:02crwdne2935265:0
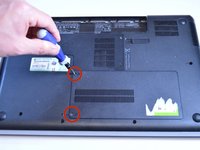
    • Locate the two Phillips head retaining screws which secure the hard drive compartment.

    • Use a Phillips #0 screwdriver to loosen the retaining screws.

    • Remove the panel covering the compartment.

    • Ground yourself before attempting to touch any components. To ground yourself, touch a conductive metal to eliminate any static buildup in your body, which can damage computer components.

  4. HP G62-223CL Hard Drive Replacement: crwdns2935265:04crwdnd2935265:01crwdnd2935265:01crwdne2935265:0
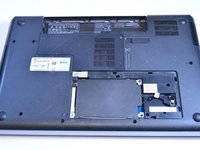
    • Locate the three 6 mm Phillips head screws for the hard drive.

    • Use a Phillips #0 screwdriver to remove the screws.

  5. HP G62-223CL Hard Drive Replacement: crwdns2935265:05crwdnd2935265:01crwdnd2935265:01crwdne2935265:0
    • Remove the hard drive from the compartment.

    • Pull the connector cable from the end of the hard drive.

  6. HP G62-223CL Hard Drive Replacement: crwdns2935265:06crwdnd2935265:01crwdnd2935265:01crwdne2935265:0
    • Locate the two 6 mm Phillips head screws on each side of the hard drive.

    • Use a Phillips #0 screwdriver to remove the screws.

    • Remove the cover from the hard drive.

crwdns2915888:0crwdne2915888:0

To reassemble your device, follow these instructions in reverse order.

crwdns2935229:02crwdne2935229:0

Garret Layton

crwdns2935283:001/13/15crwdne2935283:0

669 crwdns2915208:0crwdne2915208:0

crwdns2935297:05crwdne2935297:0

crwdns2915084:0crwdne2915084:0

USF Tampa, Team 1-4, Sullivan Winter 2015 crwdns2935289:0USF Tampa, Team 1-4, Sullivan Winter 2015crwdne2935289:0

USFT-SULLIVAN-W15S1G4

crwdns2931471:04crwdne2931471:0

crwdns2935297:05crwdne2935297:0

crwdns2944067:00crwdne2944067:0

crwdns2917038:0crwdne2917038:0

crwdns2936625:0crwdne2936625:0:

crwdns2936751:024crwdne2936751:0 2

crwdns2936753:07crwdne2936753:0 5

crwdns2936753:030crwdne2936753:0 14

crwdns2942667:0crwdne2942667:0 2,604