crwdns2933423:0crwdne2933423:0

HP Envy x360 15-u473cl Motherboard Replacement

crwdns2942213:0crwdne2942213:0

  1. HP Envy x360 15-u473cl Motherboard Replacement, Battery: crwdns2935265:01crwdnd2935265:01crwdnd2935265:02crwdne2935265:0 HP Envy x360 15-u473cl Motherboard Replacement, Battery: crwdns2935265:01crwdnd2935265:02crwdnd2935265:02crwdne2935265:0
    • Power off your laptop before beginning disassembly.

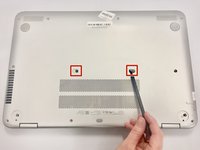
    • Pry off the 2 rear rubber pads (closest to the laptop hinge) using the plastic opening tool to reveal two screws.

    • Remove the 2 anti-tamper proof covers using the spudger to reveal two screws.

  2. HP Envy x360 15-u473cl Motherboard Replacement: crwdns2935265:02crwdnd2935265:01crwdnd2935265:01crwdne2935265:0
    • Remove the fourteen 7mm screws using the Phillips #0 screwdriver from the bottom of the laptop.

  3. HP Envy x360 15-u473cl Motherboard Replacement: crwdns2935265:03crwdnd2935265:01crwdnd2935265:02crwdne2935265:0 HP Envy x360 15-u473cl Motherboard Replacement: crwdns2935265:03crwdnd2935265:02crwdnd2935265:02crwdne2935265:0
    • Turn the device right side up and open the lid.

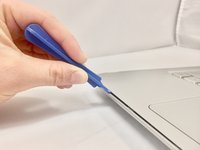
    • Insert the plastic opening tool in between the keyboard plate and the base of laptop.

    • Run the tool along seem, prying up as you go.

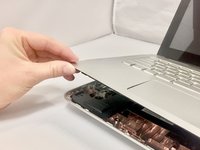
    • Separate the keyboard plate from the base, lifting from the front.

  4. HP Envy x360 15-u473cl Motherboard Replacement: crwdns2935265:04crwdnd2935265:01crwdnd2935265:01crwdne2935265:0
    • There are 3 ribbon cables (black, white, and copper color) connecting the computer to the keyboard plate. Disconnect the 3 ribbon cables using the plastic opening tool by prying up the latches holding each cable in place.

    • Remove the keyboard plate from the device.

  5. HP Envy x360 15-u473cl Motherboard Replacement: crwdns2935265:05crwdnd2935265:01crwdnd2935265:01crwdne2935265:0
    • Remove the thick white ribbon cable covering the battery using the plastic opening tool by prying up the latches attaching each end.

  6. HP Envy x360 15-u473cl Motherboard Replacement: crwdns2935265:06crwdnd2935265:01crwdnd2935265:01crwdne2935265:0
    • Remove the three 4mm screws using the Phillips #0 screwdriver.

  7. HP Envy x360 15-u473cl Motherboard Replacement: crwdns2935265:07crwdnd2935265:01crwdnd2935265:01crwdne2935265:0
    • Disconnect the battery from the motherboard.

    • There may be tamper-proof tape holding the battery in place. Remove the tape if present.

    • Remove the battery from the device.

  8. HP Envy x360 15-u473cl Motherboard Replacement, Fan: crwdns2935265:08crwdnd2935265:01crwdnd2935265:01crwdne2935265:0
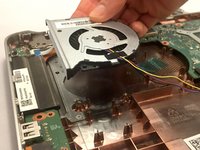
    • Remove the three 4mm screws using the Phillips #0 screwdriver from the device fan.

  9. HP Envy x360 15-u473cl Motherboard Replacement: crwdns2935265:09crwdnd2935265:01crwdnd2935265:02crwdne2935265:0 HP Envy x360 15-u473cl Motherboard Replacement: crwdns2935265:09crwdnd2935265:02crwdnd2935265:02crwdne2935265:0
    • Disconnect the fan from the motherboard using the spudger.

    • Remove the fan from the device.

  10. HP Envy x360 15-u473cl Motherboard Replacement, Motherboard: crwdns2935265:010crwdnd2935265:01crwdnd2935265:02crwdne2935265:0 HP Envy x360 15-u473cl Motherboard Replacement, Motherboard: crwdns2935265:010crwdnd2935265:02crwdnd2935265:02crwdne2935265:0
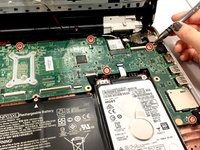
    • Remove the five 4mm screws with the Phillips #0 screwdriver.

    • Remove one 3mm screw with the Phillips #00 screwdriver.

  11. HP Envy x360 15-u473cl Motherboard Replacement: crwdns2935265:011crwdnd2935265:01crwdnd2935265:02crwdne2935265:0 HP Envy x360 15-u473cl Motherboard Replacement: crwdns2935265:011crwdnd2935265:02crwdnd2935265:02crwdne2935265:0
    • Disconnect the 2 white ribbon cables using the plastic opening tool.

    • Disconnect the two black cable bundles using the plastic opening tool.

  12. HP Envy x360 15-u473cl Motherboard Replacement: crwdns2935265:012crwdnd2935265:01crwdnd2935265:03crwdne2935265:0 HP Envy x360 15-u473cl Motherboard Replacement: crwdns2935265:012crwdnd2935265:02crwdnd2935265:03crwdne2935265:0 HP Envy x360 15-u473cl Motherboard Replacement: crwdns2935265:012crwdnd2935265:03crwdnd2935265:03crwdne2935265:0
    • Disconnect the charging port wire bundle from the motherboard using the plastic opening tool.

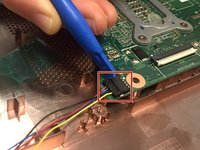
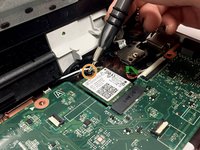
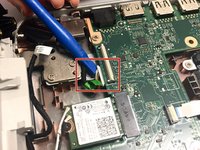
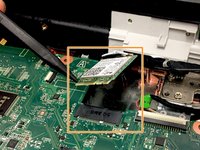
    • Disconnect the wireless card by pulling away from the black transistor using the spudger.

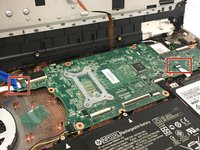
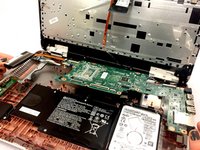
    • Remove the motherboard.

crwdns2915888:0crwdne2915888:0

To reassemble your device, follow these instructions in reverse order.

crwdns2935229:03crwdne2935229:0

Maximillian McDonald

crwdns2935283:001/13/18crwdne2935283:0

784 crwdns2915208:0crwdne2915208:0

crwdns2935297:05crwdne2935297:0

crwdns2915084:0crwdne2915084:0

Eastern Washington University, Team S1-G2, Ramos Winter 2018 crwdns2935289:0Eastern Washington University, Team S1-G2, Ramos Winter 2018crwdne2935289:0

EWU-RAMOS-W18S1G2

crwdns2931471:05crwdne2931471:0

crwdns2935297:05crwdne2935297:0

crwdns2944067:00crwdne2944067:0

crwdns2917038:0crwdne2917038:0

crwdns2936625:0crwdne2936625:0:

crwdns2936751:024crwdne2936751:0 0

crwdns2936753:07crwdne2936753:0 4

crwdns2936753:030crwdne2936753:0 17

crwdns2942667:0crwdne2942667:0 2,185