crwdns2915892:0crwdne2915892:0
If your HP Envy x360 15-bp143cl laptop is experiencing frequent shutdowns, power issues, hardware malfunctions, or has suffered water or electrical damage, you may need to replace the motherboard to restore proper functionality. This guide will walk you through the steps to replace the motherboard in the HP Envy x360 15-bp143cl.
The motherboard—also known as the system board or mainboard—is the central circuit hub of your device. It connects and coordinates all essential components, including the CPU, memory, storage, ports, and integrated peripherals. A faulty motherboard can cause a wide range of issues, from non-booting systems to random errors and loss of connectivity.
Important Safety Tips:
- Power off your laptop completely and disconnect all external power sources and devices.
- Remove the battery immediately after opening the device to prevent short circuits or electric shock. If your battery is swollen or shows signs of damage, [[What to do with a swollen battery, follow this guide on what to do with a swollen battery before continuing.
- Use an anti-static wrist strap or work on an ESD-safe mat to protect sensitive internal components from electrostatic discharge.
This replacement requires careful disassembly, including detaching the heat sink and unplugging multiple ribbon cables. Reapplication of thermal paste to the CPU and GPU is necessary when reinstalling the heat sink, so familiarity with this process is essential. Follow this guide to familiarize yourself with how to apply thermal paste.
crwdns2942213:0crwdne2942213:0
-
-
Flip the laptop over.
-
Peel off the rubber strip closest to the hinges.
-
-
-
Use a Phillips #1 screwdriver (PH1 bit) to remove the four 6.5mm screws that were underneath the rubber strip.
-
-
-
Use a Torx T5 screwdriver (T5 bit) to remove the three 5mm screws near the bottom edge of the laptop.
-
-
-
Lift the back panel to remove it from the laptop.
-
-
-
-
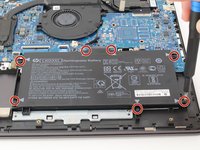
Use a Phillips #1 screwdriver (PH1) to remove the seven 4mm screws indicated by the gray arrows on the battery.
-
-
-
Pull the battery from the connecting port and lift to remove it from the laptop.
-
-
-
Peel off the tape securing the heatsink.
-
-
-
Use a Phillips #1 screwdriver to remove the seven 4 mm screws securing the fan.
-
Detach the fan cable from the mother board.
-
-
-
Lift the fan up and off the motherboard.
-
-
-
Use a Phillips #1 screwdriver to remove the ten 4 mm screws securing the motherboard.
-
Pull the four cables directly out of their ports.
-
Flip up the lock-bar on the two ZIF connectors, then gently pull the two ribbon cables directly out of their ports.
-
-
-
Gently lift the motherboard up and out of the chassis.
-


To reassemble your device, follow these instructions in reverse order.
To reassemble your device, follow these instructions in reverse order.
crwdns2935221:0crwdne2935221:0
crwdns2935227:0crwdne2935227:0

crwdns2915084:0crwdne2915084:0

The Citadel Military College of South Carolina, Team 1-2, Eggleston Spring 2022 crwdns2935289:0The Citadel Military College of South Carolina, Team 1-2, Eggleston Spring 2022crwdne2935289:0
CMCSC-EGGLESTON-S22S1G2
crwdns2931471:02crwdne2931471:0
crwdns2935297:03crwdne2935297:0