crwdns2915892:0crwdne2915892:0
Use this guide to replace a dead or faulty battery in an HP Envy x360 15-bp143cl. The laptop is also identified by its model number, 3TS71UAR#ABA.
Many factors can cause a laptop’s battery to quickly lose charge. Review the HP Envy x360 15-bp143cl Battery Troubleshooting Page to check if any factors, such as running too many processes at once, are affecting the battery life of your device.
The amount of charge a battery can hold will decrease with extended use. Numerous charging cycles will cause the battery to die. If this is the case, or the device contains a damaged battery, it will need to be replaced.
Turn the laptop off and disconnect it from any power supply before starting the replacement process.
Wear the Anti-Static Wrist Strap before working near the motherboard to prevent any damage.
Warning: If the battery is swollen, excessively hot, or has a poor smell, wait to replace the battery until it is safe. This reduces the possibility of it catching on fire or releasing toxic fumes. If this problem persists, seek professional help.
crwdns2942213:0crwdne2942213:0
-
-
Flip the laptop over.
-
Peel off the rubber strip closest to the hinges.
-
-
-
Use a Phillips #1 screwdriver (PH1 bit) to remove the four 6.5mm screws that were underneath the rubber strip.
-
-
-
-
Use a Torx T5 screwdriver (T5 bit) to remove the three 5mm screws near the bottom edge of the laptop.
-
-
-
Lift the back panel to remove it from the laptop.
-
-
-
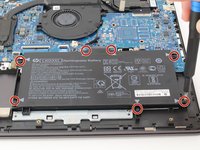
Use a Phillips #1 screwdriver (PH1) to remove the seven 4mm screws indicated by the gray arrows on the battery.
-
-
-
Pull the battery from the connecting port and lift to remove it from the laptop.
-


To reassemble your device, follow these instructions in reverse order.
To reassemble your device, follow these instructions in reverse order.
crwdns2935221:0crwdne2935221:0
crwdns2935229:03crwdne2935229:0

crwdns2915084:0crwdne2915084:0

Cal Poly, Team S12-G3, Regan Fall 2019 crwdns2935289:0Cal Poly, Team S12-G3, Regan Fall 2019crwdne2935289:0
CPSU-REGAN-F19S12G3
crwdns2931471:03crwdne2931471:0
crwdns2935297:06crwdne2935297:0
crwdns2947410:01crwdne2947410:0
Thank you for the pictures and advice!
I did not see any memory. Can you tell me if there are two slots for upgrading? I read that one stick of memory is soldered and the other is socketed.
Regards!