crwdns2933423:0crwdne2933423:0

HP Envy Ultrabook 4-1015dx Hard Disk Drive Replacement

crwdns2942213:0crwdne2942213:0

  1. HP Envy Ultrabook 4-1015dx Hard Disk Drive Replacement, Battery: crwdns2935265:01crwdnd2935265:01crwdnd2935265:01crwdne2935265:0
    • Make sure that the device is turned off and that all external devices are removed.

  2. HP Envy Ultrabook 4-1015dx Hard Disk Drive Replacement: crwdns2935265:02crwdnd2935265:01crwdnd2935265:01crwdne2935265:0
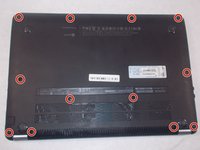
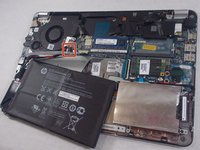
    • Flip the device over so that the back plate is facing upwards.

  3. HP Envy Ultrabook 4-1015dx Hard Disk Drive Replacement: crwdns2935265:03crwdnd2935265:01crwdnd2935265:02crwdne2935265:0 HP Envy Ultrabook 4-1015dx Hard Disk Drive Replacement: crwdns2935265:03crwdnd2935265:02crwdnd2935265:02crwdne2935265:0
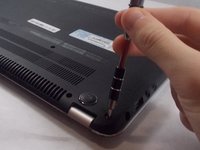
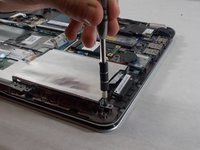
    • Using a small (size 0) Phillips head screwdriver, remove the twelve 5.5 mm external Phillips head screws that connect the back plate to the device.

    • Make sure to set the screws aside in a safe place so that you do not lose them, as they will be needed to reattach the backplate later.

  4. HP Envy Ultrabook 4-1015dx Hard Disk Drive Replacement: crwdns2935265:04crwdnd2935265:01crwdnd2935265:02crwdne2935265:0 HP Envy Ultrabook 4-1015dx Hard Disk Drive Replacement: crwdns2935265:04crwdnd2935265:02crwdnd2935265:02crwdne2935265:0
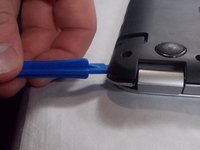
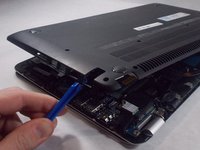
    • Using the plastic opening tool, gently pry off the back plate from the device.

  5. HP Envy Ultrabook 4-1015dx Hard Disk Drive Replacement: crwdns2935265:05crwdnd2935265:01crwdnd2935265:02crwdne2935265:0 HP Envy Ultrabook 4-1015dx Hard Disk Drive Replacement: crwdns2935265:05crwdnd2935265:02crwdnd2935265:02crwdne2935265:0
    • The large black box with the white warning images is the battery.

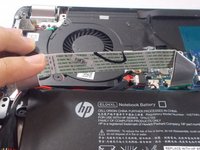
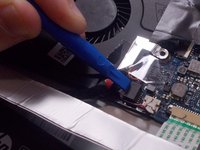
    • Move the ribbon cable so that it is no longer on top of the battery.

  6. HP Envy Ultrabook 4-1015dx Hard Disk Drive Replacement: crwdns2935265:06crwdnd2935265:01crwdnd2935265:02crwdne2935265:0 HP Envy Ultrabook 4-1015dx Hard Disk Drive Replacement: crwdns2935265:06crwdnd2935265:02crwdnd2935265:02crwdne2935265:0
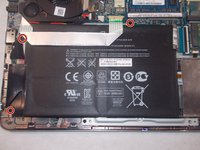
    • Using a small (size 0) Phillips head screwdriver, remove the three 3.5 mm Phillips head internal screws that hold the battery in place.

    • Make sure not to lose these internal screws; they will later be used to reattach the battery.

  7. HP Envy Ultrabook 4-1015dx Hard Disk Drive Replacement: crwdns2935265:07crwdnd2935265:01crwdnd2935265:02crwdne2935265:0 HP Envy Ultrabook 4-1015dx Hard Disk Drive Replacement: crwdns2935265:07crwdnd2935265:02crwdnd2935265:02crwdne2935265:0
    • Lift up the battery and remove it from the slot as shown.

  8. HP Envy Ultrabook 4-1015dx Hard Disk Drive Replacement: crwdns2935265:08crwdnd2935265:01crwdnd2935265:03crwdne2935265:0 HP Envy Ultrabook 4-1015dx Hard Disk Drive Replacement: crwdns2935265:08crwdnd2935265:02crwdnd2935265:03crwdne2935265:0 HP Envy Ultrabook 4-1015dx Hard Disk Drive Replacement: crwdns2935265:08crwdnd2935265:03crwdnd2935265:03crwdne2935265:0
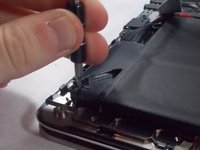
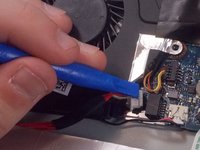
    • Use the plastic opening tool to disconnect the battery cable.

  9. HP Envy Ultrabook 4-1015dx Hard Disk Drive Replacement: crwdns2935265:09crwdnd2935265:01crwdnd2935265:01crwdne2935265:0
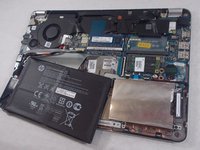
    • Lift up the battery and remove it from the device.

  10. HP Envy Ultrabook 4-1015dx Hard Disk Drive Replacement, Hard Disk Drive: crwdns2935265:010crwdnd2935265:01crwdnd2935265:03crwdne2935265:0 HP Envy Ultrabook 4-1015dx Hard Disk Drive Replacement, Hard Disk Drive: crwdns2935265:010crwdnd2935265:02crwdnd2935265:03crwdne2935265:0 HP Envy Ultrabook 4-1015dx Hard Disk Drive Replacement, Hard Disk Drive: crwdns2935265:010crwdnd2935265:03crwdnd2935265:03crwdne2935265:0
    • The hard disk drive is under a metallic looking case in the bottom-right corner of the device.

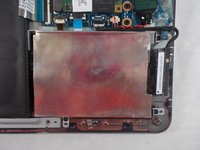
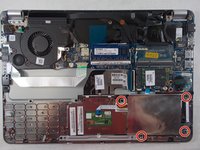
    • Using a size 0 Phillips head screwdriver, remove the four 3 mm size 0 screws attaching the hard drive casing to the device.

  11. HP Envy Ultrabook 4-1015dx Hard Disk Drive Replacement: crwdns2935265:011crwdnd2935265:01crwdnd2935265:01crwdne2935265:0
    • Remove the hard drive case.

  12. HP Envy Ultrabook 4-1015dx Hard Disk Drive Replacement: crwdns2935265:012crwdnd2935265:01crwdnd2935265:01crwdne2935265:0
    • Unplug the hard drive from the hard drive plug.

crwdns2915888:0crwdne2915888:0

To reassemble your device, follow these instructions in reverse order.

Cameron DiBenedetto

crwdns2935283:010/17/18crwdne2935283:0

97 crwdns2915208:0crwdne2915208:0

crwdns2935295:0crwdne2935295:0

crwdns2915084:0crwdne2915084:0

UMass Dartmouth, Team S1-G3, Valliere Fall 2018 crwdns2935289:0UMass Dartmouth, Team S1-G3, Valliere Fall 2018crwdne2935289:0

UMASSD-VALLIERE-F18S1G3

crwdns2931471:05crwdne2931471:0

crwdns2935297:06crwdne2935297:0

crwdns2947412:00crwdne2947412:0

crwdns2917038:0crwdne2917038:0

crwdns2936625:0crwdne2936625:0:

crwdns2936751:024crwdne2936751:0 0

crwdns2936753:07crwdne2936753:0 7

crwdns2936753:030crwdne2936753:0 14

crwdns2942667:0crwdne2942667:0 343