crwdns2933423:0crwdne2933423:0

HP Envy TouchSmart 15 Digitizer Replacement

crwdns2942213:0crwdne2942213:0

  1. HP Envy TouchSmart 15 Digitizer Replacement, Touch Screen/Digitizer: crwdns2935265:01crwdnd2935265:01crwdnd2935265:01crwdne2935265:0
    • Lay the laptop down with the bottom facing up.

  2. HP Envy TouchSmart 15 Digitizer Replacement: crwdns2935265:02crwdnd2935265:01crwdnd2935265:01crwdne2935265:0
    • Slide the switch to release the battery and remove it.

  3. HP Envy TouchSmart 15 Digitizer Replacement: crwdns2935265:03crwdnd2935265:01crwdnd2935265:02crwdne2935265:0 HP Envy TouchSmart 15 Digitizer Replacement: crwdns2935265:03crwdnd2935265:02crwdnd2935265:02crwdne2935265:0
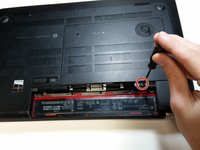
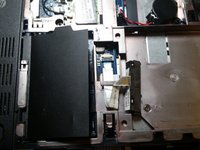
    • Remove the screw from the access panel. Gently lift and remove the panel.

  4. HP Envy TouchSmart 15 Digitizer Replacement: crwdns2935265:04crwdnd2935265:01crwdnd2935265:03crwdne2935265:0 HP Envy TouchSmart 15 Digitizer Replacement: crwdns2935265:04crwdnd2935265:02crwdnd2935265:03crwdne2935265:0 HP Envy TouchSmart 15 Digitizer Replacement: crwdns2935265:04crwdnd2935265:03crwdnd2935265:03crwdne2935265:0
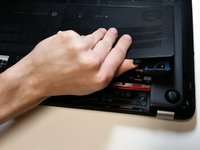
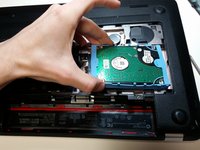
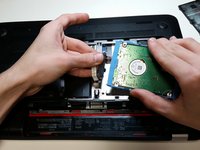
    • Remove the hard drive and disconnect its ribbon cable from both the hard drive and the motherboard.

    Gently pry up on black ribbon clank then slide ribbon off motherboard

    chewfie - crwdns2934203:0crwdne2934203:0

  5. HP Envy TouchSmart 15 Digitizer Replacement: crwdns2935265:05crwdnd2935265:01crwdnd2935265:03crwdne2935265:0 HP Envy TouchSmart 15 Digitizer Replacement: crwdns2935265:05crwdnd2935265:02crwdnd2935265:03crwdne2935265:0 HP Envy TouchSmart 15 Digitizer Replacement: crwdns2935265:05crwdnd2935265:03crwdnd2935265:03crwdne2935265:0
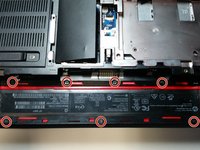
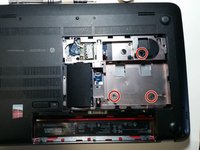
    • Remove the screws to loosen the bottom casing.

    • Remove the two feet to reveal the screws underneath.

    Description missed two screws on removing the back cover.

    Jacob - crwdns2934203:0crwdne2934203:0

  6. HP Envy TouchSmart 15 Digitizer Replacement: crwdns2935265:06crwdnd2935265:01crwdnd2935265:01crwdne2935265:0
    • Gently pry the edges to loosen the case.

    • Once loose, lift and remove the plastic casing to reveal the motherboard.

  7. HP Envy TouchSmart 15 Digitizer Replacement: crwdns2935265:07crwdnd2935265:01crwdnd2935265:02crwdne2935265:0 HP Envy TouchSmart 15 Digitizer Replacement: crwdns2935265:07crwdnd2935265:02crwdnd2935265:02crwdne2935265:0
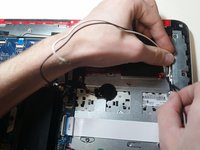
    • Lift and detach the wireless antenna cables.

    • Lift and de-route the wires from their tracks until you reach the display hinges.

  8. HP Envy TouchSmart 15 Digitizer Replacement: crwdns2935265:08crwdnd2935265:01crwdnd2935265:01crwdne2935265:0
    • Detach the two cables. Lift the tab for the ribbon cable before pulling it out.

  9. HP Envy TouchSmart 15 Digitizer Replacement: crwdns2935265:09crwdnd2935265:01crwdnd2935265:02crwdne2935265:0 HP Envy TouchSmart 15 Digitizer Replacement: crwdns2935265:09crwdnd2935265:02crwdnd2935265:02crwdne2935265:0
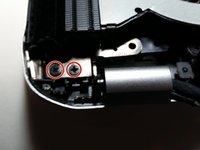
    • Remove the screws from each hinge.

    • Lift the hinges with pliers until they are perpendicular to the case.

    • Lift and remove the bottom of the laptop from the screen.

  10. HP Envy TouchSmart 15 Digitizer Replacement: crwdns2935265:010crwdnd2935265:01crwdnd2935265:01crwdne2935265:0
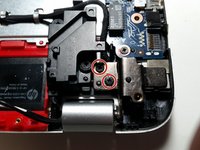
    • Lift the tabs in both the bottom corners and remove the screws beneath.

  11. HP Envy TouchSmart 15 Digitizer Replacement: crwdns2935265:011crwdnd2935265:01crwdnd2935265:02crwdne2935265:0 HP Envy TouchSmart 15 Digitizer Replacement: crwdns2935265:011crwdnd2935265:02crwdnd2935265:02crwdne2935265:0
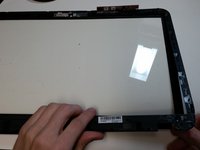
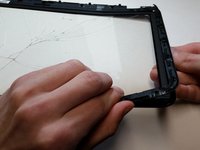
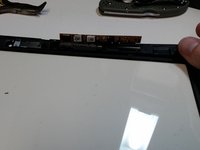
    • Using a pry tool as necessary, remove the digitizer from the rest of the screen panel. Be careful around the top edge as there are delicate components beneath.

    Forgot to mention disconnecting the wire from the digitizer to the screen.

    Jacob - crwdns2934203:0crwdne2934203:0

  12. HP Envy TouchSmart 15 Digitizer Replacement: crwdns2935265:012crwdnd2935265:01crwdnd2935265:03crwdne2935265:0 HP Envy TouchSmart 15 Digitizer Replacement: crwdns2935265:012crwdnd2935265:02crwdnd2935265:03crwdne2935265:0 HP Envy TouchSmart 15 Digitizer Replacement: crwdns2935265:012crwdnd2935265:03crwdnd2935265:03crwdne2935265:0
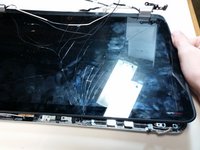
    • Using a heat gun, carefully loosen the adhesive connecting the digitizer to its plastic border.

    • Gently peel the digitizer away from the plastic border.

    • When installing the new one digitizer, press firmly around the edges.

crwdns2915888:0crwdne2915888:0

To reassemble your device, follow these instructions in reverse order.

crwdns2935229:05crwdne2935229:0

Micah Kempf

crwdns2935283:003/30/16crwdne2935283:0

260 crwdns2915208:0crwdne2915208:0

crwdns2935295:0crwdne2935295:0

crwdns2915084:0crwdne2915084:0

Michigan Tech, Team 1-12, Lauer Spring 2016 crwdns2935289:0Michigan Tech, Team 1-12, Lauer Spring 2016crwdne2935289:0

MTU-LAUER-S16S1G12

crwdns2934841:01crwdne2934841:0

crwdns2935303:01crwdne2935303:0

crwdns2944067:04crwdne2944067:0

These directions are perfect. I was able to successfully change my digitizer in under an hour

Joe Russo - crwdns2934203:0crwdne2934203:0

where do you get the digitizer?

Jacob - crwdns2934203:0crwdne2934203:0

Amazing,

My name is Nevelson, I have exactly same laptop and mine also is broke, but I don't know where to get the replacement; only the sensor, please I need help and willing to pay handsomely.

Nevelson Odimgbe - crwdns2934203:0crwdne2934203:0

Nevelson, I have updated this page to included a link to the part on amazon.

Micah Kempf - crwdns2934203:0crwdne2934203:0

crwdns2917038:0crwdne2917038:0

crwdns2936625:0crwdne2936625:0:

crwdns2936751:024crwdne2936751:0 1

crwdns2936753:07crwdne2936753:0 4

crwdns2936753:030crwdne2936753:0 33

crwdns2942667:0crwdne2942667:0 14,115