crwdns2933423:0crwdne2933423:0

HP Envy 17-J013CL Motherboard Replacement

crwdns2942213:0crwdne2942213:0

  1. HP Envy 17-J013CL Motherboard Replacement, Battery: crwdns2935265:01crwdnd2935265:01crwdnd2935265:01crwdne2935265:0
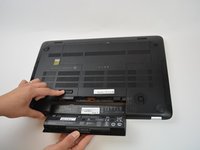
    • Lay the laptop with the battery facing towards you.

    • Remember to disconnect the AC cable and other power sources from the device before replacing/repairing parts.

  2. HP Envy 17-J013CL Motherboard Replacement: crwdns2935265:02crwdnd2935265:01crwdnd2935265:01crwdne2935265:0
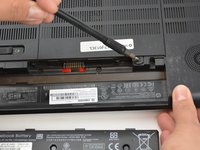
    • Grab hold of the small battery slider and apply pressure to the right.

    • The laptop itself will push the battery out for you once the switch slides all the way to the right.

  3. HP Envy 17-J013CL Motherboard Replacement: crwdns2935265:03crwdnd2935265:01crwdnd2935265:03crwdne2935265:0 HP Envy 17-J013CL Motherboard Replacement: crwdns2935265:03crwdnd2935265:02crwdnd2935265:03crwdne2935265:0 HP Envy 17-J013CL Motherboard Replacement: crwdns2935265:03crwdnd2935265:03crwdnd2935265:03crwdne2935265:0
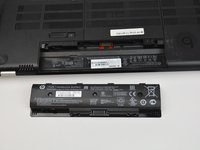
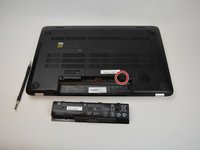
    • Pull the battery out and let go of the battery slider.

  4. HP Envy 17-J013CL Motherboard Replacement, Back Panel: crwdns2935265:04crwdnd2935265:01crwdnd2935265:02crwdne2935265:0 HP Envy 17-J013CL Motherboard Replacement, Back Panel: crwdns2935265:04crwdnd2935265:02crwdnd2935265:02crwdne2935265:0
    • Use a PH1-screwdriver to loosen the 7mm screw. The screw will not fully come out as it is held by a washer underneath but will come out enough to open it.

  5. HP Envy 17-J013CL Motherboard Replacement: crwdns2935265:05crwdnd2935265:01crwdnd2935265:01crwdne2935265:0
    • Gently pull the back panel off starting from the battery side towards the back.

    • Pull it back as it snaps out of the holding sockets.

    • It is preferred to use both hands when pulling the back panel off to prevent bending it out of shape.

  6. HP Envy 17-J013CL Motherboard Replacement, Processor: crwdns2935265:06crwdnd2935265:01crwdnd2935265:03crwdne2935265:0 HP Envy 17-J013CL Motherboard Replacement, Processor: crwdns2935265:06crwdnd2935265:02crwdnd2935265:03crwdne2935265:0 HP Envy 17-J013CL Motherboard Replacement, Processor: crwdns2935265:06crwdnd2935265:03crwdnd2935265:03crwdne2935265:0
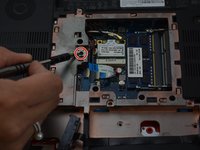
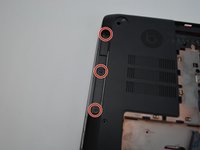
    • Locate the 7mm screw for the optical drive right next to the WLAN and Memory modules.

    • Remove the screw with a PH1-screwdriver to release the CD-drive.

  7. HP Envy 17-J013CL Motherboard Replacement: crwdns2935265:07crwdnd2935265:01crwdnd2935265:03crwdne2935265:0 HP Envy 17-J013CL Motherboard Replacement: crwdns2935265:07crwdnd2935265:02crwdnd2935265:03crwdne2935265:0 HP Envy 17-J013CL Motherboard Replacement: crwdns2935265:07crwdnd2935265:03crwdnd2935265:03crwdne2935265:0
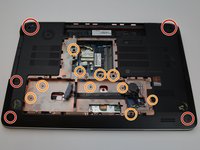
    • Use a PH1-Screwdriver to remove all the 7mm screws.

    • Use a PH0-Screwdriver to remove the 3mm screws.

    • Use the same PH0-Screwdriver for the 2mm screws.

  8. HP Envy 17-J013CL Motherboard Replacement: crwdns2935265:08crwdnd2935265:01crwdnd2935265:02crwdne2935265:0 HP Envy 17-J013CL Motherboard Replacement: crwdns2935265:08crwdnd2935265:02crwdnd2935265:02crwdne2935265:0
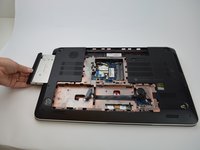
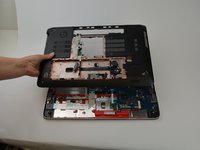
    • Pull the under panel from the laptop by pulling at the edges once all screws are removed. Gently lift it off and place to the side.

  9. HP Envy 17-J013CL Motherboard Replacement: crwdns2935265:09crwdnd2935265:01crwdnd2935265:01crwdne2935265:0
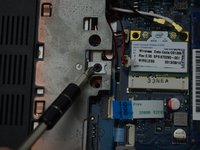
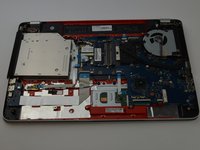
    • Unscrew the coiled springs indicated in red from the the motherboard.

    • Remove the 7mm screws with a PH1-screwdriver to loosen the fan.

    • Unplug the fan from the motherboard.

  10. HP Envy 17-J013CL Motherboard Replacement: crwdns2935265:010crwdnd2935265:01crwdnd2935265:01crwdne2935265:0
    • Lift the fan out and then lift out the black grill covering the processor.

  11. HP Envy 17-J013CL Motherboard Replacement: crwdns2935265:011crwdnd2935265:01crwdnd2935265:02crwdne2935265:0 HP Envy 17-J013CL Motherboard Replacement: crwdns2935265:011crwdnd2935265:02crwdnd2935265:02crwdne2935265:0
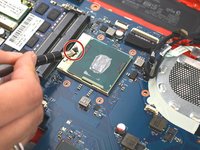
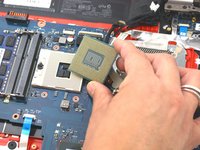
    • Use a Flathead screwdriver to turn the screw 180 degrees to unlock the processor from the motherboard.

    • Gently and vertically lift the processor out.

    • When placing the processor chip back in, make sure the golden triangle is on the top-left corner of the motherboard slot.

    • Be careful not to bend the pins on the processor chip. Broken pins will render the chip useless.

  12. HP Envy 17-J013CL Motherboard Replacement, Motherboard: crwdns2935265:012crwdnd2935265:01crwdnd2935265:01crwdne2935265:0
    • Remove the 7mm screws holding down the motherboard to the frame.

  13. HP Envy 17-J013CL Motherboard Replacement: crwdns2935265:013crwdnd2935265:01crwdnd2935265:02crwdne2935265:0 HP Envy 17-J013CL Motherboard Replacement: crwdns2935265:013crwdnd2935265:02crwdnd2935265:02crwdne2935265:0
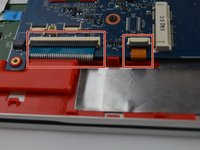
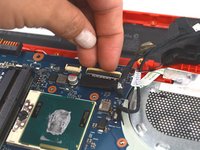
    • Locate the two bottom cables and lift up the black secure tabs.

    • Grab the cables by the translucent tabs and gently pull them out of the motherboard.

  14. HP Envy 17-J013CL Motherboard Replacement: crwdns2935265:014crwdnd2935265:01crwdnd2935265:01crwdne2935265:0
    • On the left side of the motherboard, remove the two cables by first lifting the black secure tabs and using the translucent tabs to pull them out.

  15. HP Envy 17-J013CL Motherboard Replacement: crwdns2935265:015crwdnd2935265:01crwdnd2935265:01crwdne2935265:0
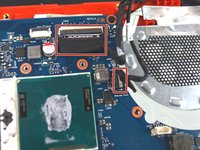
    • Next to the WLAN, remove the two plugs indicated in red from the motherboard.

    • Be gentle when removing these two as too much stress can tear the cables from the plug.

    • Remove the flat cable from the motherboard by first lifting the securing black tab and pulling it out.

  16. HP Envy 17-J013CL Motherboard Replacement: crwdns2935265:016crwdnd2935265:01crwdnd2935265:02crwdne2935265:0 HP Envy 17-J013CL Motherboard Replacement: crwdns2935265:016crwdnd2935265:02crwdnd2935265:02crwdne2935265:0
    • Where the CPU fan was, lift the securing tabs on the cables and extract them from the motherboard.

  17. HP Envy 17-J013CL Motherboard Replacement: crwdns2935265:017crwdnd2935265:01crwdnd2935265:01crwdne2935265:0
    • Gently lift the motherboard from the laptop housing and pulling to the left.

crwdns2915888:0crwdne2915888:0

To reassemble your device, follow these instructions in reverse order.

crwdns2935229:05crwdne2935229:0

Matt McBride

crwdns2935283:002/02/17crwdne2935283:0

872 crwdns2915208:0crwdne2915208:0

crwdns2935297:06crwdne2935297:0

crwdns2915084:0crwdne2915084:0

USF Tampa, Team 16-6, Blackwell Spring 2017 crwdns2935289:0USF Tampa, Team 16-6, Blackwell Spring 2017crwdne2935289:0

USFT-BLACKWELL-S17S16G6

crwdns2931471:03crwdne2931471:0

crwdns2935297:06crwdne2935297:0

crwdns2947410:01crwdne2947410:0

What is the proper name of the housing that the motherboard sets in? I need to order one of these because all the hinge plastic is broken.

TIA

Jim

jsryhstymryuberJames Abt - crwdns2934203:0crwdne2934203:0

crwdns2917038:0crwdne2917038:0

crwdns2936625:0crwdne2936625:0:

crwdns2936751:024crwdne2936751:0 2

crwdns2936753:07crwdne2936753:0 13

crwdns2936753:030crwdne2936753:0 31

crwdns2942667:0crwdne2942667:0 3,204