crwdns2933423:0crwdne2933423:0

HP Envy 15-u001dx Cooling Fan Replacement

crwdns2942213:0crwdne2942213:0

  1. HP Envy 15-u001dx Cooling Fan Replacement, HP Envy 15-u001dx Disassembly: crwdns2935265:01crwdnd2935265:01crwdnd2935265:01crwdne2935265:0
    • Remove the two no-slip covers on the rear, bottom side using spudger shown in top center of picture.

    • The two in the front do not have to be removed as there are no screws underneath them.

  2. HP Envy 15-u001dx Cooling Fan Replacement: crwdns2935265:02crwdnd2935265:01crwdnd2935265:01crwdne2935265:0
    • Remove the two cover tabs towards center of the bottom as there are screws underneath them.

  3. HP Envy 15-u001dx Cooling Fan Replacement: crwdns2935265:03crwdnd2935265:01crwdnd2935265:01crwdne2935265:0
    • Remove all fourteen 4.5 mm screws from the bottom using a Phillips #0 screwdriver. Each location is marked by a red circle in the picture.

  4. HP Envy 15-u001dx Cooling Fan Replacement: crwdns2935265:04crwdnd2935265:01crwdnd2935265:01crwdne2935265:0
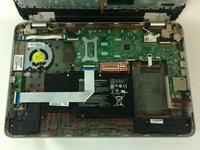
    • Separate the top cover by using a spudger to go around the sides freeing the inside latches.

    • Once the bottom is free, carefully open to the inside as there are two ribbons that connect your keyboard and touch pad to the top cover.

  5. HP Envy 15-u001dx Cooling Fan Replacement: crwdns2935265:05crwdnd2935265:01crwdnd2935265:02crwdne2935265:0 HP Envy 15-u001dx Cooling Fan Replacement: crwdns2935265:05crwdnd2935265:02crwdnd2935265:02crwdne2935265:0
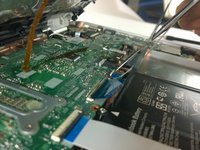
    • Use the spudger to detach the two ribbons from their connectors.

    • The regular black nylon spudger should be used whenever possible, especially around sensitive internal components.

  6. HP Envy 15-u001dx Cooling Fan Replacement, Cooling Fan: crwdns2935265:06crwdnd2935265:01crwdnd2935265:02crwdne2935265:0 HP Envy 15-u001dx Cooling Fan Replacement, Cooling Fan: crwdns2935265:06crwdnd2935265:02crwdnd2935265:02crwdne2935265:0
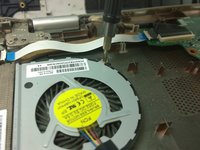
    • Remove the three 4.5 mm Phillips #0 screws holding the fan in place.

  7. HP Envy 15-u001dx Cooling Fan Replacement: crwdns2935265:07crwdnd2935265:01crwdnd2935265:01crwdne2935265:0
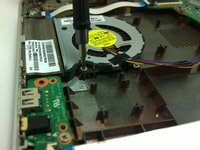
    • Gently detach the connector with a spudger and the fan is free to be removed.

    • The regular black nylon spudger should be used whenever possible, especially around sensitive internal components.

crwdns2915888:0crwdne2915888:0

To reassemble your device, follow these instructions in reverse order.

crwdns2935229:05crwdne2935229:0

Dakota Presley

crwdns2935283:010/05/16crwdne2935283:0

885 crwdns2915208:0crwdne2915208:0

crwdns2935297:06crwdne2935297:0

crwdns2915084:0crwdne2915084:0

USF Tampa, Team 9-4, Lacy Fall 2016 crwdns2935289:0USF Tampa, Team 9-4, Lacy Fall 2016crwdne2935289:0

USFT-LACY-F16S9G4

crwdns2931471:04crwdne2931471:0

crwdns2935297:07crwdne2935297:0

crwdns2944067:00crwdne2944067:0

crwdns2917038:0crwdne2917038:0

crwdns2936625:0crwdne2936625:0:

crwdns2936751:024crwdne2936751:0 0

crwdns2936753:07crwdne2936753:0 3

crwdns2936753:030crwdne2936753:0 8

crwdns2942667:0crwdne2942667:0 1,287